Do you have a question about the Kenwood DPX-6020 and is the answer not in the manual?
Precautions to prevent injury or fire, including proper unit installation and handling of wires.
Precautions to prevent damage to the unit, such as grounding, avoiding heat/humidity, and handling the faceplate.
Information regarding connecting disc changers, including switch settings and compatible models.
Instructions for selecting the tuner mode, band (FM/AM), and performing tuning.
How to store and recall radio stations using the #1-6 preset buttons.
How to assign names to radio stations for easier recall, with up to 30 stations.
Instructions for loading, playing, and ejecting cassette tapes.
How to use the FM and AM buttons for fast forwarding and rewinding cassette tapes.
Explanation of the DSP's function in correcting audio signals and producing sound effects.
How to select different virtual sound fields like "Concert Hall" or "Stadium".
How to adjust the level of DSP sound effects to "High", "Mid", or "Low".
How to adjust the bass boost level and frequency band for the DSP effects.
How to compress music's dynamic range to raise low sounds using the COMP button.
How to store and recall up to three sets of DSP settings and conditions.
Overview of the Graphic Equalizer mode for adjusting sound curves and spectrum analyzer settings.
How to choose from five preset equalizer curves like "Rock", "Pop", "Dance", "Vocal", "Flat".
How to manually adjust equalizer curves by selecting frequency bands and levels.
How to store and recall up to three custom graphic equalizer curves.
How to set and input a four-digit security code to prevent theft.
Step-by-step guide for installing the unit, including wire connections and battery re-connection.
Diagram showing connections for speakers, power, antenna, and control wires.
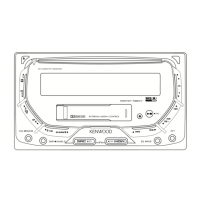
Instructions for mounting the unit using supplied screws and considering car bracket differences.
Steps for attaching the unit using accessory ① and installing the center panel.
Steps for attaching accessory ⑧ and removing the factory stereo.
Steps for attaching accessory ⑫ and removing the factory stereo.
Troubleshooting for power, sound, tape, buttons, quality, and reception issues.
Troubleshooting for memory erasure, CD loading errors, and skipping.
Troubleshooting for track playback, DSP effects, and speaker configuration.
Troubleshooting for disc mode selection, playback errors, and sound issues.
Troubleshooting for various error codes like 04, 77, 12, and system messages.
| frequency range (200 kHz space) | 87.9 MHz – 107.9 MHz |
|---|---|
| usable sensitivity (S/N = 30dB) | 9.3dBf (0.8 µV/75 Ω) |
| quieting sensitivity (S/N = 50dB) | 15.2dBf (1.6 µV/75 Ω) |
| frequency response (±3.0 dB) | 30 Hz – 15 kHz |
| signal to noise ratio (MONO) | 70 dB |
| selectivity (±400 kHz) | ≥ 80 dB |
| stereo separation (1 kHz) | 40 dB |
| frequency range (10 kHz space) | 530 kHz – 1700 kHz |
|---|---|
| usable sensitivity (S/N = 20dB) | 28 dBµ (25 µV) |
| tape speed | 4.76 cm/sec. |
|---|---|
| wow & flutter (WRMS) | 0.08 % |
| frequency response (70 µs) | 25 Hz – 22 kHz (±3 dB) |
| separation (1 kHz) | 40 dB |
| signal to noise ratio (Dolby NR OFF) | 60 dB |
| signal to noise ratio (Dolby B NR ON) | 68 dB |
| laser diode | GaAlAs (λ=780 nm) |
|---|---|
| digital filter (D/A) | 8 Times Over Sampling |
| D/A converter | 1 Bit |
| spindle speed | 500 – 200 rpm (CLV) |
| wow & flutter | Below Measurable Limit |
| frequency response (±1 dB) | 10 Hz – 20 kHz |
| total harmonic distortion (1 kHz) | 0.01 % |
| signal to noise ratio | 93 dB (1 kHz) |
| dynamic range | 93 dB |
| channel separation | 85 dB |
| maximum output power | 47 W × 4 |
|---|---|
| full bandwidth power (at less than 1% THD) | 22 W × 4 |
| preout level / load | 1500 mV/10 kΩ |
| preout impedance | ≤ 600 Ω |
| A/D converter | 3-dimensional 20-bit ∆Σ system 128-times oversampling |
|---|---|
| D/A converter | 3-dimensional 20-bit ∆Σ system 128-times oversampling |
| EQ frequency | 60 Hz/120 Hz/250 Hz/500 Hz/1 kHz/2 kHz/4 kHz/8 kHz/16 kHz |
| adjustable range | ±12 dB |
| operating voltage | 14.4 V (11 – 16 V allowable) |
|---|---|
| current consumption | 10 A at Rated power |
| installation size (W × H × D) | 178 × 100 × 155 mm (7 × 3-15/16 × 6-1/8 in.) |
| weight | 3.1 kg (6.8 lbs) |