EasyManua.ls Logo

KidKraft 53185 User Manual

KidKraft 53185
18 pages
To Next Page IconTo Next Page
Page #1 background imageLoading...
Page #1 background image
2
3
4
7
8
9
6
10
5
11
12
13
14
18
17
19
24
25
26
27
22
20
21
28
29
15
16
30
31
35
34
33
36
37
42
41
43
40
32
x 2
x 4
45
46
47
44
49
48
x 2
50
51
Customer Service
1-800-933-0771
www.kidkraft.com
1
USE AND MAINTENANCE:
-Use on level surfaces only
-Please check assembly at regular intervals,
and frequently tighten hardware if neces-
sary. If maintenance is not carried out, the
product could cease to function properly
PARTS LIST
Assembly Instructions
Item #53185
Please retain this information
for future reference
To order replacement parts,
please visit www.kidkraft.com
WARNING: CHOKING HAZARD
Small parts and sharp points, not
suitable for children under 3 years.
CAUTION: Adult Assembly Required.
Hardware contains small screws with
sharp points. Keep unassembled parts
out of reach of small children.
Grand Gourmet
Corner Kitchen
38
1
23
52
39
x 4
53
Question and Answer IconNeed help?

Do you have a question about the KidKraft 53185 and is the answer not in the manual?

KidKraft 53185 Specifications

General IconGeneral
BrandKidKraft
Model53185
CategoryToy
LanguageEnglish

Summary

Product Overview and Parts Identification

Parts List

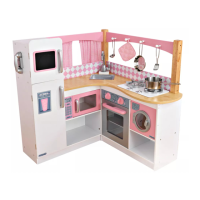
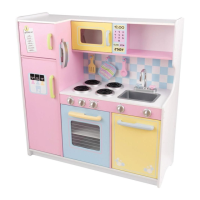
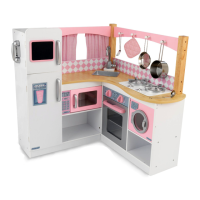
Illustrated list of all components required for assembly.

Hardware Components

Detailed listing of all screws, bolts, nuts, and other fasteners used.

Base Structure Assembly

Step 1: Prepare Base Panels

Clean predrilled holes and prepare base components for assembly.

Step 2: Assemble Corner Base

Connect side panels and base pieces using dowels and screws.

Step 3: Attach Corner Panel

Attach the third main panel to complete the corner base structure.

Adding Vertical and Horizontal Panels

Step 4: Install Left Side Panel

Attach the left vertical panel to the main structure.

Step 5: Install Right Side Panel

Attach the right vertical panel to the main structure.

Step 6: Attach Oven Door Frame

Install the frame for the oven door onto the side panel.

Integrating Appliance Details

Step 7: Install Oven Door Hinges

Attach hinges for the oven door to the main unit.

Step 8: Attach Oven Window Frame

Mount the frame for the oven window, securing it with screws.

Step 9: Install Oven Door Handle

Attach the oven door handle using screws.

Completing Main Construction

Step 10: Attach Top Panel Left

Secure the left portion of the top panel to the unit.

Step 11: Attach Top Panel Right

Secure the right portion of the top panel to the unit.

Step 12: Install Back Support Panel

Attach a vertical support panel to the rear of the unit.

Attaching Upper and Rear Sections

Step 13: Attach Rear Panel

Secure a rear panel to the assembled structure.

Step 14: Mount Microwave/Storage

Attach the panel for the microwave or storage compartment.

Step 15: Install Microwave Door

Mount the door for the microwave or storage unit.

Installing Countertop and Fixtures

Step 16: Attach Oven Door

Mount the main oven door to the unit.

Step 17: Attach Stove Burner Plate

Secure the plate with stove burners to the countertop.

Step 18: Install Faucet Assembly

Mount the faucet onto the countertop area.

Integrating Cabinetry and Doors

Step 19: Attach Cabinet Door Hinges

Install hinges for cabinet doors on the main structure.

Step 20: Mount Cabinet Doors

Attach the main cabinet doors to the unit.

Step 21: Attach Shelf Supports

Install supports for interior shelves within cabinets.

Finalizing Interior and Trim

Step 22: Secure Top Trim Rail

Attach the horizontal trim piece across the top.

Step 23: Install Backsplash and Trim

Attach decorative backsplash and trim pieces.

Step 24: Attach Bottom Trim

Secure the bottom trim piece along the base.

Installing Doors and Accessories

Step 25: Mount Left Cabinet Door

Attach the left cabinet door to the unit.

Step 26: Install Right Cabinet Door

Attach the right cabinet door to the unit.

Step 27: Install Dishwasher Door

Mount the door for the dishwasher compartment.

Attaching Handles and Final Touches

Step 28: Attach Door Handles

Install handles on the appliance and cabinet doors.

Step 30: Install Oven Door

Attach the final oven door, likely the main one.

Step 31: Install Door Catches

Attach catches to ensure doors close properly.

Completing the Kitchen Unit

Step 32: Attach Fabric Backdrops

Secure fabric panels to the back of the kitchen unit.

Step 33: Install Sink Assembly

Insert and secure the sink unit into its designated opening.

Important Information and Support

Safety and Parental Guidance

Essential safety warnings and parental supervision requirements.

Care, Maintenance, and Warranty

Instructions for cleaning, product care, and warranty information.

Related product manuals