Do you have a question about the KidKraft Cook Together Kitchen 53186 and is the answer not in the manual?
Identifies all components and hardware required for assembly.
Crucial safety advice for adult assembly and child use, including choking hazards.
Initial assembly of hardware and base panels for the kitchen structure.
Connecting side panels and supports to form the main base.
Securing vertical panels to the base using specified fasteners.
Fastening primary components of the kitchen structure.
Connecting additional side panels to the main unit.
Mounting the sink basin and faucet assembly.
Information on warranty coverage, claims, and limitations.
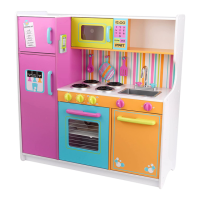
The KidKraft Cook Together Kitchen is a comprehensive play kitchen designed for children, offering a realistic and interactive experience. This product requires adult assembly and is intended for children over 3 years of age due to small parts and sharp points in its unassembled state. Parental supervision is required during play.
The Cook Together Kitchen simulates a real kitchen environment, allowing children to engage in imaginative role-play activities such as cooking, washing dishes, and organizing kitchen items. It features multiple play areas, including a stovetop, oven, microwave, sink, refrigerator, and various storage compartments. The design incorporates interactive elements to enhance the play experience, such as clickable knobs, doors that open and close, and a removable sink for easy cleaning. The kitchen encourages creativity, social interaction, and the development of fine motor skills as children manipulate the different components.
The kitchen is designed for use on level surfaces to ensure stability during play. Its multi-level structure provides ample space for several children to play simultaneously, fostering cooperative play. The various compartments, including shelves and a refrigerator, allow children to store play food and kitchen accessories, promoting organization skills.
The stovetop area includes burners and clickable knobs, mimicking the operation of a real stove. The oven and microwave doors open, providing space for pretend baking and heating. The sink area features a faucet and a removable sink basin, which can be lifted out by an adult for cleaning. This feature adds a layer of realism and practicality to the play experience.
The kitchen also includes several accessory pieces, such as handles for the oven and microwave, and a towel rack, further enhancing the realistic feel. The overall design is intended to be engaging and durable, supporting hours of imaginative play.
To ensure the longevity and proper functioning of the Cook Together Kitchen, regular maintenance is recommended. The product should be used on level surfaces to prevent instability and potential damage. It is crucial to check the assembly at regular intervals and frequently tighten any hardware if necessary. Failure to perform this maintenance could lead to the product ceasing to function properly or becoming unsafe.
For cleaning, the surfaces of the kitchen can be wiped with a slightly damp cloth and a mild dishwashing liquid. It is important to avoid using cleaning products that contain alcohol or ammonia, as these can dull the shiny surface of the product. Furniture polish can also be used to clean and dust the surface, helping to maintain its appearance.
For any food or drink playthings included with the kitchen, adults should wash them thoroughly before use. These items are not dishwasher, oven, or microwave safe. It is advisable to test any cleaning materials on an inconspicuous area of the product, such as the underside of a surface, before applying them more broadly.
The product is warranted solely against manufacturing defects for a period of 90 days from the date of purchase. To activate and protect this warranty, it is essential to preserve evidence of the original purchase and carefully inspect the toy prior to and after assembly. This inspection should look for any missing, degraded, broken, or hazardous parts, including those that could be swallowed by a child or cause injury. If any defects are observed, the toy should not be used, and the manufacturer should be notified immediately. Misuse, improper assembly, failure to honor warnings, failure to supervise, inspect, or maintain the toy, or damage to the toy (intentional or inadvertent) will invalidate the warranty.
For customer service and warranty claims, contact information is provided in the manual. This ensures that users can receive support for any issues related to the product's maintenance or defects.
| Material | MDF, Solid Wood, Plastic |
|---|---|
| Recommended Age | 3 years and up |
| Assembly Required | Yes |
| Color | White |
| Number of Pieces | 1 |
| Batteries Required | No |
| Manufacturer | KidKraft |
| Model Number | 53186 |