The Kinder Oasis Plus is a gas-fired appliance designed to provide a live fuel-effect fire, offering both aesthetic appeal and a source of heat. This manual provides comprehensive instructions for its installation, maintenance, and safe use.
Function Description
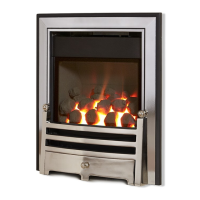
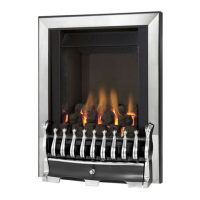
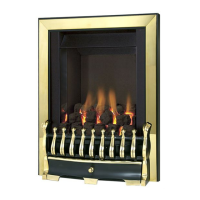
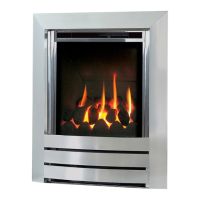
The Kinder Oasis Plus functions as a decorative gas appliance that simulates a real fire with a live fuel effect. It is designed to be installed into a suitable fireplace opening and provides radiant heat to the room. The appliance is available in various models, including those with manual, slide, and remote controls, offering flexibility in operation. It uses either Natural Gas (G20) or Propane Gas (G31) as fuel, depending on the specific model. The primary purpose is to create a warm and inviting ambiance while also serving as a heating solution.
Important Technical Specifications
The Kinder Oasis Plus comes with several key technical specifications that vary slightly depending on the model (KOPCMN, KOPCSN, KOPCRN2 for Natural Gas, and KOPCSP for Propane Gas).
Fuel Type:
- Natural Gas (G20): Supply pressure of 20mbar.
- Propane Gas (G31): Supply pressure of 37mbar.
Heat Output:
- Natural Gas (G20) Models:
- Maximum Gross Heat Input: 6.9 kW
- Minimum Gross Heat Input: 4.2 kW
- Nominal Heat Output: 4.1 kW
- Minimum Heat Output (Indicative): 2.1 kW
- Propane Gas (G31) Models:
- Maximum Gross Heat Input: 6.9 kW
- Minimum Gross Heat Input: 4.2 kW
- Nominal Heat Output: 4.2 kW
- Minimum Heat Output (Indicative): 2.1 kW
Efficiency:
- Natural Gas (G20): Useful Efficiency at Nominal Heat Output: 66.7%, Useful Efficiency at Minimum Heat Output (Indicative): 50.0%. Appliance efficiency measured as specified in BS 7977-1: 2009 + A1: 2013 is 60.6%.
- Propane Gas (G31): Useful Efficiency at Nominal Heat Output: 66.2%, Useful Efficiency at Minimum Heat Output (Indicative): 50.0%. Appliance efficiency measured as specified in BS 7977-1: 2009 + A1: 2013 is 60.2%.
Ignition:
- Push Button Piezo (MC models)
- 1.5V Battery Generator (SC models)
- 4.5V Battery Generator (RC models)
Electrode Spark Gap: 4.5mm Nominal
Weight: 18.5kg
Fire Box Dimensions (Oasis Plus Models):
- Width (with trim, no spacer): 498mm
- Height (with trim, no spacer): 600mm
- Depth (overall-without fender): 230mm
- Gas Connection: 8mm Compression (Supplied with fire)
Flue and Chimney Suitability:
- Minimum diameter of circular flues: 125 mm (with flue restrictor fitted)
- Minimum effective height of all flue types: 3 metres
- When fitting to conventional chimneys or 175mm flues, it may be desirable to fit the flue restrictor baffle (supplied) to reduce the flue flow and increase the efficiency of the fire.
Usage Features
The Kinder Oasis Plus offers various control options to suit user preferences:
Manual Control Models:
- Ignition: Depress the control knob and turn anti-clockwise to the position marked pilot. Hold in the control knob for a few seconds to purge the pipe work. Continue to hold-in the control knob and press the igniter button. If the burner does not light, continue to press the igniter button until ignition occurs. Continue to hold the control knob for 5-10 seconds to allow the thermocouple to heat up.
- Heat Adjustment: Turn the control knob anti-clockwise to the high position and the main burner will light. Turn the control knob to the low position and the gas input will be reduced to the minimum setting.
- Shut-off: Slightly depress the control knob and turn to the pilot position, the main burner will go out but the pilot will remain lit. Slightly depress the control knob and turn to the off position, the pilot will now be extinguished.
Slide Control Models:
- Ignition: Depress the control lever fully downwards to the position marked pilot. Hold down the control lever for a few seconds to allow the gas to reach the pilot. The fire will then begin its ignition sequence. If the pilot does not light, continue to press the control lever until ignition occurs. The pilot flame can be seen by looking underneath the front ceramic rail, above the burner heat shield, at the front left hand side of the fuelbed. When the pilot has lit, continue to hold the control lever down for 5-10 seconds to allow the thermocouple to heat up.
- Heat Adjustment: After lighting, move control lever up to the high position and the main burner will light. The gas control can be moved from the High to Low position to give the desired heat output.
- Shut-off: To turn the fire off, FULLY raise the control lever to the OFF position.
Remote Control Models:
- Power Isolation Switch: Located on the control valve, this switch should be in the "on" position for operation.
- Handset Operation: The handset features buttons for "Power" (on/off), "Increase Heat Input (+)", and "Decrease Heat Input (-)".
- Ignition: Press and hold the power button continuously until the red light illuminates next to the operation symbol (typically takes two seconds). The red light will flash as the burner is being lit. While the burner is lighting, the red light will flash. When the burner has lit, the red light will stop completely. The burner will now be lit at maximum heat input level.
- Heat Adjustment: Pressing and releasing the "+" button will increase the heat input level one step at a time. Pressing the "-" button continuously will move the heat input level to the minimum.
- Shut-off: To turn the fire off, press the power button and the burner will stop.
- Battery Life: The battery life can be extended by sliding the power isolator switch to the left (to the "0" position away from the "1" position) on the valve itself, which is located behind the ashpan cover on the fire.
- Loss of Remote Handset: In the event of loss, a backup fire can be controlled from the valve. Consult the troubleshooting chart on the rear page of this manual.
Maintenance Features
Regular maintenance is crucial for the safe and efficient operation of the Kinder Oasis Plus.
General Servicing:
- Servicing should be carried out annually by a competent person such as a GAS SAFE registered engineer. This is a condition of the Kinder guarantee schemes.
- The service should include visually checking the chimney and fire opening for accumulations of debris and a smoke test to check for a positive up-draught in the chimney.
- The Oxy-pilot must also be replaced as a condition of the guarantee.
- The condition of the coals should be checked and if necessary the whole set should be replaced with a genuine replacement set.
- The burner assembly is designed to be removed as a complete unit for ease of access.
Cleaning:
- Trims and Painted Metal Parts: Use a variety of methods that can be chosen to clean the trim. If a Brass trim is supplied with this fire, this is plated brass and this trim must only be cleaned using a clean damp cloth. Metal polishes must not be used on these trims. If a black trim was chosen, then these should only be cleaned using a clean, damp cloth also. The trim is best cleaned by removing it from the fire and placing it face up on a flat surface. The fender that was supplied with the fire is lacquered to protect the finish and therefore must only be cleaned using a clean damp cloth. Abrasive cleaners, chemical cleaning agents or any type of polish must never be used as damage to the finish may result.
- Fuel Bed: Do not recommend cleaning of coals or fuelbed components as these are fragile and damage may result. None of these parts must be washed or exposed to any cleaning agents or water. Any damaged parts must be replaced by contacting your dealer or telephoning BFM Europe Ltd on the number stated on the rear cover of this book. Coals must only be replaced with a complete and genuine replacement set and the fire must never be run with the wrong number or damaged coals. The fuelbed must be carefully re-assembled as stated in the following section.
Component Replacement:
- Burner Assembly: Instructions are provided for removing and replacing the burner assembly for all control types.
- Piezo Igniter: Disconnect the ignition lead and 2 off microswitch leads from the igniter. Unscrew the Battery retaining cap and place battery to one side. Then unscrew igniter retaining ring and remove igniter from panel. Re-assemble in reverse order and carry out a gas tightness test.
- Control Tap (Manual Control Models): Remove the burner assembly. Pull the control knob off the control tap spindle. Loosen and remove the three gas pipe retaining nuts from the control tap and release the ends of the gas pipes from the control tap body. Loosen and remove the thermocouple securing nut from the end of the control tap. Unscrew the control tap locknut from the front of the control panel and remove the control tap. To refit, reassemble in reverse order, noting that the control tap locates with a flat in the control panel. Carry out a gas tightness test after re-assembly.
- Oxy-Pilot Assembly: Remove the burner assembly. Unscrew and remove the thermocouple retaining nut from the end of the control tap and disconnect the ignition lead from the pilot electrode. Unscrew and remove the two pozi-driv screws which secure the pilot assembly to the burner. Remove the pilot. Re-assemble in reverse order and carry out a gas tightness test.
- Control Cable (Slide Control Models): The control lever operating cable can be seen running across the base of the fire, below the burner. To release the cable, unscrew the cable securing screw located in the centre of the aluminium operating arm and release the front part of the operating arm, thereby freeing the cable from the burner. Not the securing screw is retained in the block to prevent it from being lost. Release the other end of the cable by pushing the cable forwards to the right, i.e. into the operating arm so as to release the tension. Pull the cable nipple out of the retaining hole and remove the cable through the slot in the operating arm.
- Batteries (Remote Control Models): Remove the ashpan cover, locate the control valve battery cover at the right hand side of the burner, slide the power isolator switch to the "0" position (to the left). Remove the battery cover and replace the 3 off AA batteries with good quality Alkaline items. BFM Europe recommend the use of "Energizer" batteries. It is important that only an alkaline battery is used, otherwise premature battery failure and leakage may result.
Spillage Monitoring System:
- This appliance is fitted with an atmosphere sensing spillage monitoring system. It is designed to shut the fire off in the event of a partial or complete blockage of the flue causing a build up of combustion products in the room in which the fire is operated.
- The spillage monitoring system must not be adjusted by the installer.
- The spillage monitoring system must not be put out of operation.
- When the spillage monitoring system is exchanged, only a complete original manufacturers part may be fitted. It is not possible to replace individual parts on the pilot system on this appliance, only a complete pilot assembly (including the thermocouple) may be fitted.
- In the event of repeated operation, a GAS SAFE registered gas engineer must be called to investigate and rectify the cause.
This comprehensive overview highlights the key aspects of the Kinder Oasis Plus, ensuring users have a clear understanding of its capabilities and requirements.