Do you have a question about the King Industrial KC-13HPC and is the answer not in the manual?
Keep dated proof of purchase for warranty and servicing purposes.
Parts for this product are available at authorized King Canada service centres.
2-year limited warranty against defects in materials and workmanship.
Manual is a guide; specifications and references are subject to change.
Refer to the King Canada web site for updated parts diagram and lists.
Read manual, understand tool application, limitations, and hazards.
Use approved 3-conductor cord and 3-prong grounding type plug.
Ensure guards are in good working order, properly adjusted and aligned.
Develop habit of checking and removing tools before turning on.
Maintain a clean, uncluttered area with non-slippery flooring.
Do not use in damp/wet locations; ensure good lighting and workspace.
Ensure all visitors remain at a safe distance from the work area.
Use padlocks, master switches, or remove starter keys for security.
Operate the tool at the proper speed for optimal performance and safety.
Do not force the tool or attachment to perform unintended jobs.
Avoid loose clothing; wear safety glasses and protective hair covering.
Wear ANSI Z87.1 safety glasses; consider a dust mask for dusty operations.
Maintain proper footing and balance at all times during operation.
Keep tools sharp, clean, and follow lubrication/accessory change instructions.
Disconnect power before servicing or changing accessories/attachments.
Ensure the switch is in the 'OFF' position before plugging in.
Use only recommended accessories to prevent hazards.
Avoid tipping hazard; do not store items requiring standing on the tool.
Inspect guards/parts for damage; ensure proper operation or repair/replace.
Turn power OFF; allow the tool to come to a complete stop.
For safety, read the entire manual before operating the planer.
Ensure cutterhead inserts are securely installed and kept clean/sharp.
Inspect stock for foreign objects; feed properly and avoid forcing.
Do not operate when tired, distracted, or under the influence of impairing substances.
Keep guards in place and properly re-attached after maintenance or cleaning.
Minimize kickback risk by standing to the side and using proper feeding technique.
Use in-feed and out-feed support for long workpieces.
Indicates how much material is removed from the workpiece per pass.
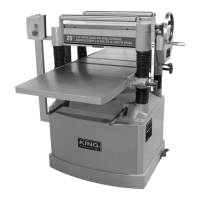
Controls machine power with a removable safety key for security.
Resets the motor automatically after overheating or low voltage.
Lever used to lock the height adjustment handwheel in position.
Port for connecting dust collection systems or chip ejection.
Adaptor to connect different size hoses to the dust chute.
The handwheel used to raise or lower the cutterhead assembly.
Shows the current workpiece thickness setting.
Allows selection of a desired final workpiece thickness setting.
Supports the workpiece before it enters the cutterhead.
The main cutting component featuring helical cutter inserts.
Individual cutting elements within the cutterhead (26 total).
Cover for storing accessories and tools.
Wrench used for adjusting or replacing cutter inserts.
Hexagonal key provided for various adjustments and assembly.
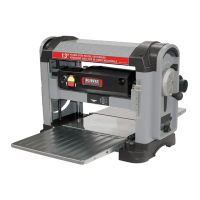
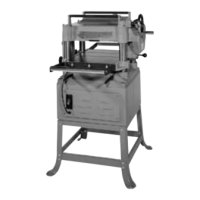
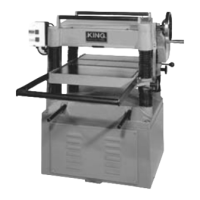
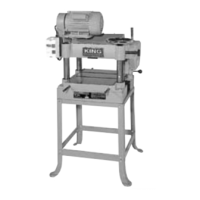
Model identification for the planer.
The maximum width of material that can be planed.
The maximum thickness of material that can be planed.
Specifies the total number of cutter inserts on the cutterhead.
The speed at which the workpiece is fed through the planer.
The rotational speed of the cutterhead in RPM.
Details the motor's amperage rating.
Specifies the voltage, phase, and frequency requirements.
Physical size and weight of the assembled planer.
Size and weight of the planer as shipped.
Electrical connections must be by a qualified electrician; disconnect power for adjustments.
Connect to a 110V-120V, 15-AMP circuit breaker for safety.
Ensure the planer is properly grounded via its 3-prong plug.
Designed for 110V-120V circuits; avoid 2-prong adaptors.
Resets motor if it overheats or voltage is low.
Use correct wire gauge and 3-prong cords/receptacles for extension cords.
Features a safety switch with a removable key to prevent unauthorized use.
Ensure machine is OFF and unplugged before assembly; connect power only after completion.
Secure planer to a flat, level, sturdy surface; avoid edges.
Instructions for attaching the height adjustment handwheel knob.
Guide for attaching the 2-position dust chute and adaptor.
How to adjust the cutterhead height using the handwheel.
Setting the adjustable stops for desired final workpiece thickness.
Detailed procedure for readjusting the pre-set depth stops.
Steps to ensure infeed and outfeed extension tables are properly aligned.
Procedure to calibrate the thickness scale to match actual measurements.
Explanation on how to read and use the depth of cut indicator.
Guidelines for maximum material removal per pass for different wood widths.
How the planer removes material to achieve desired thickness.
Step-by-step instructions for operating the planer safely and effectively.
Routine checks and cleaning for optimal performance and longevity.
Procedure for inspecting, rotating, or replacing cutter inserts.
Detailed steps for removing, cleaning, and replacing cutter inserts.
Guide for replacing motor carbon brushes after approximately 150 hours of use.
Instructions for inspecting the drive belt and replacing it when worn.
Detailed steps for removing and installing the drive belt.
| Weight | 600 lbs |
|---|---|
| Number of Knives | 3 |
| Blade Type | HSS |
| Planing Width | 13 inches |
| Planing Thickness | 6 inches |
| Feed Rate | 26 feet per minute |
| Dust Port | 4 inches |