EasyManua.ls Logo

KingForce M15 - User Manual

KingForce M15
17 pages
Print Icon
To Next Page IconTo Next Page
Loading...
Model: M15
Customer Support:
Phone:+1 833 553 0460
Email:support@kingforceusa.com
Electronic Lock
Question and Answer IconNeed help?

Do you have a question about the KingForce M15 and is the answer not in the manual?

Summary

Components List

Tools Required for Installation

Lists necessary tools for installation, emphasizing a Phillips screwdriver and caution against power drills.

Quick Start Tips

Recommends scanning a QR code for installation videos and offers video call support.

Installation Guide STEP 1

Prepare the Door and Check Dimensions

Details measuring door holes (2-1/8", 1"), backset (2-3/8" or 2-3/4"), and door thickness (1-3/8" to 2").

Installation Guide STEP 2

Install the Latch and Strike

Instructions for inserting the latch bolt into the door and installing the strike plate on the door frame.

Installation Guide STEP 3

Install the Exterior Assembly

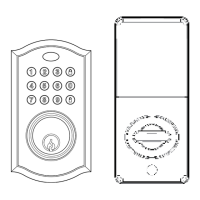
Guides on routing the cable and attaching the exterior keypad assembly to the door.

Installation Guide STEP 4

Install the Interior Assembly

Instructions for mounting the interior assembly, connecting the cable, and ensuring proper fit.

Installation Guide STEP 5

Install Batteries and Perform Door Handing

Details on inserting batteries and completing the automatic door handing process for correct latch operation.

Programming Guide

Download Tuya App

Explains how to download the Tuya app via QR code or app store search.

Connect Smart Lock

Steps to connect the smart lock to a mobile device via Bluetooth and auto-scan.

Advanced Settings: New Entrance Setup

How to Set Up a New Entrance

Guides on setting up a new user/entrance, inviting members, and control methods.

Advanced Settings: Password & Timer

How to Modify Password

Steps to modify user passwords within the app's member management section.

How to Delete Password

Steps to delete user passwords via the app's member management.

How to Set Delay Time

Instructions on configuring the auto-locking delay time in the lock's settings.

Advanced Settings: Troubleshooting & Capacity

Troubleshooting Connection Issues

Suggests restarting Bluetooth and trying again if connection fails.

Password Capacity

States that the lock supports adding up to ten passwords.

Protection Mode and Reset

How to Exit Protection Mode

Explains how to exit protection mode by waiting or removing/reinserting the battery.

Factory Default Reset

Details the process of performing a factory reset to delete all associated codes.

System Alerts

Alert: Red Flashing Light with Beeps

Indicates door jammed or incorrect user code entry, with solutions provided.

Alert: Red Light on Button Press

Signals low battery or super low battery, advising battery replacement.

Alert: Green Light and Beeps

Indicates poor quality battery or battery run out, with solutions for power supply.

Alert: Unresponsive Keypad;Indicator

Suggests bad cable connection as the cause and advises reconnection.

Customer Support Information

Provides contact information and recommends watching installation videos or scheduling video support.

Prepare Door and Jamb

Template Usage

Instructions on cutting and folding the template for door preparation.

Marking Door for Drilling

Guides on marking hole centers for the latch bolt and backset on the door.

Drilling and Chiseling the Door

Steps for drilling door holes (2-1/8", 1") and chiseling for the latch assembly.

Marking and Drilling the Door Jamb

Instructions for marking and drilling the door jamb for the strike plate.

Tools Required for Undrilled Doors

Lists necessary tools for installing the lock on doors that are not pre-drilled.

Template Visual Guide

Template Diagram and Instructions

Visual guide detailing how to use the template for marking door and jamb drilling locations.

Back Side of Template

Template Back View

Shows the back side of the template, likely blank or for notes.

FCC Compliance Information

FCC Warning Statement

Provides compliance information regarding FCC rules and potential interference.

Radiation Exposure Statement

Details compliance with FCC radiation exposure limits and recommended installation distance.

Overview

This document is an installation and operation guide for the Kingforce Model M15 Electronic Lock. It provides comprehensive instructions for setting up, using, and maintaining the smart lock, along with customer support information.

Function Description:

The Kingforce Model M15 is an electronic smart lock designed for residential use. Its primary function is to provide secure access to a door using a keypad for code entry, a traditional key, or through a smartphone application (Tuya APP). The lock supports multiple access methods, including user codes and app-based control, offering flexibility and enhanced security features compared to traditional mechanical locks. It integrates with the Tuya APP for remote management, allowing users to set up new entrances, manage members, modify passwords, and control the lock from their mobile devices. The lock also includes a protection mode that temporarily disables the keypad after multiple incorrect code entries, enhancing security against unauthorized access attempts.

Important Technical Specifications:

  • Model: M15
  • Door Hole Diameter: 2-1/8" (54 mm)
  • Backset: Adjustable for 2-3/8" or 2-3/4" (60 or 70 mm)
  • Door Edge Hole Diameter: 1" (25 mm)
  • Door Thickness: Compatible with doors between 1-3/8" and 2" (35mm and 50mm)
  • Power Source: 4 AA batteries (non-rechargeable, non-alkaline recommended)
  • Connectivity: Bluetooth for smart lock connection via Tuya APP
  • Password Capacity: Up to ten user passwords can be added.
  • Strike Plate Hole Depth: Minimum 1" (25mm) deep in the door frame.
  • Latch Bolt: T-shaped hole in the bottom position for proper installation.
  • Customer Support Phone: +1 833 553 0460
  • Customer Support Email: support@kingforceusa.com

Usage Features:

  • Multiple Access Methods: Users can unlock the door using a numerical code on the keypad, a physical key, or through the Tuya APP on their smartphone.
  • Tuya APP Integration: The lock is fully controllable via the Tuya APP (available for iOS and Android), enabling remote management, user setup, and password modifications.
  • New Entrance Setup: The Tuya APP allows administrators to create new "Homes" and invite members, granting them access. Access can be granted via invite codes (Tuya account, WeChat, SMS) or by creating specific passwords for members.
  • Two-Way Control via APP:
    • Administrator Control: Administrators can manage members, open modes, set passwords, and create passwords for members through the app.
    • User Control: Users can control the smart lock by swiping their phone within the app.
  • Password Management: The app facilitates easy modification and deletion of user passwords.
  • Delay Time Setting: Users can configure a delay time for the lock's automatic locking function through the app settings.
  • Protection Mode: After 5 consecutive incorrect code entries, the keypad locks for 90 seconds, indicated by 3 beeps and 3 red lights. This feature prevents brute-force attempts.
  • Keypad Indicator: A light indicator on the keypad provides visual feedback for lock/clear and unlock actions.
  • Key Override: A physical key is provided for manual unlocking, serving as a backup in case of battery depletion or electronic malfunction.
  • Easy Installation: The guide emphasizes a straightforward installation process, recommending a Phillips screwdriver and advising against using a power drill to prevent damage. A QR code links to an installation video for visual guidance.

Maintenance Features:

  • Battery Replacement: The lock operates on 4 AA batteries. The guide specifies using non-rechargeable, non-alkaline batteries. Low battery alerts are provided through LED red lights on the keypad.
  • Door Handing Process: After battery installation, a door handing process must be performed to calibrate the latch bolt's extension and retraction, ensuring smooth operation. This involves pressing the lock button, and the latch bolt should extend by itself.
  • Troubleshooting Guide: The manual includes a "System Alerts" section to help diagnose common issues:
    • Door Jammed: If the door is jammed while attempting to lock, the button flashes red 3 times with 3 beeps. The solution is to manually re-lock the door and reposition the strike if needed.
    • Incorrect User Code: Flashes red 3 times with 3 beeps. Solution: Re-enter the User Code.
    • Keypad Lock Out: After 5 incorrect User Codes within one minute, the keypad locks for 90 seconds. Solution: Re-enter User Code after 90 seconds.
    • Low Battery: LED red light when pressing any button. Solution: Replace batteries.
    • Super Low Battery (cannot unlock/lock): LED red light when pressing any button. Solution: Replace batteries.
    • Poor Quality Battery (lock no respond): LED green light and beeps 1 second after pressing unlock/lock button. Solution: Replace batteries.
    • Battery Run Out (keypad/light indicator no respond): Solution: Use Micro-USB supply power to unlock or use the physical key, then replace batteries.
    • Bad Cable Connection: Solution: Re-connect the cable.
  • Exiting Protection Mode: Users can wait 90 seconds for the mode to exit automatically, or remove the battery for more than 5 seconds and reinsert it.
  • Factory Default Reset: A factory reset deletes all associated codes. This is performed by opening the battery cover, then pressing and holding the set button for more than 5 seconds until the lock beeps 5 times and flashes blue 5 times, followed by a 1-second beep and 1 green flash.
  • Customer Support: Kingforce offers video call guide service for installation and setup, which can be scheduled via email.

KingForce M15 Specifications

General IconGeneral
BrandKingForce
ModelM15
CategoryLocks
LanguageEnglish