!
!
!
!
!
!
!
!
!
!
!
!
!
!
!
!
!
!
!
!
!
!
!
!
!
!
!
!
!
!
!
!
!
!
!
!
!
!
IMPORTANT SAFEGUARDS CONTINUED
• Do not place any of the following materials in the oven: that is, paper,
cardboard, plastic, and the like.
• Do not cover drip pan or any part of the oven with metal foil. This will
cause overheating of the oven.
• Save these Instructions.
• This appliance has a polarized plug (one blade is wider than the other).
To reduce the risk of electric shock, this plug is intended to fit into a
polarized outlet only one way. If the plug does not fit fully into the outlet,
reverse the plug. If it still does not fit, contact a qualified electrician. Do
not attempt to modify the plug in any way.
A. A short power-supply cord (or detachable power-supply cord) is
provided to reduce the risk resulting from becoming entangled in
or tripping over a longer cord.
B. Longer detachable power-supply cords or extension cords are
available and may be used if care is exercised in their use.
C. If a longer detachable power-supply cord or extension cord is used:
1) The marked electrical rating of the cord set or extension cord
should be at least as great as the electrical rating of the
appliance,
2) The cord should be arranged so that it will not drape over the
countertop or tabletop where it can be pulled on by children or
tripped over unintentionally; and
3) If the appliance is of the grounded type, the cord set or
extension cord should be a grounding-type 3-wire cord.
GETTING STARTED
• The Searing Oven should always be placed on a flat, stable surface.
Keep at least 4 inches of empty space open on each side. Make sure
to keep the item away from any towels, curtains, or combustible
materials.
• Before plugging the item into your home’s power outlet, please
ensure that the outlet voltage is consistent with the voltage
mentioned in “Compatibility” section.
• Before using, remove any labels and wash and dry the accessories
in accordance with the care instructions.
• You should only use the included accessories when cooking with the
Searing Oven. The Guiding Handle can be used to remove the Drip
Pan and Sear Tray.
• Do not scratch the surface or cut directly on the Sear Tray.
• When in use, you may notice flare ups inside the Searing Oven. This
is due to the fat content of your food and this is okay.
OPERATING INSTRUCTIONS
• The KHQ Searing Oven has a temperature range of 400ºF to a
maximum of 1550ºF.
• Please note: Use extra caution and ensure you always wear oven
mitts or gloves to protect your hands and fingers when using the item.
• Insert the Drip Pan at the very bottom of the Searing Oven before
proceeding to cook. It should sit below/slide under the lowest rails, as
you may use the lowest level for the Sear Tray.
• The Sear Tray can be positioned at 3 different levels depending on
your cooking needs. Please note that the top/highest level is closest
to the heating element, so your food will cook very quickly.
•
Plug the Searing Oven into a compatible outlet. For first use, locate the
power switch in the back of the unit and press to ON. The unit will beep
to indicate it is powered on.
• The machine will conduct a self-test and the fan will turn on. The fan
will stop automatically after 3 seconds. The machine is now in standby
mode, where the temperature digital display will show "---", timer digital
display will show 0:00, and all present lights will remain off until you
choose a function.
• If you do not choose a preset and the unit remains in standby mode
for 3 minutes, it will power off.
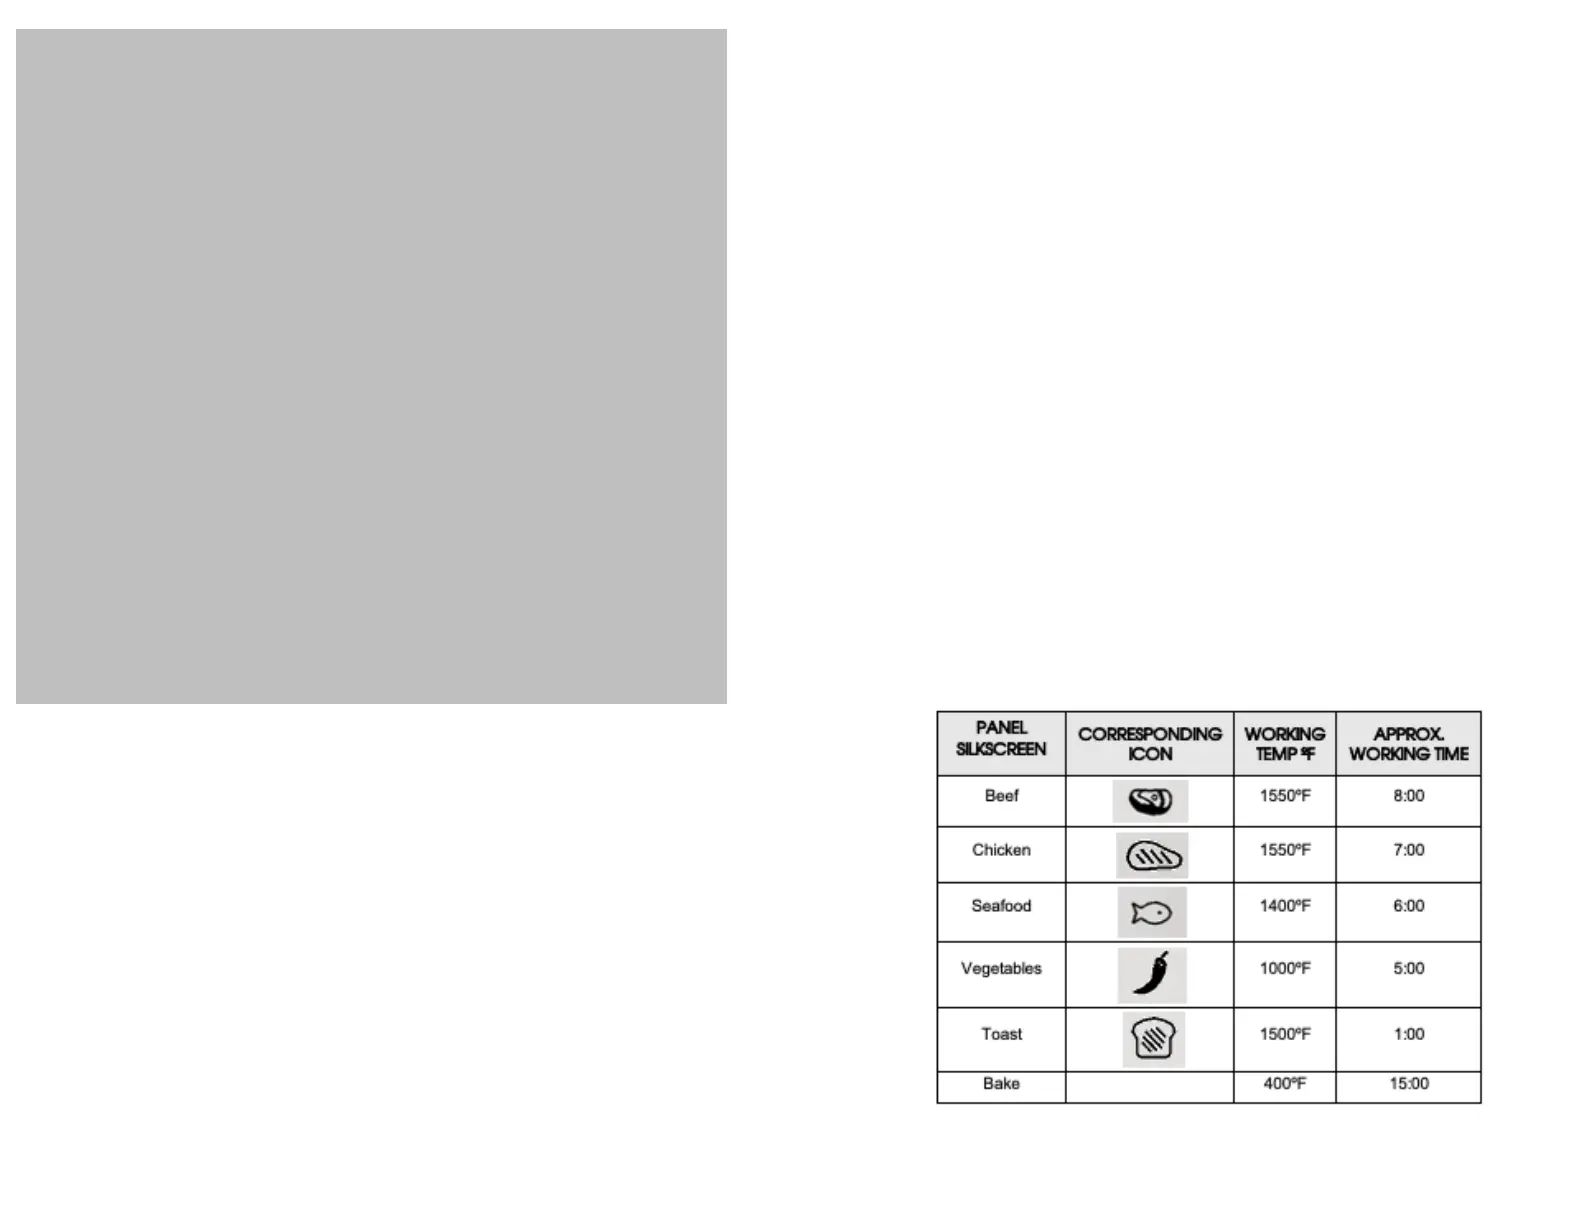
• Once the unit is on, you may choose a preset by turning the dial on
the right side of the oven. The preset options will light up on the digital
display, with their default time and temperature settings. Please see
below for reference on the available presets.
• To select the preset with its default settings, simply push the knob
in and the unit will begin preheating.
 Loading...