EasyManua.ls Logo

Kohler Clearflo K-7160 User Manual

Kohler Clearflo K-7160
4 pages
To Next Page IconTo Next Page
Page #1 background imageLoading...
Page #1 background image
113176-2-BC
2000 Kohler Co.

 
BEFORE YOU BEGIN
HOW TO USE THESE INSTRUCTIONS
Please read these instructions carefully to familiarize
yourself with the required tools, materials, and installation
sequences. Follow the sections that pertain to your
particular installation. This will help you avoid costly
mistakes. In addition to proper installation, read all
operating and safety instructions.
All information in these instructions is based on the latest
product information available at the time of publication.
Kohler Co. reserves the right to make changes in product
characteristics, packaging, or availability at any time
without notice.
NOTES
Observe all local plumbing and building codes.
Inspect waste and supply tubing; replace if
necessary.
If you are installing a new bath, install the drain
before installing the bath. Refer to the
manufacturers installation instructions.
Adjustable pop-up drain has removable parts.
Drain “T” is reversible for vertical or horizontal
drainage.
K-7166 and K-7166M is for Seawall 6’ (1.5m)
bath or whirlpool and 14” (35.6cm) Mayflower
bath.
TOOLS REQUIRED
Assorted screwdrivers
Adjustable or open end wrench
Pipe wrenches
Pliers
Plumbers putty
ROUGHING-IN
Fig. #1
2-7/8” (7.3cm)
3” (7.6cm)
1-1/2” N.P.S.
1-1/2” O.D.
7” (17.8cm)
17” (43.2cm) BATH =
14-3/4” (37.5cm)
24” (61cm) BATH =
21-1/2” (54.6cm)
2-7/8” (7.3cm)
3” (7.6cm)
1-1/2” N.P.S.
1-1/2” O.D.
7” (17.8cm)
14” (35.6cm) BATH =
11-1/2” (29.2cm)
16” (40.6cm) BATH =
14” (35.6cm)
K-7160 K-7161
K-7161M
K-7160M
Question and Answer IconNeed help?

Do you have a question about the Kohler Clearflo K-7160 and is the answer not in the manual?

Kohler Clearflo K-7160 Specifications

General IconGeneral
Model NumberK-7160
MaterialBrass
Adjustable trip leverYes
ColorChrome
FinishPolished Chrome

Summary

Before You Begin

How to Use These Instructions

Guidance on reading and following installation steps for accuracy and safety.

Roughing-In

Installation

Apply Plumbers Putty and Strainer

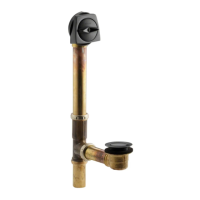
Apply sealant around the strainer and secure it into the drain ell.

Tighten Drain Ell

Secure the drain ell using pliers and ensure correct orientation.

Attach Overflow Gasket and Ell

Attach the gasket to the overflow ell and insert it into the tube.

Assemble Hold Down Plate

Secure the hold down plate to the overflow ell from inside the bath.

Below Floor Installations

Assemble drain parts for below-floor configurations, including tailpiece and trap.

Above Floor Installations

Assemble drain parts for above-floor configurations, including tailpiece and trap.

Multiple Lift Rod Models

Install lift rod assembly for models with separate lift rods.

Attached Lift Rod Assembly Models

Install lift rod assembly for models with integrated lift rods.

Assemble Overflow Hood and Handle

Attach the handle to the overflow hood, adjusting position as needed.

Insert Drain Stopper

Place the drain stopper into the drain ell.

Adjust Stopper Height

Modify stopper height by adjusting the nut below it for proper clearance.

Adjust Lift Rod Assembly

Modify lift rod assembly clearance by adjusting the block on the rail.

Related product manuals