EasyManua.ls Logo

Kohler Levity User Manual

Kohler Levity
4 pages
To Next Page IconTo Next Page
Page #1 background imageLoading...
Page #1 background image
20171297051-17.vsd ©Kohler Co.-
Troubleshooting
USA/Canada: 1-800-4KOHLER / México: 001-877-456-4537 / kohler.com
Leaking
Levity Shower and Bath Doors
B
1
7
Where is the leaking
occurring?
16
Install the seal
service kit.
No
12
Close both door panels, with the
inside panel closest to the
showerhead. Do the bottom
bumpers contact the wall on
both sides? Does the top of the
glass contact the top bumper on
both sides? Both answers must
be yes to select yes.
11
Does the bath or
shower ledge have
curved corners?
20
Does the threshold
have silicone sealant
along the outside
edge?
21
Apply 100% silicone sealant to
the outside edge of the
threshold. Allow sealant to cure
per the manufacturer’s
instructions before using the
shower.
22
Remove the silicone sealant and clean the
surface. Reapply 100% silicone sealant to the
outside edge of the threshold. Allow sealant to
cure per the manufacturer’s instructions before
using the shower.
Yes
No
Yes
14
Does the bottom of
each wall jamb and
wall jamb cover
match the curvature
of the bath or shower
ledge?
8
Is there silicone sealant
around the inside and
outside of the wall jambs?
9
Apply 100% silicone
sealant around the wall
jambs. Allow sealant to
cure per the manufacturer’s
instructions before using
the shower.
19
Is there silicone
sealant around the
inside and outside of
the wall jambs?
18
Apply 100% silicone sealant
around the wall jambs. Allow
sealant to cure per the
manufacturer’s instructions
before using the shower.
Yes
Wall Jambs
Under Threshold
Door Panels
No
No
No
Yes
15
Refer to the help topic and
video below to adjust the
rollers so the door panels
are flush with the walls. Is
the leaking still occurring?
17
Issue resolved.
No
Yes
No
Yes
10
To “Page Two.”
Side
5
To “Page Three.”
1
Reference the top bumpers
of your shower door to
determine when the door
was manufactured. Is the
word “KOHLER” stamped
along the side or the
bottom of the top bumpers?
Bottom
2
Using a level and a
tape measure, check
the walls for plumb.
Are the walls within
3/8" of plumb?
3
Close both door panels, with the
inside panel closest to the
showerhead. Refer to the help
topic and video below to adjust
the rollers so the door panels
are flush with the walls. Is the
leaking still occurring?
No
Yes
6
Install the seal
service kit.
Yes
4
Issue resolved.
No
13
Remove the covers and the wall
jambs. Refer to the installation
guide and shape the wall jambs and
covers to match the curvature of the
ledge. Reinstall the wall jambs and
apply 100% silicone sealant around
the wall jambs. Adjust the rollers so
the door panels are flush with the
walls.
Yes
Question and Answer IconNeed help?

Do you have a question about the Kohler Levity and is the answer not in the manual?

Kohler Levity Specifications

General IconGeneral
MaterialAluminum
FinishMatte Black, Brushed Nickel
Door ConfigurationSliding
Frame TypeFrameless, Semi-frameless
Glass FinishClear, Frosted
Hardware FinishMatte Black, Brushed Nickel

Summary

Initial Door and Wall Checks for Leaks

Check Bumper Manufacturing Date

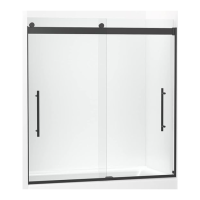
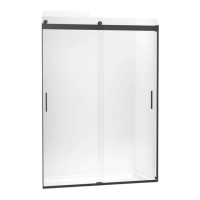
Determine door manufacturing date by checking for 'KOHLER' stamp on bumpers.

Verify Wall Plumbness

Measure wall plumbness to ensure it is within the 3/8" tolerance.

Adjust Door Panel Alignment

Align door panels flush with walls by adjusting rollers for proper contact.

Troubleshooting Wall Jamb Leaks

Diagnose Wall Jamb Leak Source

Identify if the leak is occurring at the wall jambs or under the threshold.

Check Wall Jamb Sealant

Verify silicone sealant presence around the inside and outside of wall jambs.

Address Ledge Curvature Issues

Shape wall jambs to match ledge curvature and apply sealant.

Troubleshooting Under Threshold Leaks

Check Bottom Bumper Contact

Ensure bottom bumpers contact walls and glass contacts top bumpers.

Verify Threshold Sealant

Check for silicone sealant along the outside edge of the threshold.

Apply Threshold Sealant

Apply 100% silicone sealant to the outside edge of the threshold.

Troubleshooting Door Panel and Centerguide Issues

Diagnose Leaks Between or Under Panels

Determine if leaking occurs between door panels or under the door.

Adjust Panel Position for Shower Use

Ensure inside panel is closest to showerhead during use for proper sealing.

Check Centerguide Installation

Verify the centerguide is installed correctly and panels overlap it.

Ensure Correct Door Sizing

Confirm the door is sized correctly for the finished opening.

Advanced Leak Troubleshooting

Re-check Wall Plumbness and Alignment

Re-evaluate wall plumbness and ensure door panels are flush with walls.

Inspect Wall Jamb Cleats and Sealant

Check cleats for tightness and sealant around wall jambs.

Confirm Bottom Bumper Contact

Verify bottom bumpers contact the wall on both sides.

Final Checks for Leaking

Diagnose Leaks Between or Under Panels

Determine if leaking occurs between door panels or under the door.

Verify Top Cleat and Wall Jamb Alignment

Check if top cleats are level with wall jambs and touching.

Ensure Showerhead Direction

Make sure showerheads are pointed away from the door panels.

Check Centerguide Overlap

Confirm door panels overlap correctly over the centerguide.

Related product manuals