f
e
d
b
c
a
f
g
g
1
b
a
2
e
b
3
54b
*
Pinch
e
b
d
Touchstrip
Brighter
Dimmer
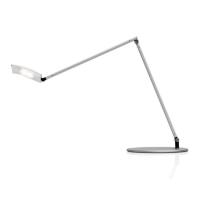
Mosso Pro desk lamp
Assembly Instructions / Instructions de Montage / Istruzioni di montaggio / Instrucciones de montaje / Monteringsvejledning
a LED head / cabeza LED / tête LED / barra luminosa a LED / LED licht / LED Hoved
b Body / cuerpo / pare / parte / Körper / legeme
c Adapter / adaptateur / addatore di rete / netzstecker
d Allen wrench / llave Allen /chiave a brugola / clé allen / Innensechskantschlüssel / unbrakonøgle
e Base / fod / Fußplae
f Splier cord* / Cable divisor / Cordon séparateur / Cavo sdoppiatore / Splierkabel / Splierledning
g Cord clips* / Clips de cable / Clips de cordon / Clip per cavo / Kabelclips / Ledningsklip
• Secure the body to the base with
the provided hex key
• Asegure el cuerpo a la base con la
llave hexagonal proporcionada
• Fixez le corps à la base avec la clé
hexagonale fournie
• Fissare il corpo alla base con la
chiave esagonale fornita
• Befesgen Sie den Körper mit
dem mitgelieferten Inbusschlüssel
an der Basis base
• Fastgør kroppen l basen med
den medfølgende unbrakonøgle
USB Charging Base*
• Connect lamp and base cables
to the splier cord. Connect the
splier cord the adapter. The
USB port will charge compable
devices.
• Conecte la lámpara y los cables
de la base al cable divisor.
Conecte el cable divisor al
adaptador. El puerto USB cargará
disposivos compables.
• Connectez les câbles de la lampe et de la base au cordon séparateur. Connectez
le cordon séparateur à l'adaptateur. Le port USB chargera les appareils
compables.
• Collegare i cavi della lampada e della base al cavo dello sdoppiatore. Collegare il
cavo sdoppiatore all'adaatore. La porta USB ricaricherà i disposivi compabili.
• Verbinden Sie Lampen- und Sockelkabel mit dem Splierkabel. Verbinden Sie
das Splierkabel mit dem Adapter. Der USB-Anschluss lädt kompable Geräte.
• Tilslut lampe og bundkabler l splierledningen. Tilslut adapteren l
splierledningen. USB-porten oplader kompable enheder.
USB Charging Base*
• Bundle the lamp and base cords together and squeeze
them into the cord clips.
• Ate los cables de la lámpara y la base y apriételos en los
clips para cables.
• Regroupez les cordons de la lampe et de la base et
glissez-les dans les clips de cordon.
• Lega insieme i cavi della lampada e della base e stringili nei
fermacavi.
• Bündeln Sie die Lampen- und Sockelkabel zusammen und
drücken Sie sie in die Kabelclips.
• Bund lampen og bundkablerne sammen og klem dem ind i
ledningsklemmerne.
• Slide your finger along the touchstrip to power on/off and adjust the brightness. Touch the center of the lens
to changes from warm to cool light. Touch and hold to cycle between the two light temperatures.
• Deslice el dedo por la ra tácl para encender / apagar y ajustar el brillo. Toque el centro de la lente para
cambiar de luz cálida a fría. Mantenga pulsado para alternar entre las dos temperaturas de luz.
• Faites glisser votre doigt le long de la bande tacle pour allumer/éteindre et régler la luminosité. Touchez le
centre de l'objecf pour passer d'une lumière chaude à une lumière froide. Touchez et maintenez pour alterner
entre les deux températures de lumière.
• Fai scorrere il dito lungo la touchstrip per accendere/spegnere e regolare la luminosità. Tocca il centro
dell'obievo per passare dalla luce calda a quella fredda. Tocca e eni premuto per scorrere tra le due
temperature della luce.
• Streichen Sie mit Ihrem Finger über den Touchstrip, um das Gerät ein- und auszuschalten und die Helligkeit
anzupassen. Berühren Sie die Mie der Linse, um von warmem zu kühlem Licht zu wechseln. Berühren und
halten Sie, um zwischen den beiden Lichemperaturen zu wechseln.
• Skub fingeren langs touchstripen for at tænde / slukke og justere lysstyrken. Berør midten af linsen for at
skie fra varmt l køligt lys. Berør og hold for at skie mellem de to lystemperaturer.
*Applicable only when USB charging base is chosen. For other mounng opons, please refer to the respecve mount's manual.
*Aplicable solo cuando se elige la base de carga USB. Para otras opciones de montaje, consulte el manual de montaje correspondiente.
*Applicable uniquement lorsque la base de chargement USB est choisie. Pour d'autres opons de montage, veuillez vous référer au manuel du support respecf.
*Applicabile solo quando viene scelta la base di ricarica USB. Per altre opzioni di montaggio, fare riferimento al rispevo manuale della montatura.
*Gilt nur, wenn die USB-Ladestaon ausgewählt ist. Weitere Montagemöglichkeiten entnehmen Sie bie der jeweiligen Montageanleitung.
*Gælder kun, når USB-opladningsbase er valgt. For andre monteringsmuligheder henvises l den respekve monteringsvejledning.