Do you have a question about the KONNEK STEIN F23 and is the answer not in the manual?
Details the process of connecting the camera to the mobile application.
Primary settings menu for device configuration and management.
Advanced system configuration options including network and display.
This document provides a quick start guide for the KONNEK STEIN Indoor Security Camera F23, outlining its components, installation process, app integration, and interface explanations. The camera is designed for indoor use, offering a range of features for home security and monitoring.
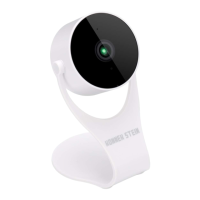
The package includes the camera unit, a power adapter, a quick start guide, a screw package, and mounting brackets. The camera itself features a microphone, lens, indicator light, and a reset button on the front. On the back, it includes a TF card slot, speaker, and power interface. These components facilitate its core functions of capturing audio and video, storing data, and providing user feedback.
Installation of the F23 camera is designed to be flexible, supporting both ceiling installation and flat placement. The process involves drilling a hole at the desired location, inserting wall anchors, and then securing the mounting bracket with screws. Once the bracket is in place, the camera can be aligned with the card slot on the bracket and installed onto the wall. This flexible mounting option allows users to position the camera optimally for their specific monitoring needs, whether it's overlooking a room from the ceiling or discreetly placed on a shelf.
To operate the camera, users need to download the "linklemo" app, available on both the App Store and Google Play. It's crucial to note that the device is only compatible with 2.4GHz Wi-Fi networks. Attempting to connect to a 5GHz Wi-Fi network will result in a connection failure. Most modern routers offer both 5GHz and 2.4GHz modes, so users should select the 2.4GHz option during the installation process to ensure proper connectivity.
The app integration begins with binding the camera to the user's account. This involves clicking "Add Product" on the app's homescreen and then selecting "card machine." The next step is to reset the device by pressing its button until a beep is heard and the status indicator light flashes at intervals. After confirming the reset, users proceed to connect the device to their Wi-Fi network, ensuring they select the 2.4GHz option. The app then guides the user to scan a QR code displayed on the phone, positioning it 0.3-0.6 feet directly in front of the camera. A voice prompt will confirm successful scanning. Finally, the user connects the network and assigns a name to the device within the app.
The main interface of the app provides several key functionalities. Users can add new devices, view the device name, access cloud video storage, and receive message notifications. The interface also includes navigation options for "Intelligent home," "Message," and "Mine," allowing users to manage their devices, view communications, and access personal settings.
The live interface of the app offers comprehensive control and monitoring capabilities. Users can view real-time video streams from the camera, with options to adjust settings, resolution, and volume. The interface also includes buttons for full screen viewing, taking screenshot pictures, recording video, and accessing other functions. Additionally, users can utilize the speaker function for two-way audio communication, playback recorded footage, access the "Guard home" feature, and browse the "Album" for stored media.
The settings interface provides a range of customization and maintenance options for the camera. Users can enable "Do not disturb" mode to prevent message pushes during specific times, ensuring uninterrupted privacy. The "Private mode" allows users to turn off the camera entirely for enhanced privacy. If a user wishes to reconnect the device or troubleshoot issues, there's an option to "Delete device" from the app. Power frequency can be set according to different regional standards. The "Defend home model" feature allows users to configure the camera to push prompt messages when a screen change is detected within a specified setting area and time period, enhancing security alerts. Finally, users can switch between different "Infrared night vision" modes to optimize visibility in low-light conditions.
Maintenance features are primarily managed through the app, allowing users to remotely control and configure the camera. The ability to delete and reconnect the device simplifies troubleshooting and re-setup. Cloud video storage ensures that recorded footage is securely backed up and accessible, even if the physical camera is compromised. The "Defend home model" and "Infrared night vision" settings contribute to the camera's ability to maintain effective surveillance under various conditions, reducing the need for manual adjustments. The quick start guide and app interface are designed to make the setup and ongoing management of the F23 camera user-friendly, minimizing the need for complex maintenance procedures.
| Night Vision | Yes |
|---|---|
| Two-Way Audio | Yes |
| Motion Detection | Yes |
| Power Supply | DC 5V/1A |
| Resolution | 1080p |
| Connectivity | Wi-Fi |
| Storage | MicroSD card (up to 128GB) |
| Storage Type | MicroSD |
| Operating Temperature | -10°C to 50°C |