Main Features
The TM-50TR is equipped with a variety of functions to
help you practice obtaining a “good sound”.
In addition to the conventional tuner functions (Meter,
Sound Out and Sound Back), the TONE TRAINER function
can be used to measure the stability levels of the pitch,
dynamics and brightness to help you practice producing a
good stable sound.
With the periodic metronome function, the metronome
clicks with each set measure as well as plays a tone with the
set time signature and tempo to help you practice keeping
the rhythm.
Installing batteries
1.
Slide the battery
compartment cover
on the back of the
TM-50TR in direc-
tion “a” as shown
in the illustration
and lift up the cover
in direction “b.”
2.
Insert the batteries,
making sure to ob-
serve the correct polarity.
3.
In order to get accurate readings of the remaining bat-
tery power, please refer to the “Seing the baery type”
section and select the type of baery that’s being used.
If the unit malfunctions try removing and then rein-
stalling the baeries.
When the baeries become depleted, a baery symbol
will appear on the display. When this occurs, it’s time
to replace the baeries.
Setting the battery type
In order to get accurate readings of the remaining baery
power, select the type of baery that’s being used.
1.
When you replace the baeries and turn on the power,
the display will show a screen allowing you to specify
the type of baeries you’re using.
2.
Press the TAP TEMPO buon to select the baery type.
AL: When using alkaline baeries
nH: When using nickel-metal hydride baeries
3.
Press either the TUNER ON button or the METRO-
NOME ON buon.
The setting will be completed, and the TM-50TR will
start up.
Using the stand
You can use the stand provided on the back of the TM-50TR
to tilt it back at an angle for easy viewing.
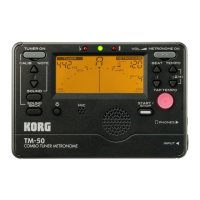
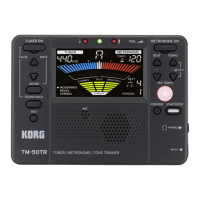
Parts of the TM-50TR
1.
TUNER ON button
2.
CALIB/NOTE ▲,▼ buttons
3.
SOUND button
4.
SOUND BACK button
5.
INST (instrument group) button
6.
MIC
7.
Speaker
8.
PERIODIC (periodic metronome) button
9.
Display
10.
Tuning guide
11.
VOL (Volume)
12.
METRONOME ON button
13.
BEAT ▲,▼ button
14.
TEMPO ▲,▼ button
15.
TAP TEMPO button
16.
START/STOP button
17.
PHONES jack
18.
INPUT jack
f
e
a. Calibration (Reference pitch)
b. Note name c. Tempo
d. Instrument group e. PITCH meter
f. DYNAMICS/BRIGHTNESS meter and metronome pendu-
lum
g. BEAT (metronome beat)
h. PERIODIC (periodic metronome)
i. STABILITY (performance stability) meter
Turning the power on/o
To turn the power on
Press either the TUNER ON button or the METRONOME ON
buon and the power will turn on. Press the buon for the func-
tion that you want to use.
When the TUNER ON buon is pressed, the tuner starts in the
Meter mode and “ ” will appear on the display.
When the METRONOME ON buon is pressed, the metronome
starts and “ ” will appear on the display.
The TM-50TR can use the tuner and metronome simultaneously.
The TUNER ON buon and the METRONOME ON buon
are designed lower than other buons so that the power is
not turned on involuntarily when the TM-50TR is placed in
your pocket or in a bag. To turn the device on or o, push in
the power buon.
Turning the tuner o
When the tuner is in use, press the TUNER ON buon to turn o
the power. The tuner will also turn o automatically if it’s not in
use for twenty minutes.
Turning o the metronome
When the metronome is in use, press the METRONOME ON
buon to turn o the power. The metronome will also turn o
automatically if not in use for twenty minutes.
Connections
If you want to connect an instrument, contact mic,
etc.
If you want to tune an instrument with a pickup, such as an elec-
tric guitar, connect a cable to your instrument, and plug the cable
into the TM-50TR’s INPUT jack.
The INPUT jack is only for a 1/4” mono cable. Stereo (TRS)
cables cannot be used.
If you want to tune your instrument using the Korg CM-200
CONTACT MICROPHONE (sold separately), plug the contact
mic into the TM-50TR’s INPUT jack.
If a device is not connected to the INPUT jack, tuning will be
performed by the internal mic.
Plucked string instruments such as guitars can be connected
to the INPUT jack for tuning; however, they are not compati-
ble with the TONE TRAINER function.
Connecting headphones
You can connect commercially available headphones with a 1/8"
stereo mini-plug to the PHONES jack. When plugged in, no
sound will be heard from the speaker. Use the volume control to
adjust the volume of the headphones output.
Using the tuner
Tuning while watching the meter (Meter mode)
1.
Connect your instrument cable or contact mic to the TM-
50TR’s INPUT jack.
If a device is not connected to the INPUT jack, tuning will be
performed by the internal mic.
2.
Press the TUNER ON buon.
“ ” will appear at the top of the display and the
calibration (reference pitch) will be displayed below that.
3.
To change the calibration, press the CALIB/NOTE ▲ or ▼
buon.
The calibration value increases and decreases in units of 1 Hz.
By pressing and holding these buons, you can increase or de-
crease the value continuously. This seing is stored even when
the power is o.
4.
Play a single note on your instrument.
The closest note to the input sound will appear in the center of
the display. Tune your instrument to the correct pitch, so that
the desired note name appears.
If you’re using the internal mic, place your instrument as
close as possible to the mic so that extraneous sound is not
picked up while tuning.
5.
While playing a single note on your instrument, tune the in-
strument so that the center mark of the PITCH meter and the
center indicator of the tuning guide light up.
The left tuning guide indicator will light up if the pitch of your
instrument is at, and the right indicator will light up if the
pitch is sharp.
Tuning to a just major third above or a minor third above
If you want to tune to a just major third above A (0 cent),
tune your instrument so that the note name indicator
shows C
♯
and the meter is at “ ”.
If you want to tune to a just minor third above A (0 cent),
tune your instrument so that the note name indicator
shows C and the meter is at “
”.
Tuning to a reference tone (Sound Out mode)
1.
Press the TUNER ON buon.
You will enter the Meter mode.
2.
Press the SOUND buon to select Sound Out mode.
The reference tone is output from the PHONES jack or
speakers. Use the volume control to adjust the output
volume.
3.
Press the CALIB/NOTE ▲ or ▼ buon to select the note.
The output reference tone changes as follows.
C (C3) C
♯
D E
♭
E F F
♯
G G
♯
A B
♭
B
C (C4) ... C (C6) C (C3)...
This seing is stored even when the power is o.
4.
Tune the instrument according to the reference tone.
5.
Press the SOUND button again to return to the Meter
mode.
If connected to either the INPUT jack or the PHONES
jack, the PITCH meter is activated.
Tuning using the reference tone and meter
(Sound Back mode)
In Sound Back mode, the tone of the input instrument is
detected, and the closest reference tone is output. This can
be used to check the pitch deviation of the tone that you
output.
This function can be used when you are connected to either
the INPUT jack or the PHONES jack (or both).
1.
Press the TUNER ON buon.
You will enter the Meter mode.
2.
Press the SOUND BACK buon to enter the Sound Back
mode.
In the Sound Back mode, the reference tone that’s closest
to the tone of the input instrument is output. Use the
volume control to adjust the volume.
“
” will appear on the display.
If headphones are connected to the PHONES jack, the
input sound from the internal mic or INPUT jack will be
received and the reference tone will be output from the
headphones.
If nothing is connected to the PHONES jack, the input
sound from the INPUT jack is received and the reference
tone is output from the speakers.
3.
Tune the instrument using the reference tone and meter.
4.
If the SOUND BACK buon is pressed again, you will
return to the Meter mode.
Measuring/displaying performance stability
(TONE TRAINER function)
1.
Press the TUNER ON buon.
You will enter the Meter mode.
2.
Press the INST buon to select the group that the instru-
ment to be measured belongs to.
Each press of the INST buon switches the selected in-
strument group as follows.
WOODWINDS BRASS STRINGS WOODWINDS ...
 Loading...