5
EN
OPERATION
• Protect the laser device against moisture and direct
sun light.
• Do not subject the laser device to extreme tempe-
ratures or variations in temperature. As an example,
do not leave it in vehicles for longer periods. In case of
large variations in temperature, allow the laser device to
adjust to the ambient temperature before putting it into
operation.
• Avoid heavy impact to or falling down of the laser
device. Damage to the laser device can impair its ac-
curacy. After heavy impact or shock, compare the laser
line with a known horizontal or vertical reference line.
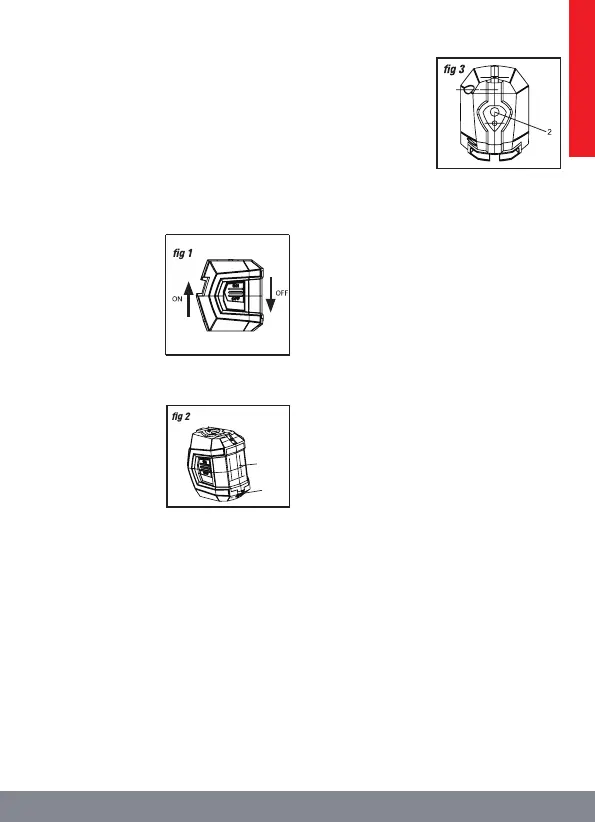
1. Power switch
Push the power switch
up to turn the self-level-
ling cross-liner laser le-
vel on, slide the power
switch down to turn the
tool o (g 1).
2. To install or replace batteries (g 2)
The battery compart-
ment holds two “AA”
batteries.
1. Push the latch to
open the battery cover.
2. Insert two new “AA”
alkaline batteries, fol-
lowing the polarity (+/-)
as indicated on the pole
plate.
3. Securely close the cover.
NOTE:
• Always turn o the tool before installing or replacing
the batteries.
• Remove the batteries from the tool when not using it for
extended periods.
• The AA batteries should match each other in brand and
type.
• Do not mix old and new batteries.
• Remove depleted batteries immediately, and dispose
of them according to the laws and regulations governing
your community.
3. Laser line projection modes
Your self-levelling cross-line laser level has three laser-
projection modes. To select a specic laser-projection
mode, press the mode button until you reach the desired
projection mode. This laser tool defaults to the cross-hair
pattern mode when it is turned on.
To choose a projection
mode, press the mode
button:
1. Press the button
once to select the hori-
zontal laser line.
2. Press the button
twice to select the verti-
cal laser line.
3. Press the button
three times to return to the cross-hair pattern (horizontal
and vertical).
4. Using your self-levelling cross-line laser level
Your self-levelling cross-line laser level has two working
modes: Self-levelling mode and Lock (manual) mode.
• Self-levelling mode
In this mode, the tool will level itself if it is within ± 4° of
horizontal.
1. Place the self-levelling cross-line laser level on a at,
smooth surface that is within ± 4° of horizontal.
2. Turn the tool on by sliding the power switch to the
left position.
The self-levelling cross-line laser level will automatically
level within 5 seconds. The LED indicator will shine green.
3. Press the mode button until the desired laser-pro-
jection mode is achieved and the laser line is projected
from the laser aperture.
4. When the self-levelling cross-laser out of levelling, the
LED will turn to red and the laser line will blink.
5. To turn o the laser lines, slide the switch to the right
position.
WARNING!
When turning the laser on, always be aware of pro-
tecting your eyes and the eyes of those around you.
Never point the laser light at anyone’s face, inclu-
ding your own.
• Lock mode
This mode cannot be used to perform horizontal or ver-
tical levelling, because the laser lines are no longer self-
balancing.
In this mode, the LED indicator will always shine red.
1. Keep the power switch o, press the mode button to
turn on the laser. The laser lines are now locked, and are
no longer self-levelling.
2. Press the mode button repeatedly to change the laser
projection mode.
3. Slope your self-levelling cross-line laser level to pro-
ject a straight line for reference. In this mode, the laser
lines are projected continuously and will not blink, even
if the slope angle exceeds 4°.
4. To turn the laser o, press the mode button repeatedly
until the laser shuts o.
4
5
 Loading...