PT-871xr Quick Start Guide
This guide helps you install and use your PT-871xr for the first time.
Go to www.kramerav.com/downloads/PT-871xr to download the latest user manual and check if firmware
upgrades are available.
Step 1: Check what’s in the box
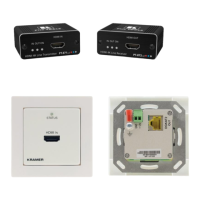
PT-871xr HDMI 4K Line Transmitter
We highly recommend using only Kramer UNIKAT cables with these products. If using 3
rd
party shielded CAT-6A cables, both ends of the
shield must be soldered to the connectors for the products to function properly. Do not use any jumpers, unshielded wall plates or mid-
span cable connections. These extenders are not compatible with HDBaseT technologies. Prior to signal extension, ensure that the
extension line cable is lying straight and not coiled.
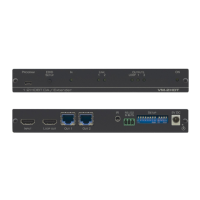
Step 2: Get to know your PT-871xr
The terms HDMI, HDMI High-Definition Multimedia Interface, and the HDMI Logo are trademarks or registered trademarks of HDMI Licensing Administrator, Inc.
Lights when an active source is connected to HDMI IN.
Lights when an active acceptor is connected to HDMI OUT on the receiver (for example,
WP-872xr).
Lights when power is connected to the device.
Connect to an HDMI source.
Set the operation DIP-switches. Both DIP-switches are set to OFF (up) by default.
Always set the DIP-switches identically on transmitter and receiver devices.
DIP-switch 1:
Compression Options
OFF (up) – Standard compression level.
ON (down) – High compression level for additional range extension.
DIP-switch 2:
Compression Setup
OFF (up) – Enable compression (mandatory).
ON (down) – For future use.
DGKat-2.0 OUT RJ-45 Connector
Connect to the DGKat-2.0 IN connector on the receiver (for example, WP-872xr) using twisted
pair cable.
Connect the power adapter to one of the devices.
Step 3: Install the PT-871xr
Install PT-871xr using one of the following methods:
• Attach the rubber feet and place the unit on a flat surface.
• Fasten a bracket (included) on each side of the unit and attach it to a flat surface
(see www.kramerav.com/downloads/PT-871xr).
• Mount the unit in a rack using the recommended rack adapter
(see www.kramerav.com/product/PT-871xr).
• Ensure that the environment (e.g., maximum ambient temperature &
air flow) is compatible for the device.
• Avoid uneven mechanical loading.
• Appropriate consideration of equipment nameplate ratings should be
used for avoiding overloading of the circuits.
• Reliable earthing of rack-mounted equipment should be maintained.