Do you have a question about the Kraus KCC-1400 and is the answer not in the manual?
Verify all parts are present; contact customer service for missing or damaged items.
Inspect the sink for damage incurred during shipping before proceeding with installation.
Utilize the provided cut-out template for accurate sink placement and sizing.
Observe all applicable state plumbing and building codes during the installation process.
Turn off water at angle stops and release pressure from the old faucet.
Flush angle stops to remove any debris prior to starting the installation.
Ensure pre-drilled holes meet the requirement of 1 3/8" (min) to 1 1/2" (max).
Adhere to the maximum countertop thickness limit of 1 1/2 inches for installation.
List of essential tools for installation, including safety goggles, drill, and various hand tools.
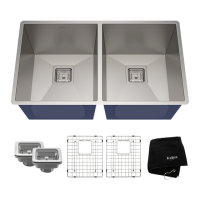
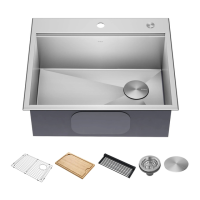
Inventory of all components provided with the kitchen set, such as the sink and faucet.
Details the sink model number (KWT310-33) and its specific dimensions (33" x 22" x 9").
Specifies the minimum required cabinet size for the sink installation, which is 36 inches.
Check and place the cut-out template on the countertop for correct sink placement.
Accurately trace the template onto the countertop using a pencil.
Cut the countertop opening precisely along the traced line using an appropriate saw.
Secure the mounting hardware to the prongs on the underside of the sink rim.
Clean the surface and apply silicone-based sealant or plumber's putty to the sink's edge.
Insert the sink, align it, tighten screws, and remove excess sealant.
Connect drain, trap, and water supply lines to the faucet and check for leaks.
Select and cut the template based on the desired reveal type (Positive or Flush).
Verify the cut-out template against the sink and place it in the desired countertop location.
Accurately trace the template onto the countertop using a pencil.
Cut the countertop opening precisely along the traced line using an appropriate saw.
Align sink with countertop and mark mounting bracket locations 1/2" from the edge.
Drill 3/8" diameter by 1/2" deep holes in the countertop for anchor placement.
Insert anchors into drilled holes and tap them flush with a hammer.
Apply adhesive around the sink rim and press the sink firmly into the countertop cutout.
Secure the sink bowl with mounting hardware and allow sealant to cure for 30-60 minutes.
Connect drain, trap, and water supply lines to the faucet and perform leak checks.
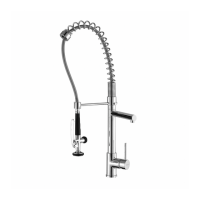
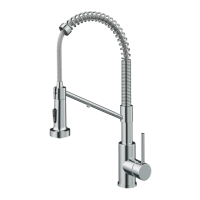
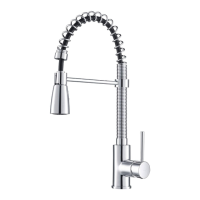
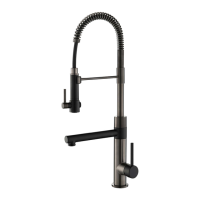
Identifies the detachable spray head of the kitchen faucet.
The main central unit of the faucet housing the spout and handle.
Components for securing the faucet, including washers, nuts, and screws.
Fitting for fast connection of water supply lines to the faucet.
Weighted component attached to the pull-down hose for retraction.
A 2.5mm wrench tool provided for assembly tasks.
Detailed measurements and specifications for the faucet's height, reach, and spout dimensions.
Advice to shut off the main water supply before beginning faucet installation.
Turn off water, remove old faucet, and detach mounting hardware from faucet body.
Guide the faucet body through the designated hole in the sink for installation.
Install washers, thread mounting nut, and tighten screws to secure the faucet shank.
Push the quick connector firmly upward to attach it to the receiving block.
Attach the weight clip and slide the weight onto the faucet hose for proper retraction.
Thread and tighten the supply line nut onto the water supply valve.
Flush faucet lines for one minute, check for leaks, and reinstall the spray head.
Resolve leaks under the faucet handle by tightening the bonnet nut with a hex wrench.
Address irregular or reduced water flow by cleaning the aerator or checking for debris.
Troubleshoot low water pressure by cleaning connectors/aerators or replacing components.
Restore water flow by cleaning screen filters in hose connectors from debris.
Clean the sink with warm water, mild soap, and a soft cloth, avoiding abrasive materials.
Exclusions and limitations of the kitchen sink warranty, including misuse and improper installation.
Details the one-year warranty for industrial, commercial, and business use of the sink.
Outlines faucet warranty exclusions like damage from abrasive cleaners or improper maintenance.
Specifies the one-year warranty for industrial, commercial, and business faucet applications.
Instructions and link to register the Kraus product online for warranty and support.
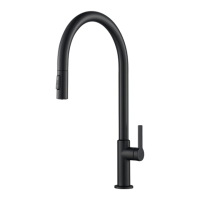
| Product Type | Kitchen Faucet |
|---|---|
| Number of Handles | 1 |
| Flow Rate | 1.8 gpm |
| Handle Type | Lever |
| ADA Compliant | Yes |
| Finish | Chrome |
| Spout Height | 8.5 inches |