7
English
SET UP
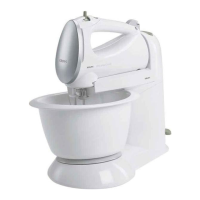
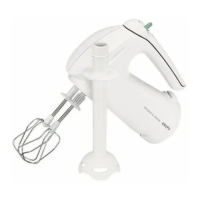
A Whisk
A1 Accessory ejection button
A2 Speed control
A3 Turbo button / Blender shaft
function
B Multi-strand whisks for light preparations
C Mixers for heavy dough
D Alignment pin
E Stainless steel blender shaft (depending
on model)
F Measuring bowl (depending on model)
G Rear panel
Thank you for choosing a product from the KRUPS range, exclusively designed for preparing
food and for domestic use inside the home.
The safety instructions are part of the unit. Please read them carefully before using your new
appliance. Keep them in a place where you can find and keep them for future reference.
DESCRIPTION
Before rst use, remove the accessories from their packaging and clean them in hot water.
Dry thoroughly.
Connect the appliance:
Your appliance has 5 speeds and a turbo button. Always mix or knead in position “1” before
switching to a higher speed - g. 4.
For kneading heavy doughs we recommend that you only use position “5” - fig. 5.
You can also increase the speed by pressing the TURBO button (A3).
However we recommend that you use it only for a brief period of time (a maximum of
30 sec. for a heavy dough).
Before removing the accessories, please switch off the appliance (this will avoid splashing).
Set the speed selector (A2) to position “0” - g. 7.
Mixer function with beaters B or kneaders C:
Depending on the amount to be prepared, place the ingredients in a suitable container
(preferably a shallow bowl or cup).
Set the speed selector (A2) to position "0" - g. 1.
Insert the stems of the whisks (B) or mixers (C) in the holes provided and lock them.
Immerse the accessories into the mixture, before switching on the unit - this will avoid
splashing.
Blender function E (depending on model)
Check that the appliance is unplugged, that the speed control (A2) is set to “0” and that the
beaters or kneaders have been removed from the appliance.
Lift the panel at the back of the appliance and screw the blender shaft (E) anti-clockwise
without forcing it until you hear a click (g.6). If you feel resistance when screwing in, this
USING THE APPLIANCE
TIPS & TRICKS
Whisks and mixers have a specic design. The mixer or whisk with the alignment (D)
must be placed in the biggest hole – g. 2 and g. 3.
NC00138028 - 3MIX5500 3L-FR-EN-DE-NL.indd 7 21/10/16 11:02
 Loading...