2120
EN
ENGLISH
Using the machine for the rst time
Unbox the coffee machine and remove packaging and any other
items that are not part of the product (labels, ties, etc.). (Fig. 1)
Clean the coffee machine with a damp cloth or sponge. (Fig. 2)
Note: Before using your coffee maker for the rst time, run a brew
cycle without coffee to rinse.
BREWING COFFEE
1. Place the machine on a solid, at surface. Connect the appliance
to a 120 V~ electrical outlet. (Fig. 3)
2. Fill the water tank (B) with cold water to desired water level (Max
60 oz). (Fig. 4-6)
Note: Do not exceed the Max line (60 oz) when brewing into
coffee pot. Doing so could cause coffee pot to overow.
3. Place the coffee pot (I) with its lid on the keep warm plate (G).
CAUTION: Make sure the coffee pot is correctly placed on the
keep warm plate before starting the brew cycle. If the coffee pot
is not correctly positioned on the keep warm plate, hot water or
coffee could overow from the appliance.
4. Place funnel (E) correctly in the coffee machine, then put permanent
lter (D) in the correct position. (Fig. 7-8)
5. Add the desired amount of ground coffee directly into the lter,
then close the top cover (A). The amount of coffee to use will vary
depending on the desired strength and taste. (Fig. 9)
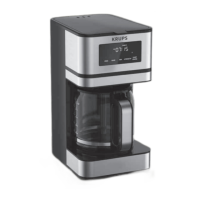
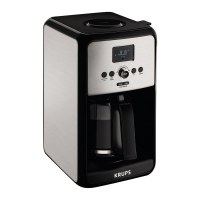
A Lid
B Water tank
C Measuring spoon
D Permanent lter
E Funnel
F Funnel holder
G Keep warm plate
H Coffee pot lid
I Coffee pot
J Blue indicator light – auto-on
function activated
K PROG (Timer programming)
L HOUR
M MIN (Minute)
N STRENGTH (Coffee strength)
O START/PAUSE
P Red indicator light – brew
cycle started
DESCRIPTION
6. Press the “START/PAUSE” button (O); the red LED light (P) will
come on and brewing will begin. (Fig. 10) During the brew cycle,
only the “START/PAUSE” button (O) will work.
Note: The cycle can be interrupted at any time by pressing the
“START/PAUSE” button (O); the red LED light will turn off.
7. When the brew cycle has nished, the unit will beep. Wait a few
minutes for the rest of the coffee to nish dripping into the coffee
pot (I) before removing it by the handle. (Fig. 11)
8. The coffee maker automatically goes to Keep Warm function after
the brew cycle and the “Time since brew” display will appear on the
LCD screen. Default keep warm time is 2 hours after coffee brewing
has nished. The keep-warm time can be adjusted, see “Setting the
Keep Warm Time” section (p. 23) for more information.
Note: You can end the keep warm time any time by pressing the
“START/PAUSE” button (O). The LED light and the appliance will turn
off. Wait a few minutes before making a second pot of coffee. Please
allow the brewing chamber to fully cool down and remember to empty
the used coffee grinds prior to making your next cup.
CAUTION: Be careful when opening the coffee maker lid after brewing
as this area will be hot and steam built up in the machine can cause
burns. Use the lift tab located on the front of the lid and be careful with
hands and face so it does not come in contact with any steam or hot
water.
USEFUL INFORMATION AND TIPS
The amount of coffee prepared will be less than the volume of water you
lled the tank with, as the ground coffee and lter partially absorb it.
SETTING THE CLOCK
1. Press and hold the “HOUR” button (L) for three seconds. (Fig. 12)
The time on the LCD screen will ash. Use the “HOUR” (L) and
“MIN” (M) buttons to set the time. (Fig. 13 and 14)
2. After your selection, the time on the LCD screen will ash for ve
seconds and the time is set.

 Loading...