This document is a user manual for a Kucht Professional Dual Fuel Convection Range. It provides comprehensive information on safety, installation, operation, care, and troubleshooting for various models including KRD482F, KRD483F, KRD484F, KRD486F, KRD488F, KRD306F, KRD302F, KRD309F, KRD304F, KRD303F, KRD369F, KRD368F, KRD366F, KRD362F, KRD363F, KRD361GF, KRD364GF, KRD365GF, and KRD367GF.
The Kucht Professional Dual Fuel Convection Range is designed for indoor use and combines gas cooktop burners with an electric convection oven. It aims to provide a professional cooking experience in a home kitchen.
Safety and Installation:
The manual emphasizes safety with clear warnings, including the importance of installing the anti-tip bracket to prevent the range from tipping over, which could cause serious injury or death. It provides detailed instructions for securing the anti-tip brackets to the wall and ensuring they are engaged when the range is moved. Users are warned against operating the range without the anti-tip device in place.
Important safety instructions include:
- Not storing or using flammable vapors or liquids near the appliance.
- Procedures to follow if gas is smelled (e.g., do not light appliances, do not touch electrical switches, call gas supplier).
- Electric grounding instructions, noting the appliance is equipped with a four-prong grounding plug for shock hazard protection.
- Warnings against using the appliance as a space heater, covering oven slots/holes with aluminum foil, and storing items of interest to children above the range.
- Recommendations to wear proper apparel, refer servicing to qualified technicians, use dry potholders, and never leave surface units unattended at high heat settings.
- Guidelines for using glazed cooking utensils and positioning utensil handles.
- Caution when cleaning a hot cooktop to avoid steam burns.
- Instructions for safe oven door operation and not heating unopened food containers.
- Ensuring oven vent ducts are unobstructed and placing oven racks when the oven is cool.
- Proper electrical grounding in accordance with local codes or the National Electrical Code, ANSI/NFPA 70 (Canadian Electrical Code in Canada).
- Disconnecting electrical supply before servicing.
- Keeping the range area clear of combustible materials.
- Adjusting top burner flame size to not extend beyond the cooking utensil.
- Installing a manual gas valve in an accessible location.
- Sealing any wall or floor openings behind/under the appliance.
Installation Specifications:
- Minimum clearance between the top of the cooking surface and the bottom of an unprotected wood or metal cabinet: 30 inches.
- Minimum clearance when the bottom of a wood or metal cabinet is protected by flame-retardant millboard covered with sheet steel, stainless steel, aluminum, or copper: 24 inches.
- Maximum depth of adjacent cabinets installed above cooking tops: less than 13 inches.
- The bottom of the hood should be 30-36 inches above the countertop, resulting in 66-72 inches above the floor.
- The range must not be installed closer than 12 mm from any adjacent surface.
Power Supply and Gas Supply:
- The range is connected via a terminal connection block.
- A 4-conductor power-supply cord kit rated 240 volts, 30A minimum, and marked for use with ranges, must be used.
- Closed-loop terminals are required for the cord kit.
- Gas supply pressure for LP gas: 13.0 IN.W.C.
- Gas supply pressure for NG gas: 10.0 IN.W.C.
- Appliance regulator outlet pressure for LP: 10.0 IN.W.C.
- Appliance regulator outlet pressure for NG: 5.0 IN.W.C.
- Installation must conform to national and local fuel gas codes (ANSIZ223.1 / NFPA 54 or CAN 1-1.1-M81).
- A manual gas line shut-off valve must be installed.
- Leak testing with soap water is required after gas connections.
- The appliance must be isolated from the building's gas supply piping system during pressure testing.
- Post-installation checks include ignition of cooktop and oven burners, visual re-ignition of tubular burners, and gas leak checks.
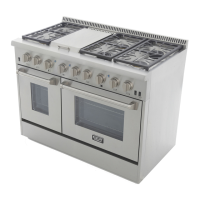
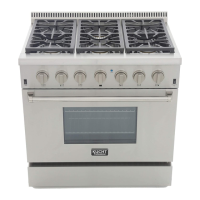
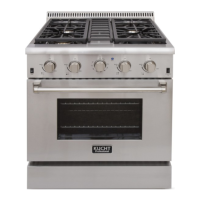
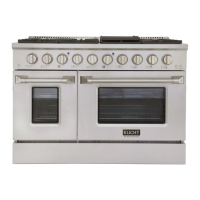
Range Overview and Cooktop Equipment:
The manual illustrates 30-inch (4 burner), 36-inch (6 burner), and 48-inch (griddle, two oven) dual fuel range models.
48-inch Dual Fuel Range Sample Components:
- Griddle covers, burner grates, griddle, back trim.
- Top burner knobs, 18" oven light switch, 18" oven knob, griddle knob, 18" oven door.
- 18" oven indicator light, 30" oven indicator light, top burner knob, 30" oven light switch, 30" oven fan switch, 30" oven knob, griddle indicator light, oven door gasket.
- Oven lamp, 30" oven fan cover, oven bottom, 30" oven door.
- Kickstrip grate, broil/roast slotted grid, broil/roast pan.
- 18" shelf, 30" shelf.
- Base Heating Element, Top Heating Element.
Oven Heating Elements:
- Electric Broiler (Top) Heating Element: 1@3500 W.
- Oven Electric Heating Element (30-inch and 36-inch ovens): 1@850 W (Top) & 3000 W (Base).
- Oven Electric Heating Element (48-inch dual fuel range with 18-inch oven): 1@2500 W (Base).
First Use and Operation:
- Before first use, ensure anti-tip bracket is installed, note model/serial numbers, read safety warnings, and remove packaging.
- Conditioning the oven: Heat the empty oven at the highest temperature for 30 minutes using BAKE and 30 minutes using BROIL (if applicable) with the ventilation hood on high. Wipe out the oven after cooling.
- Oven Shelves: Shelves have safety stops to prevent them from sliding out completely and front stops to prevent hitting the back of the oven. Instructions are provided for inserting shelves by lifting the front about 15° upward to clear the safety stop.
- Surface Burner Ignition: Push and turn the control knob counter-clockwise to the 'HI' position. An electric spark will ignite the burner. Adjust the knob for desired heat.
- Simmer and Boil: Smaller flames (SIM setting, 680 BTU/hr) are for gentle simmering, melting, and delicate sauces. Larger flames are for heavy cooking loads like boiling water.
- Flame Size: Flame should be steady and blue. An orange flame may indicate foreign material in the gas line.
- Power Failure: If gas doesn't ignite within four seconds, turn off the valve, wait five minutes, and repeat. Do not operate during a power failure.
- Oven Use:
- Oven bake heat element operation: Turn knob counter-clockwise to a temperature between 150°F and 500°F. Both upper and lower elements turn red.
- Oven broil heat element operation: Turn knob counter-clockwise to the 'broil' position. Only the top element turns red.
- Oven indicator light illuminates when heating.
- Keep oven door closed during all oven modes.
- Do not cover shelves or oven floor with aluminum foil.
- Do not place water, ice, or dishes directly on the oven floor.
- Do not use plastic wrap or wax paper in the oven.
- Do not leave food in the oven for more than two hours before/after cooking.
- Oven vent releases hot air/moisture; do not block.
- Oven elements cycle on/off to maintain temperature. Use oven light to monitor cooking.
- Oven Functions:
- Natural Airflow Bake: Heat from bottom bake burners circulates naturally.
- Infrared Broil: Top broil burner heats a metal screen for searing.
- Convection Bake: Heat from bottom bake burners is circulated by a rear fan for even heat distribution and faster cooking.
- Convection Roast: Fan circulates heated air over food, sealing in juices. Use broiler pan and slotted grid.
- Convection Defrost: Fan circulates air without heat for natural defrosting. Do not leave food for more than two hours.
- Convection Dehydrate: Warm air from bake element circulated by fan at 175°F to remove water.
- Broiling Guidelines:
- Use broiler pan and slotted grid to reduce smoking/splatter.
- Preheat broiler for 2 minutes for searing rare steaks.
- Broil one side, then turn and cook the second side.
- Broil temperature is 500°F (260°C).
- Place broiler pan on interior oven rack, centered under the broil burner.
- Choose shelf positions 2 or 3 for thick meats, 4 for thinner items.
- Use metal or glass-ceramic bakeware for browning; avoid heatproof glass or earthenware.
- Center item in the oven.
- Griddle Use (for models with griddle):
- Clean thoroughly with warm, soapy water before first use.
- Remove stainless steel cover before turning on.
- Ensure grease tray is under the front edge.
- Push and turn control knob counter-clockwise to desired temperature.
- Preheat for 10-12 minutes. Indicator light turns on when preheated.
Care and Cleaning:
- Read cleaning instructions and safety warnings before cleaning.
- Allow parts to cool before cleaning, or wear protective mitts for warm/hot parts.
- Test cleaners on a small area first.
- Do not let soiling/grease accumulate.
- Do not use abrasive or harsh cleaners, scouring pads, or steel wool.
- Do not use a steam cleaner.
- Do not perform maintenance on parts not specifically named.
- Do not lift black grill and griddle frames off cooktop.
- Burner caps and brass flame spreaders: Wash in hot soapy water, rinse, dry. Clear notches with a stiff nylon brush or paper clip.
- Cooktop: Clean after each use with sponge, soft cloth, fibrous/plastic brush, nylon pad. Do not use harsh/abrasive cleaners, waxes, polishes, or commercial cooktop cleaners. Dry completely.
- Control Panel, Door Handle, Control Housing: Clean with mild detergent and warm water. Do not use abrasive cleaners. Dry with a soft, lint-free cloth.
- Side Racks: Pre-soak stubborn soiling, clean with mild detergent and hot water, wipe dry, or clean in dishwasher.
- Oven Shelves: Scrub stubborn soiling with dampened, soap-filled, non-metal, non-abrasive pad, wipe dry. Apply chrome cleaner.
- Broil/Roast Pan and Slotted Grid: Pre-soak stubborn soiling, wash by hand or in dishwasher.
- Bake and Broil Burners: Self-clean during normal use; do not clean these parts.
- Porcelain Surfaces (oven interior, inner door liners): Clean with mild detergents and hot water. Rinse and dry with a soft, lint-free cloth. Do not use abrasives or commercial oven cleaners.
- Oven Window: Clean with mild detergent and hot water or mild glass cleaner. Dry with a soft, lint-free cloth.
- Oven Door Gasket: Do not clean this part. If large food particles need removal, dampen a sponge with hot water, gently wipe, and press with a dry towel. Do not rub or use cleaning agents.
- Stainless Steel Surfaces: Do not use chlorine bleach or steel wool pads. Use a hot, damp cloth with mild detergent, then a clean, hot, damp cloth to remove soap, and dry with a dry, clean cloth.
Replacing Parts:
- Burner Parts: Illustrations show the components (burner cap, inner burner base, outer burner head, ignitor, thermocouple, burner base cup). Ensure locating pins on the brass flame spreader align with holes on the simmer ring. Incorrect alignment can cause dangerous flames.
- Oven Door:
- Open door fully.
- Open levers fully on both sides.
- Hold door firmly, close halfway.
- Disengage hinges and remove.
- To replace:
- Hold door firmly in a halfway open position.
- Insert hinge tongues into slots, ensuring notches drop into place.
- Open door fully.
- Close levers fully, then close door.
- Oven Light Bulb: Release glass cover on lamp holder, remove old bulb, replace with new bulb.
Troubleshooting:
- Cooktop ignition/hotplate burners faulty: Check power, igniter/burner slot blockage, correct placement of burner trim/caps, gas supply, and if sparkers activate.
- Cooktop burner flames large/yellow: Check correct placement of burner head/caps, and if burner ports are blocked. Clean with fuse wire.
- Noisy oven fan: Normal as oven heats up.
- Installation problem: Service organizations charge for call-outs if correcting original installer's work.
- Food cooking too slowly/quickly/burning: Cooking times may differ from previous oven. Check recommended temperatures/shelf positions. Oven settings are a guide; adjust to individual tastes.
- Oven not cooking evenly: Turn large items during cooking. Ensure space for heat circulation if using two shelves. Center baking trays. Check door seal. Level the range if necessary.
- Oven not coming on: Check power supply and circuit breaker.
- Oven temperature getting hotter as range gets older: May need a new thermostat (fitted by qualified service person).
- Oven light not working: Bulb may be burnt out. Replace bulb after turning off power and allowing oven to cool.
Warranty and Service:
- Manufactured by KUCHT LLC, 700 Route 46 West Unit #3, Clifton, New Jersey 07013.
- Applies to products purchased and located in the United States.
- Full warranty for Parts and Labor: 2 years.
- Implied warranties terminate upon expiration of the limited warranty.
- KUCHT LLC pays for repair labor and replacement parts for defects in material/workmanship by an Authorized Service Agency during normal working hours.
- Contact (866) 685-8248 / (866) 68 KUCHT for service.
- Warranty exclusions: Damage from abuse, accident, natural disaster, electrical power loss, alteration, outdoor use, improper installation/operation, repair by unauthorized personnel. Service to instruct on use, correct house wiring/fuses, or installation. Cosmetic damage not reported within 30 days. Costs for removal for repairs (service is in-home). Damage from misuse, unapproved consumables/cleaning products. Service to repair/replace consumable parts. Removal/reinstallation if installed in inaccessible location or not per instructions. Void if serial number altered/removed. Repairs from unauthorized modifications. Travel/transportation expenses for service in remote areas.
- Warranty applies to personal/family/household use, not commercial.
- Warranty extends to new owner if sold during warranty period.
- KUCHT LLC is not responsible for incidental or consequential damages; liability will not exceed product cost.
- Users should provide proof of purchase or installation date for in-warranty service.