Troubleshooting
Repairs may only be carried out by a qualified tecnician!
Check first whether you have made a mistake in operating the controls. You
can rectify some faults yourself, or call the service centre to carry out the re-
pairs, as indicated
Fault Cause Remedy
Not possible to
switch oven.
Electronic component
defect.
Disconnect fuse, call the
service centre.
Oven does not heat
up.
Fuse defect. Check or replace fuse.
Oven temperature
control or function
switch has not been
switched on.
Set oven temperature
control or function switch
as
required.
Oven light no longer
works.
Light bulb defect. Call service centre to
replace the light bulb.
Oven door glass is
broken.
Switch off cooker,
call service centre.
Strong smells from
oven inspite of
ökotherm
catalyst.
ökotherm
catalyst
must be regenerated.
Heat the empty oven by
intensive-hot air-convection
at maximum temperature
for 60 mins.
Strong vinegar smell
when preparing.
Sour doughs,
yeast doughs,
dishes with alcohol.
Unavoidable odours.
Fruit juice or protein
stains on enamelled
parts.
Moist cake or meat
juices.
Harmless changes in the
enamel, cannot be
remedied.
Installation instructions for fitter
Only Küppersbusch fitted hobs have been designed and tested for use
on top of a Küppersbusch fitted oven. Other hobs must not be used.
Küppersbusch fitted ovens may only be connected to the corresponding
Küppersbusch fitted hobs by a qualified and authorised fitter.
Statutory regulations and the connection specifications issued by the
local power apply company must be strictly observed.
Safeguard the cooker by means of line-protecting switches, fuses or con-
tactors with at least 3 mm contact opening width.
Switch off the cooker by means of these safety devices before con-
necting up the oven, carrying out repair work or replacing the oven light
bulb.
It must not be possible to touch components which are insulated under
operating conditions.
The earth wire must be so long that if the mains lead cleat fails, the live
wires of the connecting cable are subjected to tension before the earth
wire.
Electrics
WARNING! This appliance must be earthed!
Electrical requirements (for UK and Republic of Ireland only)
Check that the voltage stamped on the rating plate corresponds with your
house electricity supply, which must be AC (alternating current).
Electrical connection of the apppliance must be performed by a trained
electrician. The legally recognized regulations and the connection require-
ments of the electricity board seving your area must be fully complied with.
WARNING! Should the oven be supplied with a continental two-pin
plug fitted, then this plug must be cut off from the connection cable.
Dispose of the plug safely; do not insert it in a 13 A socket elsewhere
in the house as this could cause a shock hazard.
UK and Republic
of Ireland only
Permanent connection to an oven power po-
int.
Other countries Connection by means of an earthed plug
socket.
Connection values 400 V 2 N
∼
50 Hz (240 V N
∼
AC in UK)
for connection 2N
∼
fuse rating 16 A
for connection 1N
∼
fuse rating 20 A
Use H05 RR-F or H07 RN cable length aro-
und 2 meters.
Heating element voltage: 230 – 240 V
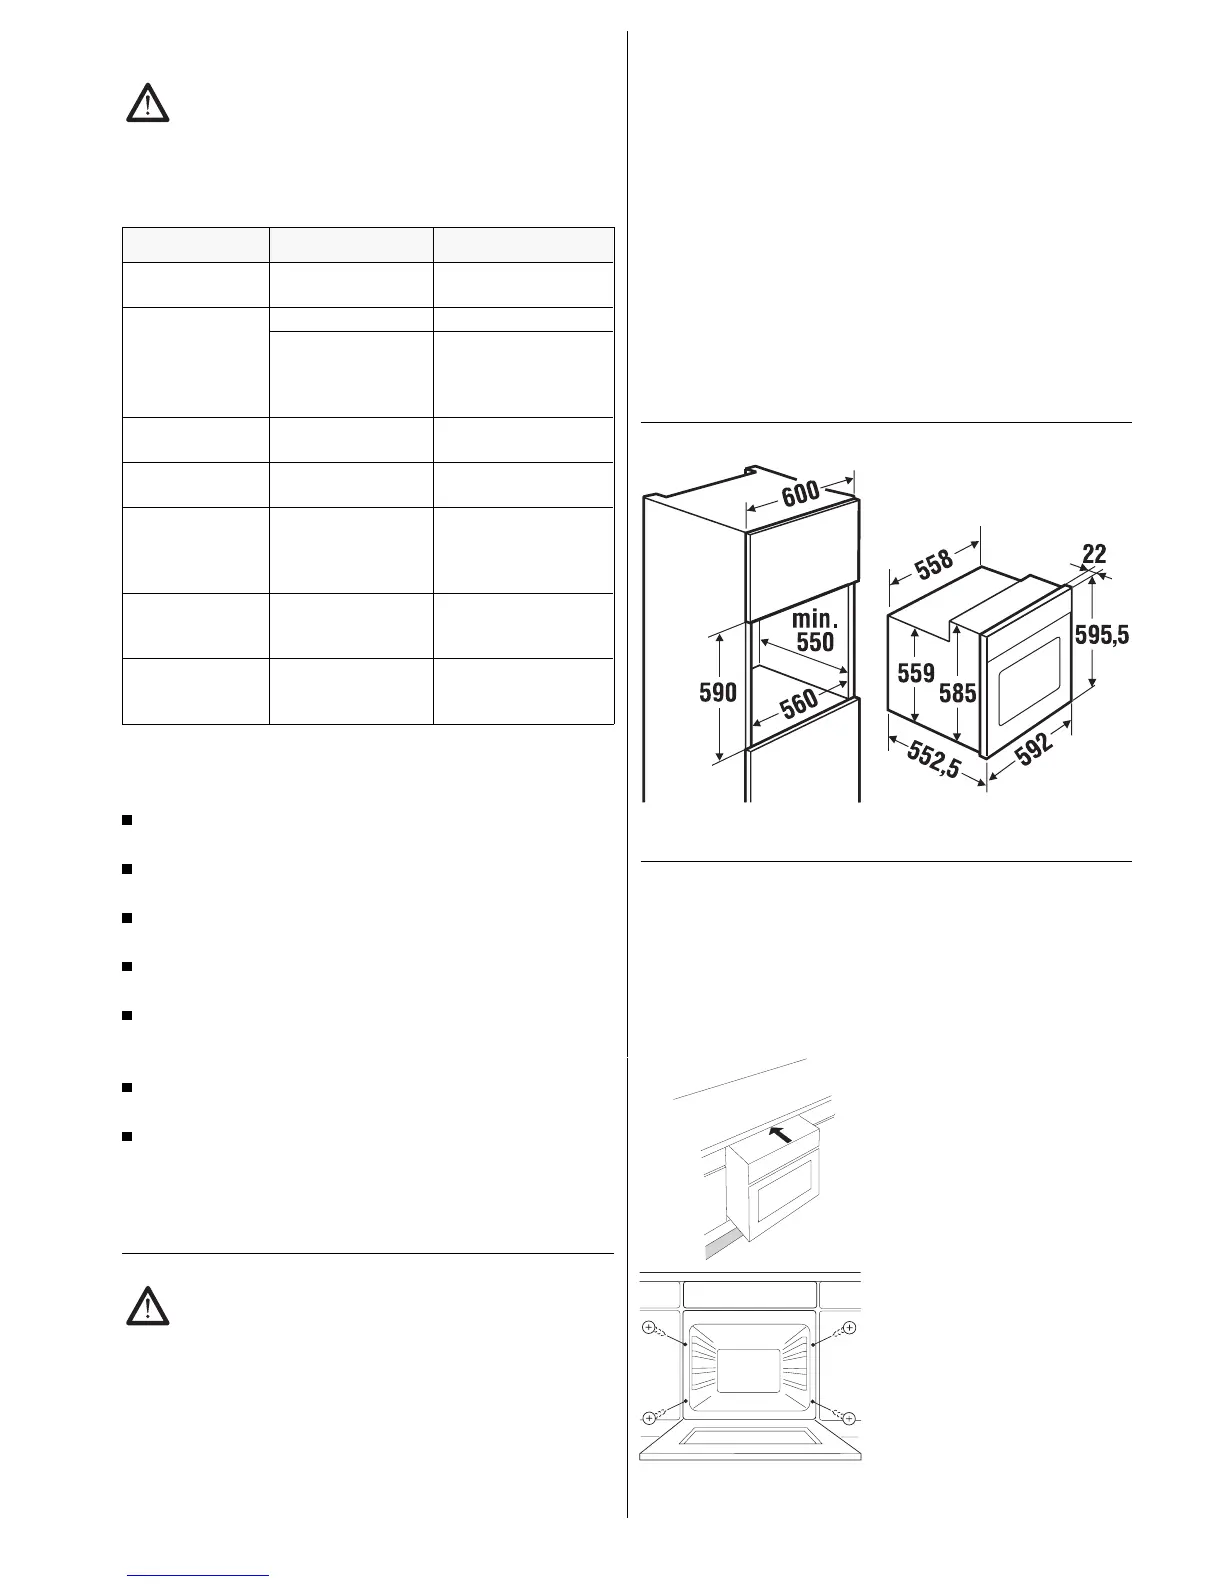
Installation dimensions
Installation in a fitted kitchen
The cooker is Y-type design, providing overheating protection for surroun-
ding surfaces (fitted cupboard components). The plastic coating or veneer
must be applied with a heat-resistant adhesive (100 °C). This adhesive pre-
vents the surfaces from warping or working loose.
This cooker can be placed with its back wall and one side wall next to cup-
board or room walls of any height. The other side wall may only be placed
next to a fitted cupboard of the same height at the most.
The cooker must be installed absolutely horizontally.
Installing the oven
Connect the plug to the socket.
Push the oven right into the cupboard
alcove. Do not jam the connecting cable!
Fastening the oven
Open the oven door.
Screw the cooker to the fitted cup-
board element using the enclosed
screws from inside outwards, starting
at a slant.
24 EEB 620.0



 To Previous Page