Section 2.0 - Set Up & Start Up
Work Safely. Always wear safety glasses near the machine.
Because of the fast speeds and extremely high acceleration rates caution should be taken to keep the operator
aware of pinch points, moving slides and sudden motions.
Select a steady work bench or machine base to support the Kwikmark. Because of the high speeds and accelerations
during operation a solid top such as butcher block maple or metal works best. The work area should have an approximate
22 inch deep by 36 inch wide open space for the machine clearance, cabling, etc.
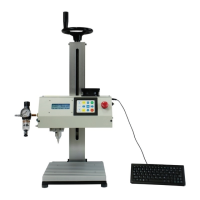
Carefully remove the Kwikmark from its box, place it on the bench and inspect the unit in general to verify that no damage
has taken place during shipment.
Assemble the handwheel to the top of the vertical leadscrew on the upright column. Assemble the lter/regulator/gage unit
to the valve on the left side of the machine. These components are removed for shipping to minimize chance of damage
during transit.
When the Kwikmark and accessories are in position at your work area, begin the following procedures:
1. Turn o power switch (press E-Stop) before plugging the unit into your power outlet.
2. Connect the keyboard to the ps-2 (mini-din) receptacle located on the side of the machine.
See Diagram 2 in Section 6 Machine Diagrams
3. Connect a 25- 80 PSI clean and ltered air line to the pneumatic air prep input on the side of the machine.
The input tting is 1/8th NPT thread. This is directly connected to the lter, gauge and regulator also at the
side of the machine. See Diagram 2 in Section 6 Machine Diagrams
4. If using the optional KwikTurn cylindrical attachment, connect the yellow signal cable to the 5 pin hex I/O
connector also located on the side of the machine. See Diagram 2 in Section 6 Machine Diagrams
5. Plug the 110 power cord to your power source. Requirement is: 110-220 VAC, 50-60Hz, 2.5 Amp service.
See Diagram 2 in Section 6 Machine Diagrams
Machine Set Up