Do you have a question about the Kyosho INFERO MP9 TKI3 readyset and is the answer not in the manual?
Emphasizes this is a functional model, not a toy, for users over 14.
Advice for assembly, handling small parts, and keeping manual.
Guidance on choosing safe locations and insurance.
Explains warning and prohibition symbols used in the manual.
Clarifies it's a functional model for users over 14 years old.
Guidance on proper assembly, maintenance, and using option parts.
Warnings about improper use of batteries, potential for damage.
Instructions to follow for safe operation of the model.
Warning about small, sharp parts and keeping them away from children.
Prohibits operation near roads, crowds, or children.
Alerts to potential loss of control with low transmitter battery power.
Advise to stop and check if the model behaves strangely.
Lists specific locations where operation is not permitted.
Detailed instructions for safe handling of fuel, including outdoor use and fire prevention.
Caution against inserting fingers or objects into moving parts.
Warning about touching hot engine and muffler parts after operation.
Emphasizes careful handling of tools like cutters and screwdrivers.
Advises painting in a well-ventilated area with caution.
Ensures power is off and batteries are removed when not in use.
Advises against storing the model in hot, humid, or direct sunlight conditions.
States the body shell must always be mounted when running the car.
Recommends periodic checks for loose screws and nuts.
Lists specific terrain types and locations to avoid for operation.
Warns against using non-genuine parts or modifying the model.
Lists the tools provided with the model kit.
Lists necessary items for the transmitter, like batteries.
Lists necessary items for the car, like batteries and fuel.
General cautions regarding battery usage and compatibility.
Identifies the included transmitter model and its basic layout.
Explains how to adjust steering angle limits.
Describes how to adjust steering trim for straight running.
Details the function of the power switch.
Explains how to reverse servo operation direction.
Describes the function of the steering wheel.
Describes the function of the throttle trigger for speed and braking.
Shows how to access the battery compartment.
Warns that only the included transmitter can be used.
Step-by-step guide for inserting batteries into the transmitter.
Indicates when to replace transmitter batteries based on LCD voltage.
Warns of potential loss of control if transmitter batteries are low.
Explicitly states Oxyride batteries cannot be used.
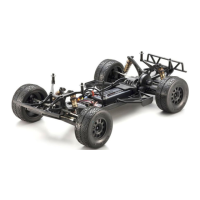
Identifies key parts of the car chassis.
Lists gearbox and differential components.
Identifies front and rear shock units.
Identifies engine, fuel tank, muffler, and air filter.
Identifies power switch, radio box, and servos.
Steps for removing the car's body shell.
Guides on installing the battery box for the receiver.
How to turn the transmitter on/off.
Explains how to reverse steering and throttle directions.
How to turn the chassis power on.
Step to turn on the transmitter power.
Step to turn on the receiver power.
Process for synchronizing transmitter and receiver.
How to confirm successful binding via LED indicator.
Guide for setting up the fail-safe function for safety.
How to check and adjust steering response.
Explains how to use the D/R adjuster for steering angle.
Setting the D/R adjuster for a lesser steering angle.
Setting the D/R adjuster for a greater steering angle.
Adjusting steering trim to make front tires run straight.
Identifies and names the various parts of the engine.
Explains the role of the throttle lever in engine RPM control.
Describes the carburetor's function of mixing air and fuel.
Explains how the needle valve adjusts fuel mixture.
Details the function of the throttle stop screw for idling.
Explains the glow plug's role in igniting the fuel mixture.
Describes how to start the engine using the recoil starter.
Explains the function of the screw for adjusting low-speed mixture.
Describes the purpose of the air filter.
Specifies the type of fuel required for the model.
Recommends using high-performance glow plugs.
Explains the use of booster cords or plug heaters.
Describes the utility of a plug wrench for maintenance.
Highlights the usefulness of a fuel filter for refueling.
Notes that the KE21R carburetor is pre-set for initial break-in running.
Instructions for filling the fuel tank, emphasizing cleanliness.
Method for drawing fuel into the carburetor for starting.
Process of heating the glow plug for ignition.
How to pull the recoil starter rope correctly.
When and how to remove the booster cord after starting.
Driving the car with a rich fuel mixture for the first few tanks.
Advice on adjusting needle settings for harder running and temperature monitoring.
Specifies the initial setting for the needle valve.
Specifies the initial setting for the idle adjusting screw.
Emphasizes that engine adjustments should be made while the car is running.
Details the initial setting for the high-speed needle.
Details the initial setting for the low-speed needle.
Mentions that adjustments may vary based on glow plug and fuel type.
Repeats that the KE21R carburetor is pre-set for break-in.
Instruction to add fuel to the fuel tank.
Steps for priming the carburetor by covering the intake and pulling the starter.
Guide on attaching the glow plug heater for ignition.
How to pull the recoil starter rope for engine start.
When to detach the glow plug heater after the engine starts.
Driving the car with a rich mixture for the first few tanks as break-in.
Guidance on setting the needle for demanding running conditions.
Instruction to drain all fuel from the tank after use.
How to drain residual fuel from inside the engine.
Method for cleaning the engine's exterior using brushes and cleaners.
Strict warning against using gasoline or thinner for cleaning due to fire risk.
Specifies the type of fuel required, including nitro-methane content.
Recommends using high-quality glow plugs.
Explains the need for a glow plug connector and battery.
Identifies the tool needed for glow plug installation/removal.
Mentions the usefulness of a fuel filter and bottle for refueling.
Steps to fuel the model and set the carburetor to idle.
Method to draw fuel into the carburetor by covering the air intake.
Instruction to connect the glow plug battery for ignition.
Guidance on pulling the starter rope with appropriate force and length.
When to detach the glow plug connector after engine start.
Driving with a rich fuel mixture for break-in purposes.
Details the initial setting for the main needle valve.
Explains how to adjust the idle speed using the adjustment screw.
Strong warning against touching hot engine parts to avoid burns.
Recommends using specific Racing Fuel for models.
Notes that a glow plug is included and how to replace it.
Mentions the included glow plug starter and its potential variations.
Identifies the tool needed for glow plug replacement.
Highlights the usefulness of a fuel filter and rapid refill pipette.
Confirms the KE21R carburetor is pre-adjusted for break-in.
Instructions for filling the fuel tank with special modeling fuel.
Method to prime the engine by covering the carb and pulling the starter.
Step to place the glow plug starter on the plug to ignite it.
Caution on maximum pull length for the starter rope to avoid damage.
When to remove the glow plug starter after the engine starts.
Notes that adjustments may vary based on piloting style and temperature.
Confirms pre-set positions for needle and idle screw for break-in.
Adjusting the main needle for engine RPM control.
Adjusting the idle speed of the engine.
Critical warning against touching a hot engine to avoid severe burns.
Instructs to drain all fuel from the tank after use.
How to drain residual fuel from inside the engine to prevent issues.
Guide for cleaning the engine's exterior using brushes and compressed air.
Strict warning against using incorrect fuels or cleaners due to fire hazard.
Recommends Racing Fuel for all Kyosho R/C models.
Notes a glow plug is included and advises consulting a retailer for replacement.
Explains the use of a glow plug heater for electrification.
Identifies the necessary tool for glow plug removal/installation.
Highlights the utility of a fuel filter and refill bottle.
States that needle and low-speed screws are pre-adjusted for break-in.
Explains how to adjust the needle for optimal air/fuel mixture.
Details the adjustment of the air/fuel mixture using the low-speed screw.
Warning against touching a hot engine, only adjusting the needle.
How tightening the idle screw increases engine RPM.
Identifies the idle screw for RPM adjustment.
Describes the condition for stable idle: flywheel rotating, clutch bell static.
Emphasizes performing adjustments with the car on the ground to avoid damage.
Instructs to empty the fuel tank after break-in driving.
How to remove residual fuel from inside the engine to prevent oxidation.
Guides on cleaning the engine's exterior with a brush and compressed air.
Critical warning against using gasoline or thinners for cleaning due to fire risk.
Method to stop fuel flow by pinching the fuel tube.
Warning about hot engine parts and dangerous rotating components.
Procedure to turn off the receiver and transmitter after stopping the engine.
Addresses the issue of the starter cord being difficult to pull.
Identifies excessive fuel as a cause for starting failure.
Covers issues when the starter cord can be pulled but the engine doesn't start.
Indicates a lack of fuel reaching the carburetor.
Suggests checking carburetor opening if fuel is not reaching it.
Points to a non-glowing glow plug element as a cause.
Suggests replacing batteries in the glow plug heater.
Recommends replacing the glow plug if it's not functioning.
Notes that low temperatures can affect engine performance.
Describes issues related to the engine overheating.
Addresses problems caused by a blocked or clogged carburetor.
Explains issues arising from a blocked air filter.
Points to improper engine settings as a potential problem.
Provides a list of available spare parts with part numbers and prices.
Advises on proper transmitter holding and antenna orientation.
Suggests practicing gentle throttle and steering movements.
Recommends practicing repeated throttle squeezing and releasing for speed control.
Practice holding the transmitter to get familiar with steering direction.
Guides on adjusting the D/R adjuster for steering response.
Setting the D/R adjuster for a reduced steering angle.
Setting the D/R adjuster for an increased steering angle.