Do you have a question about the La Crosse CA79103/V11 and is the answer not in the manual?
Guide on powering up the weather station and sensors.
Guide to downloading and launching the La Crosse View mobile application.
Steps to connect the station to your home Wi-Fi network via the app.
Process for adding detected sensors to your La Crosse View app.
Manual process for adding sensors if automatic detection fails.
How to manually configure language, time, date, and other station preferences.
Explanation of the function of each button on the weather station.
Adjusting the backlight intensity of the LCD display.
Programming the display to automatically dim during selected hours.
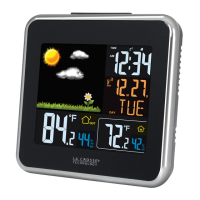
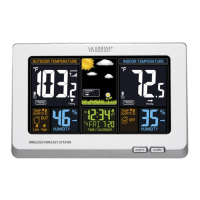
Understanding the time and calendar display elements on the station.
Detailed explanation of temperature and humidity readings on the display.
Explains various icons and readings related to temperature and humidity.
How to view history records and understand the outdoor comfort meter.
Setting and managing temperature and humidity alerts.
Understanding the weather forecast information displayed by the station.
Details on the different weather forecast icons and their meanings.
Using buttons to view daily and hourly forecast predictions.
Information on the station's internal barometer and relative pressure readings.
Proper placement and mounting instructions for sensors.
How to add and display data from extra sensors.
Technical details and requirements for the station and sensors.
Details on the product's warranty coverage and contact information.
Environmental guidelines for product disposal and recycling.
Regulatory compliance statement for Canada.
Steps to perform a factory reset on the station.
This document serves as a setup and user guide for the La Crosse Technology Wi-Fi Color Forecast Station, model number CA79103/V11. It details the initial setup, connection to the La Crosse View app, station settings, button functions, display brightness, time and calendar display, temperature and humidity data viewing, alert settings, forecast data, pressure readings, and sensor placement and mounting.
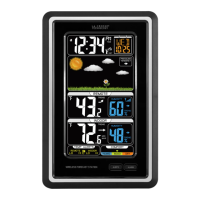
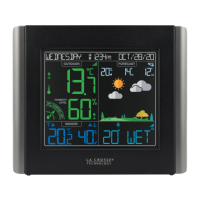
The La Crosse Technology Wi-Fi Color Forecast Station is a versatile device designed to monitor indoor and outdoor environmental conditions, provide weather forecasts, and offer additional sensor integration for comprehensive home monitoring. It features a color LCD display that presents a wide array of data, including time, date, day of the week, indoor and outdoor temperature and humidity, chance of precipitation, daily forecasted high and low temperatures, and various weather forecast icons. The station can operate as a standalone unit, displaying data based on its internal barometer, or it can be connected to Wi-Fi to access enhanced AccuWeather forecasts and time updates from the internet. Through the La Crosse View app, users can stay connected to their home conditions remotely, receive alerts, and manage additional sensors. The station supports add-on sensors such as thermo-hygro sensors and water leak sensors, expanding its monitoring capabilities.
The station's initial setup involves powering up the main weather station by inserting the 5V power adapter and removing the insulation tab from the battery compartment. For the thermo-hygro sensor, two fresh "AA" batteries should be installed, and for the water leak sensor, two fresh "AA" batteries are also required after removing the front cover. It may take up to 10 minutes for sensor data to appear on the station's screen.
Connecting the station to the La Crosse View app is optional but recommended for unlocking advanced features. Users can download the free La Crosse View app from the App Store or Google Play Store and follow the on-screen setup instructions. The app allows users to monitor home conditions and set alerts. To connect the station to a Wi-Fi network, the app provides detailed instructions. For initial setup, users tap "Add Device" in the app, while for reconnecting, they tap "Connect Wi-Fi." A solid Wi-Fi indicator on the display confirms a successful connection. The station's Wi-Fi status can be checked by pressing the dedicated button on the top of the station.
Adding sensors to the app is facilitated by an "Add Device" notification that appears in the app within 15 minutes of the station connecting to Wi-Fi. Users can tap this icon to add sensors or manually add them by scanning the barcode on the sensor or typing in the Device ID. The app allows users to add a device name and location name for each sensor.
Station settings can be manually adjusted by holding the settings button. This menu allows users to set language, beep on/off, 12/24 hour time, hour, minute, year, month, date, calendar order (Month/Date or Date/Month), Celsius/Fahrenheit units, pressure units (hPa/InHg), and pressure number setting. The +/- buttons are used to adjust values, and the settings button confirms selections.
The LCD display brightness can be adjusted through four levels, plus an off option, by pressing the light button. An auto-dim feature can be programmed to automatically dim the display during preselected times.
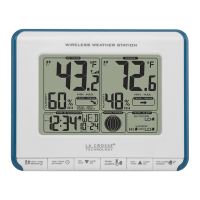
The display shows various time and calendar information, including the day of the week, Wi-Fi icon (indicating active Wi-Fi connection), auto-dim icon (indicating active auto-dim setting), 12/24 hour time display (which updates automatically when connected to Wi-Fi), low battery indicator for the station, and calendar (with selectable order).
Temperature and humidity data are prominently displayed. The outdoor section shows a low battery icon for the thermo-hygro sensor, outdoor high/low temperature alert icons, sensor reception indicator, outdoor comfort meter, outdoor temperature, and outdoor humidity. The indoor section displays indoor high/low temperature alert icons, indoor high/low humidity alert icons, indoor temperature, and indoor humidity. Records of indoor/outdoor temperature and humidity history with time and date stamps can be viewed by pressing the temperature button. Individual records can be reset by holding the minus button until dashes appear. The outdoor comfort meter indicates the comfort level based on current relative humidity.
Temperature and humidity alerts can be set by holding the alerts button. Users can adjust alert settings using the +/- buttons and confirm with the alert button. Active alerts are indicated by specific icons on the LCD. Alerts can be activated or deactivated by pressing and releasing the alert button.
Forecast data is presented with an internet icon (indicating AccuWeather forecasts when connected to Wi-Fi), chance of precipitation, daily forecasted high and low temperatures, and forecast icons that predict weather conditions. Seasonal trees in the forecast section change seasonally. When connected to Wi-Fi, the station displays additional weather icons and enhanced forecast information powered by AccuWeather. Daily and hourly forecast buttons allow users to scroll through future forecasts. The display also features day/night forecast icons, showing a sun icon during daylight hours and a moon icon during nighttime hours for sunny or partly sunny forecasts.
Relative pressure readings are derived from the station's internal barometer. The display shows pressure tendency arrows and allows users to select desired units (hPa or InHg) and set a specific pressure number.
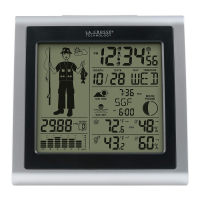
The station supports additional add-on sensors, such as water leak sensors. Water leak sensor data shares the same display area as pressure readings. The EXTRA button allows users to toggle through data from extra sensors and pressure readings. An auto-scroll feature can be activated to cycle through available readings, with the auto-scroll icon appearing and sensor icons blinking every 2 seconds.
The manual provides guidance on sensor placement and mounting. For the water leak sensor, it should be placed on a floor, detecting water at 0.787mm. If hung vertically, it requires at least 6.35mm of water to trigger. Important: metal contacts on the sensor should not touch other metal to avoid false readings and damage. LED lights on the water leak sensor indicate normal transmission (blue flash), water detected (red flash), and low battery (purple light).
For the thermo-hygro sensor, it can be hung using a nail or mounted with a screw. It should be mounted on a north-facing wall or in a shaded area, preferably under an eave or deck rail, to avoid inaccurate readings from the sun. The sensor should be mounted vertically to allow moisture to drain properly. The maximum wireless transmission range is up to 121 meters (400 feet) in open air.
The manual also includes a "Care and Maintenance" section, advising against mixing old and new batteries, or different types of batteries. It emphasizes purchasing the correct size and grade of battery, replacing all batteries of a set at the same time, cleaning battery contacts, ensuring correct polarity, removing batteries if not used for an extended period, and promptly removing expired batteries. Users are cautioned against exposing the device to extreme temperature, vibration, or shock. Cleaning should be done with a soft damp cloth, avoiding solvents or scouring agents. The product is not a toy and should be kept out of reach of children. It is intended for home use only and not for medical purposes. Improper use or unauthorized opening of the housing voids the warranty. If the product is not working properly, changing batteries and/or checking the AC cord connection is recommended.
A factory reset option is available by pressing and holding the light and Wi-Fi buttons simultaneously until the display beeps, which can help resolve persistent issues.
| Brand | La Crosse |
|---|---|
| Model | CA79103/V11 |
| Category | Weather Station |
| Display Type | LCD |
| Indoor Temperature Range | 32°F to 122°F (0°C to 50°C) |
| Outdoor Temperature Range | -40°F to 140°F (-40°C to 60°C) |
| Indoor Humidity Range | 10% to 99% RH |
| Outdoor Humidity Range | 10% to 99% RH |
| Transmission Range | 300 feet (91 meters) |
| Time Display | Yes |
| Calendar Display | Yes |
| Alarm | Yes |
| Backlight | Yes |
| Wireless Transmission | Yes |
| Power (Sensor) | 2 x AA batteries (not included) |
| Mounting Type | Wall or Tabletop |