Do you have a question about the lavina 25-X and is the answer not in the manual?
Terms for returning LAVINA® X machines for credit or repair, requiring authorization.
Information about Superabrasive, its founding and mission.
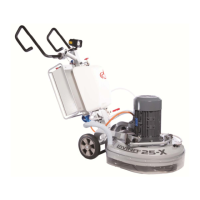
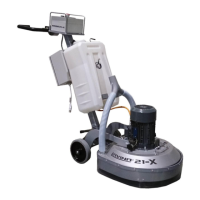
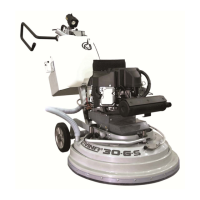
Overview of the Lavina® X machine's intended use and capabilities.
Details on the Lavina® X machine's main components and design features.
Recommended temperature range and conditions for operating the machine.
Guidance on proper electrical connection and safety precautions.
Specifies the intended applications for the Lavina® X machine.
Lists applications and environments where the machine must not be used.
Essential checks and preparations before operating the machine.
Details on built-in safety devices and their importance.
Describes methods for arresting the machine's motor.
Addresses residual risks and how to minimize them for safe operation.
Identifies inherent risks during normal operation and maintenance.
Critical pre-operation checks and safety guidelines.
Guidelines for safe operation of the machine.
Procedures for shutting down and securing the machine.
Safety considerations for maintaining a safe work environment.
Mandatory safety gear for operating the machine.
Requirements and responsibilities for the machine operator.
Step-by-step guide to separating machine components for transport.
Instructions for changing the machine's position for tool mounting.
Guidance on safely lifting the machine using appropriate equipment.
How to adjust the handle height for ergonomic operation.
Essential checks to perform before starting machine operation.
Explanation of the water spray direction and flow control.
Procedures for attaching and securing tools to the machine.
Identification and function of controls on the machine's panel.
Step-by-step instructions for safely starting the machine.
Guidelines for proper machine operation and technique.
Procedures for safely stopping the machine.
Explanation of alarm indicators and reset procedures.
Information on additional weights to enhance machine productivity.
Usage of the key for adjusting and mounting plates.
Description of foam plates for mounting diamond tools.
Function of the security plate for securing pads.
Features of the QuickChange system for fast tool changes.
Details on ceramic bond discs for scratch removal.
Information on resin formula discs for polishing applications.
Pads for mechanical polishing and restoring concrete.
High-quality diamond-integrated pads for floor maintenance.
Importance and procedures for keeping the machine clean.
Daily inspection checklist for the machine and its parts.
Scheduled inspection tasks for every 200 operating hours.
Scheduled inspection tasks for every 400 operating hours.
Checks related to the vacuum system and hoses.
Procedures for addressing water leaks to prevent damage.
Maintenance for wear-prone mechanical components.
Maintenance advice for the electrical system and dust prevention.
An index to help locate specific troubleshooting topics.
Instructions for replacing the power cord and plugs.
Procedure to dismount tool holders for V-ring and felt-ring replacement.
Steps for disassembling the tool holder to replace buffers and elastic elements.
Guide to adjusting the tension of the planetary chain.
Instructions for replacing the planetary chain.
Procedure for replacing the planetary driving chain wheel and tensioner.
Steps for tensioning and replacing the machine's timing belts.
Guide to replacing the driven planetary gear (sprocket).
Instructions for removing and replacing pulley units.
Procedure for replacing the planetary unit.
Guidance on making motor connections during replacement.
Troubleshooting guide for Yaskawa V1000 inverter faults and errors.
Overview of parts and their assembly for the Lavina® X machine.
List of general spare parts for the Lavina® 25-X model.
Specific spare parts for the first section of the top cover.
Specific spare parts for the second section of the top cover.
Spare parts related to the guard assembly.
Spare parts for the first section of the bottom cover.
Spare parts for the planetary drive system.
Spare parts for the pulley unit assembly.
Spare parts for the second section of the bottom cover.
Spare parts for the water tank assembly.
Spare parts for the tool holder assembly.
Spare parts for the planetary belt revision kit.
Spare parts for the carriage assembly.
Spare parts for the control box assembly.
| Brand | lavina |
|---|---|
| Model | 25-X |
| Category | Floor Machine |
| Language | English |