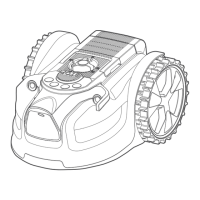
This document is an instruction manual for the LawnMaster® VBRM16 robotic lawnmower, a 16cm MX 24V Lithium-Ion Cordless Robotic Lawnmower (Tool Only).
Function Description
The LawnMaster® VBRM16 robotic lawnmower is designed to independently mow lawns in a random pattern without the need for a boundary wire or a charging station. It operates only during daylight hours. The mower uses grass detection to identify areas to mow and is equipped with ultrasonic sensors to detect obstacles taller than 6 cm, such as shrubs and fences. When the mower does not detect grass or encounters an obstacle, it changes direction randomly and resumes mowing in a new direction. The mower can be moved to different lawn areas, provided they are defined according to the instructions.
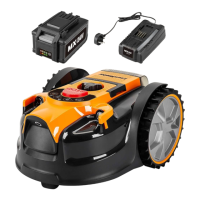
The mower utilizes a detachable MX 24V battery, which is compatible with all products in the LawnMaster® 24V 24V range. It is intended for use once or twice a week for several hours and should be stored away when not in use. It can mow approximately 100m² on a single charge, depending on lawn conditions. For optimal performance and a neat lawn finish, it's recommended to maintain a regular mowing schedule and avoid excessively long or wet grass.
For first operation, it's crucial to monitor the robot as it detects edges to identify areas where boundary definition might need improvement. Trimming lawn edges with a grass trimmer before use can help define a better lawn edge. The manual provides useful ideas for temporary boundaries and examples of how to define a better lawn edge across seasons.
Important Technical Specifications
Dimensions:
- Length: 42.5 cm
- Width: 35 cm
- Height: 22 cm
- Weight (Without 4.0Ah Battery): 5.9 kg
Mowing:
- Voltage: 24 V ===
- No Load Speed: 3500 /min
- Cutting System: 3 Pivoting Cutting Blades
- Cutting Width: 16 cm
- Cutting Height Adjustment: 20-60mm (5 Positions)
- Power Consumption during Cutting: 40 W ±20%
- Maximum Slope for Cutting Area: 35%
- Working Capacity (Depending on Product Specification): < 100 m²
- Average Mowing Time (2 cm Dry cut): 180 min
- IP-Classification: IPX4
Charger (Model No. 24LFC12):
- Charger Input: 200-240V~50/60Hz 110W
- Charger Output: 24V === 4.0A
- Charging Period (Battery Fully Discharged): 60min (For 24LB4005-C)
- Weight of Charger: 0.5kg
- Insulation Protection of Charger: Class II (Double insulation)
Battery (Model No. 24LB4005-C):
- Rated Voltage of Battery: 24V ===
- Capacity of Battery: 4.0Ah
- Battery Type: Lithium-Ion
- Weight of Battery: 0.7kg
Noise Emissions:
- Sound Power Level (LWA) Measured: 64 dB(A)
- Noise Emissions Uncertainties KWA: 3 dB(A)
- Sound Power Level (LWA) Guaranteed: 68 dB(A)
- Sound Pressure Level (LPA) at the Operator's Ear: 57 dB(A)
Usage Features
Control Panel (Fig. 16):
- START/ON Button (1): Long press for 3 seconds to power on. Press after selecting a cutting mode to start mowing.
- Battery Indicator (2):
- Green, Continuous: Sufficient power/ready for mowing.
- Red, Continuous: Recharge required.
- Red, Flashing: Abnormal battery temperature or electric core fault.
- Auto Mow Button (3): Long press for 2 seconds to select random auto cutting mode, then press START/ON.
- Error Indicator (4):
- Off: Normal operation.
- Yellow, Continuous: Lift sensor activated, obstruction sensor activated, mower tilted, rear wheels lifted (slipping), mower fallen over, STOP button pressed, or mower cannot see grass.
- Red, Continuous: Sensor error, motor fault, or operation system error.
- Spot Cutting Button (5): Long press for 2 seconds to select spot cutting mode, then press START/ON.
- Ultrasonic Indicator (6):
- Green, Continuous: Ultrasonic function is on.
- Off: Ultrasonic function is turned off.
- Yellow, Flashing: Mower has a communication issue with the camera.
- Ultrasonic On/Off Button (7): Single press to toggle the ultrasonic function.
Mowing Modes:
- Auto Cutting: Mows in a random pattern. Blades spin after 5 seconds of continuous running. Mower searches for a suitable working area and changes direction if no grass is detected within 5 seconds.
- Spot Cutting: Mows in a spiral outwards from its starting point, covering approximately 2 square meters. After completion, it switches to random pattern mowing. Useful for tidying specific areas or systematically cutting main lawn areas before random mowing.
Cutting Height Adjustment (Fig. 17):
- Adjustable from MIN (20 mm) to MAX (60 mm) using the cutting height adjustment knob (2).
- Turn clockwise to raise, anti-clockwise to lower.
- Recommended to start with a higher cutting height (40 mm) for the first few weeks and gradually lower it.
Battery Operation:
- Uses a detachable MX 24V Lithium-Ion battery (sold separately).
- Battery LED Indicators (on the battery pack) show charge level:
- 4 LEDs (inc 2 green): Fully charged
- 3 LEDs (inc 1 green): ≥ 50%
- 2 LEDs (orange & red): ≥ 25%
- 1 LED (red only): < 25%, recharge required.
- Charger indicators (Fig. 18) show charging status:
- Red, flashing: Charging paused (e.g., due to temperature).
- Red, continuous: Connected to power supply (standby).
- Green, flashing: Charging.
- Green, continuous: Fully charged.
Safety Features:
- Isolator Key (9): Must be removed before working on or lifting the machine, and when not in use.
- STOP Button (3): Immediately stops the mower in case of accident or breakdown.
- Ultrasonic Object Sensors (5): Detect obstacles higher than 6 cm. Can be turned off if the lawn is clear of obstacles.
- Grass Detection Camera (6): Recognizes changes in surface type (e.g., grass to paving) to define boundaries.
Maintenance Features
General Maintenance:
- Keep safety devices and motor housing free of dirt and dust.
- Use clean, dry cloths for cleaning plastic parts; avoid solvents.
- Periodically check nuts, bolts, and screws for tightness.
- Remove grass and leaf buildup. Wipe clean with a dry cloth; do not wash with running water.
Replacing Mower Blades (Fig. 19):
- Always wear protective, heavy gloves.
- Remove isolator key and battery pack before maintenance.
- Blades should be replaced if blunt, damaged, or showing signs of imbalance.
- Replace all 3 blades and screws simultaneously to maintain a balanced cutting system.
- Use a suitable tool (e.g., screwdriver) to fix the blade disc in place while replacing blades.
- Ensure new blades can spin freely.
Cleaning the Underside:
- Recommended regularly.
- Press STOP, remove isolator key and battery.
- Turn mower over onto a soft, clean surface.
- Use a soft brush or damp cloth to remove dirt, dust, oil, and grease.
- Wear safety gloves to clean the blade disc, chassis, and wheels.
- Remove lodged debris.
- Ensure blade disc and blades can rotate freely.
Storing the Mower (Fig. 20):
- Store indoors between uses.
- Remove isolator key and battery pack.
- Clean thoroughly.
- Carry using the handle, with the blade disc away from the body.
- Store in a clean, dry place, out of reach of children.
- Protect the underside from standing water; never store upside down outdoors.
Battery and Charger Maintenance:
- Keep battery and charger clean and free of debris.
- Do not allow foreign material into cavities or on contacts.
- Wipe with a dry cloth; avoid solvents, water, or wet conditions.
- Always unplug the charger when no battery pack is in it.
- Check for shorted contacts.
- Store away from metal objects.
- Store the battery in a cool, dry place (0°C to 25°C), out of direct sunlight.
- Store the lithium-ion battery pack in a 30%-50% charged condition.
- Fully charge the battery pack every six months during storage.
Software Updates (Fig. 21):
- Software can be updated via a USB flash drive.
- Download the latest software from the support website onto a blank USB flash drive.
- Ensure the mower is switched on (green battery indicator) and has sufficient power before updating.
- Stop the mower, remove the isolator key.
- Turn the mower upside down, open the USB port rubber cap.
- Insert the isolator key, press START/ON for 3 seconds, wait 15 seconds for power-on beep.
- Insert the USB flash drive into the USB port; four beeps indicate updating (all three indicators flash).
- Continuous beeping and a continuous green battery indicator signal completion.
- Remove the USB flash drive and replace the cap.
- Restart the machine by removing and reinserting the isolator key to complete the update.