EasyManua.ls Logo

LEGRAND On Q lyriQ - User Manual

LEGRAND On Q lyriQ
8 pages
Print Icon
To Next Page IconTo Next Page
Loading...
301 Fulling Mill Road, Suite G
Middletown, PA 17057
Phone (800) 321-2343 / Fax (717) 702-2546
www.onqlegrand.com
Page 1 of 8
INSTRUCTION/INSTALLATION SHEET
lyriQ™ Studio High Performance
Ke
yp
ad
IS-0425 REV. A
©Copyright 2009 by On-Q/Legrand All Rights Reserved.
1. Introduction
The lyriQ™ Studio High Performance Keypad, P/N AU5010-xx (see Figure 1), is
an integral part of the lyriQ™ Multi-Room Audio System. It is a component which,
when combined with other essential components (a Source Input Unit, Distribution
Module and Speakers) and your source equipment (receiver, CD player, etc.),
creates a versatile whole-house audio system that will fill your rooms with high-
quality sound for years to come. It uses Category 5 wiring to distribute audio
signals, control information and IR for remote control. The High Performance
Keypad has two on-board 20 Watt per channel class D amplifiers to provide a rich
level of clean sound even in large room applications. It also contains a full set of
features, including the ability to control all other keypad volume controls in the
house. Build a system that accommodates the needs of any space by combining
the lyriQ™ Studio High Performance Keypad with the lyriQ™ Studio Keypad (P/N
AU5009-xx) in the same system. The AU5010-xx is available in white (-WH), light
almond (-LA), titanium (-TI), or gloss black (-GB).
2. Description
The front panel of the lyriQ™ Studio High Performance Keypad, PN AU5010-xx (see
Figure 1), looks almost identical to the standard lyriQ™ Studio Keypad (AU5009-xx). It
also has push buttons for STANDBY (backlit with red LED when in Standby Mode), for
MUTE (backlit with red LEDs, when Mute function is selected), VOLUME UP/DOWN
(with six associated blue Volume Bar Graph LEDs), SOURCE SELECT (with six blue
Source Selection LEDs), and WHOLE HOUSE (backlit with white LEDs when not
selected and with flashing blue/white LEDs when Whole House function is selected).
There is also an IR target window. The visual cue from the front panel that this is a
High Performance Volume Control are the parenthesis surrounding the music note on
the lower left corner of the display area.
NOTE: lyriQ™ Keypads are recommended for indoor use only.
On the rear of the lyriQ™ Studio High Performance Keypad (see Figure 2) the Category
5 connection is an RJ45 jack (J1). The TB2 speaker output connections (left and right,
plus and minus) are spring loaded and designed to support up to 14 gauge wire. The TB3
Line Out connections (plus and minus) are also spring loaded and designed to support up
to 14 gauge wire. This mono-summed output is designed for powered sub-woofers and
as such is filtered through an 80Hz low pass filter. The other terminal block on the rear
(TB1) is used for powering the keypad. Up to 14 gauge speaker wire may be used for this
purpose, and this speaker wire (two or four conductor) is run from a power distribution
module (P/N AU1001) in the enclosure to the Keypad. We recommend 16/4 speaker
wire, since it is available paired with Category 5 from a variety of sources. Again, the TB1
connections are spring loaded (plus and minus) with the two plus connections on the red
portion of TB1 and the two minus connections on the black portion of TB1. For ease of
installation, connect the red wire and white wire to the red (plus) portion of TB1 and the
black and green wire to the black (minus) portion of TB1.
Figure 1
Figure 2
Question and Answer IconNeed help?

Do you have a question about the LEGRAND On Q lyriQ and is the answer not in the manual?

Summary

Introduction

Description

Installation

Rough-in Installation Steps

Steps for pre-drywall installation, including cable runs.

Trim-out Installation Steps

Steps for post-drywall installation, including wiring connections.

Installation - Enclosure Connections

Connections in the Enclosure

Details wiring connections within the enclosure for audio modules.

Installation - Keypad Mounting

Keypad Mounting Procedure

Instructions for mounting the keypad and wall plate after connections.

Operation

Powering On;Off and Sleep Mode

How to turn the system on/off and its automatic sleep mode.

Source Selection and Volume Control

How to select audio sources and adjust volume levels.

Mute, Do Not Disturb, and Whole House

Functions for muting audio, activating DND, and whole-house mode.

Operation - Additional Features

Dimming Setup and Power-Up Test

How to adjust backlight dimming and the keypad's startup test.

Important Safety Precautions

Installer Setup Mode

Whole House and Volume Configuration

Configure whole house response, turn-on, and maximum volume settings.

IR Settings and Audio Balance

Configure IR command handling and audio balance settings.

Installer Setup Mode - Advanced Settings

Grouping, IR Patterns, and Power Management

Configure grouping, IR repeater patterns, and automatic power-off.

Button Functions and Feedback Options

Configure Whole House button, IR feedback, and restore defaults.

Overview

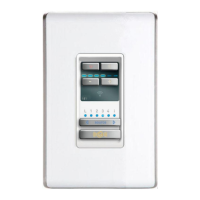
The Legrand On-Q lyriQ™ Studio High Performance Keypad (P/N AU5010-xx) is an integral component of the lyriQ™ Multi-Room Audio System, designed to deliver high-quality sound throughout a home. This keypad functions as a versatile whole-house audio control, integrating with other essential components such as a Source Input Unit, Distribution Module, speakers, and source equipment like receivers and CD players. It utilizes Category 5 wiring for the distribution of audio signals, control information, and IR for remote control.

Function Description:

The lyriQ™ Studio High Performance Keypad features two on-board 20 Watt per channel Class D amplifiers, providing robust and clear sound suitable for large rooms. Its front panel, visually similar to the standard lyriQ™ Studio Keypad (AU5009-xx), includes several push buttons for comprehensive control:

  • STANDBY: Backlit with a red LED when in Standby Mode.
  • MUTE: Backlit with red LEDs when the Mute function is selected.
  • VOLUME UP/DOWN: Accompanied by six associated blue Volume Bar Graph LEDs to indicate volume level.
  • SOURCE SELECT: Features six blue Source Selection LEDs to indicate the active source.
  • WHOLE HOUSE: Backlit with white LEDs when not selected, and flashing blue/white LEDs when the Whole House function is selected, allowing control of all other keypad volume controls in the house.
  • IR Target Window: For remote control input. A visual cue distinguishing this high-performance model is the parentheses surrounding the music note on the lower left corner of the display area. The keypad is designed for indoor use only.

Technical Specifications and Connections:

The keypad is available in multiple finishes: white (-WH), light almond (-LA), titanium (-TI), or gloss black (-GB). On the rear, the keypad features:

  • RJ45 Jack (J1): For Category 5 cable connection, distributing audio signals, control information, and IR. This connection follows the T568A wiring standard.
  • TB2 Speaker Output Connections: Spring-loaded terminals for left and right, plus and minus speaker connections, supporting up to 14 gauge wire. Designed for connecting 8 ohm evōQ™ audio speakers. Polarity and channels are clearly marked (L+, L-, R-, R+).
  • TB3 Line Out Connections: Spring-loaded terminals for plus and minus line-level output, supporting up to 14 gauge wire. This mono-summed output is designed for powered sub-woofers or external amplifiers and is filtered through an 80Hz low pass filter. These terminals do not provide amplification, but the keypad's volume control affects their output level.
  • TB1 Power Connection: Spring-loaded terminals for keypad power, supporting up to 14 gauge speaker wire (two or four conductor) from a power distribution module (P/N AU1001). The two plus connections are on the red portion of TB1, and the two minus connections on the black portion. For ease of installation, red and white wires connect to the red (plus) portion, and black and green wires to the black (minus) portion.

Installation Guidelines:

Installation is best performed in two stages during new construction:

  1. Rough-in: Before drywall installation. A single Category 5 cable and 16/4 speaker wire should be run from the enclosure location to a single gang outlet box at each Volume Control location (typically at electrical light switch height).
  2. Trim-out: After drywall installation and painting.
    • Connect the pre-wired Category 5 cable to an RJ45 plug (T568A standard) and insert it into jack J1 on the keypad.
    • For power (TB1), strip 3/8" insulation from the four conductors. Insert red and white wires into the red (plus) portion of TB1, and black and green wires into the black (minus) portion. The two red connections are tied together, as are the two black connections, for wiring flexibility. Electricians may consider black and red as plus, and green and white as minus, as long as this is consistent at both ends of the cable.
    • Connect speakers to TB2 and line out/sub-woofer to TB3, observing polarity and channel markings.
    • In the enclosure, terminate the Category 5 cable with an RJ45 plug and insert it into a zone output jack of the associated lyriQ™ audio distribution module (e.g., AU1002).
    • For the 16/4 speaker wire power cable, strip 3/8" insulation and insert red and white wires into the red (plus) portion of TB1, and black and green wires into the black (minus) portion of TB1 on the Power Distribution Module (AU1001).
    • For systems with more than eight keypads, cascade Single Source Modules by running a Cat 5e jumper from a Zone port RJ45 jack on the Multi-source Module to the "Source In" RJ45 jack on the Single Source Module.
    • Mount the keypad into a single gang box (a 20 cubic inch or larger box is recommended) using the included screws, after checking all connections and testing system operation.

Usage Features:

The keypad offers various operational modes and settings:

  • ON/OFF: Press STANDBY to toggle ON or OFF. Remote control can also toggle ON or OFF.
  • Power-Save Mode: After 30 seconds of inactivity, the keypad enters Power-Save or "sleep" mode. Pressing any button wakes it up.
  • Source Select: Press SOURCE rocker switch up (right side) or down (left side) to select desired source.
  • Volume Control: VOLUME UP/DOWN buttons.
  • Whole House Mode: Pressing WHOLE HOUSE button allows control of other keypads in the system.
  • Installer Setup Mode (STUDIO KVC): Activated by a specific key sequence (MUTE, VOLUME UP, VOLUME DOWN, VOLUME DOWN, MUTE, VOLUME UP, VOLUME DOWN, VOLUME DOWN). The keypad indicates this mode by blinking its backlight LEDs. This mode allows configuration of:
    • WHOLE HOUSE ENABLE/DISABLE: Enables or disables the keypad's response to whole-house commands.
    • TURN ON VOLUME: Sets the volume level when the keypad turns on, or remembers the last volume.
    • MAXIMUM VOLUME: Sets the maximum allowed volume.
    • IR TARGET & IR REPEAT ENABLED / DISABLED: Controls whether the keypad processes received IR commands and repeats them throughout the system. This can be disabled to prevent IR noise.
    • BALANCE: Adjusts left/right audio balance (Midpoint, Full Left, Full Right, and intermediate settings).
    • GROUPING: Configures the keypad as part of a cascaded group (No Grouping, Group Member, Group Master) for integration with modules like AU1002 or AU1014.
    • IR REPEATER PATTERN: Sets the IR command repetition pattern (40 kHz, Mixed 40 kHz/56 kHz, or 56 kHz) based on the selected source.
    • AUTOMATIC POWER OFF: Determines if the keypad automatically powers off after 20 minutes of audio inactivity.
    • WHOLE HOUSE BUTTON ENABLED / DISABLED: Determines if the WHOLE HOUSE button is operational.
    • IR ACTIVITY FEEDBACK: Allows the keypad to indicate IR activity by blinking its power LED.
    • RESTORE DEFAULT: Resets the keypad's settings to their defaults by pressing either volume button on this setting.

Maintenance Features:

  • Safety Precautions:
    • Ensure power supplies are not connected to the lyriQ™ Audio and Power Distribution Modules before connecting keypads.
    • Always follow TIA-570-B and T568A wiring standards for Category 5 cable to prevent equipment damage or electrical interference.
    • Carefully label each wire to avoid mis-wiring.
    • Maintain a minimum 12" separation between Category 5 cable and any 120VAC cabling.
    • Do not apply power to the lyriQ™ Audio System until all components are installed and wiring is properly terminated.
    • Do not attempt to terminate, change, or un-install any wiring without first turning off power to the lyriQ™ Audio System located in the Enclosure.
    • Install all system components away from heat sources such as HVAC ducts/registers, stoves, or any other heat source.
    • Do not expose any component that was designed for indoor use to moisture.
    • Do not use vacuum cleaners, liquid, or aerosol cleaners to clean system cover plates. A damp cloth may be used.
  • Self-Test: The first 5 power up self-tests take about 15 seconds, and about 2 seconds after that. Hitting any button during the test will interrupt the test and the Keypad will operate as normal.
    • Keypad white backlight LEDs will illuminate to full intensity.
    • MUTE button backlight will transition to red and back to white.
    • WHOLE HOUSE button backlight will transition to blue and back to white.
    • Volume indicator LEDs and then source indicator LEDs will illuminate left to right and then back to the left.
    • Keypad white backlight LEDs will dim off and the Standby button will be backlit red.
    • Then dim, the Keypad powers down.
  • Troubleshooting: Contact On-Q/Legrand Technical Support for assistance.

The lyriQ™ Studio High Performance Keypad is a robust and feature-rich solution for integrated multi-room audio, offering both powerful amplification and extensive control capabilities within the On-Q/Legrand ecosystem.

LEGRAND On Q lyriQ Specifications

General IconGeneral
BrandLEGRAND
ModelOn Q lyriQ
CategoryKeypad
LanguageEnglish

Related product manuals