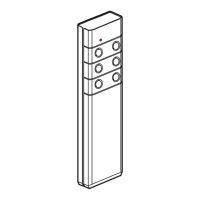
This document describes the Mosaic™ Offset infrared auxiliary control, model 784 31, a device designed for remote control and scenario management within a Legrand system. It functions as an infrared remote control, allowing users to interact with and manage various connected devices and pre-programmed scenarios.
Function Description:
The Mosaic™ Offset infrared auxiliary control serves as a handheld remote for initiating and modifying scenarios within a Legrand installation. It operates by sending infrared signals to a receiver, which then executes the programmed actions. The device is primarily used for learning and saving scenarios, as well as for modifying existing ones. It features a "LEARN" button and a control button, which are central to its functionality. The LEARN button is used to enter and exit learning modes, while the control button is associated with specific scenarios or actions. The device also includes an indicator light that provides visual feedback on its operational status, such as blinking slowly, blinking fast, or flashing, to indicate different stages of the learning or modification process. This allows users to understand the current state of the remote and the system during setup and operation.
Usage Features:
The device offers a straightforward process for learning and managing scenarios.
Learning a Scenario:
- Initiating Learning on the Remote Control: The user presses the "LEARN" button on the remote. The indicator light will provide feedback, likely blinking to confirm entry into learning mode.
- Associating a Control Button: The user then presses the desired control button on the remote that will be linked to the new scenario. This action transmits a signal, indicating which button will trigger the scenario.
- Learning on the Receiver: Next, the user interacts with the receiver (the device that will execute the scenario). This typically involves pressing a "LEARN" button on the receiver itself.
- Associating the Remote Button with the Receiver: The user then presses the same control button on the remote that was chosen in step 2. This action links the remote's button to the receiver, establishing the control relationship.
- Saving the Scenario: Finally, the user presses the "LEARN" button on the remote again to save the scenario. Upon successful saving, the indicator lights on all associated products (remote control and receivers) will turn off, confirming that the scenario has been stored.
Modifying a Scenario:
- Opening the Scenario on the Remote Control: The user presses the "LEARN" button on the remote. The indicator lights of all products associated with the scenario will blink, indicating that the scenario is open for modification.
- Piloting the Scenario: The user then presses the control button on the remote that currently pilots the scenario they wish to modify.
- Modifying the State of a Scenario Receiver: To change the state of a receiver within the scenario, the user presses the "LEARN" button on the remote, then presses the control button on the remote that they want to link to the receiver. Alternatively, to delete a product from the scenario, the user can follow a specific sequence, typically involving pressing the "LEARN" button and then a particular control button, or a combination of actions that leads to the deletion of the product.
- Saving the Modified Scenario: After making the desired modifications, the user presses the "LEARN" button on the remote again to save the changes. Similar to learning a new scenario, the indicator lights on all associated products will turn off, confirming that the modified scenario has been saved.
Cancelling a Scenario:
The device also supports cancelling scenarios or resetting the state of a scenario actor.
- Cancelling a Scenario Linked to a Control Button: To delete a scenario associated with a specific control button, the user presses the "LEARN" button on the remote. Then, they press and hold the control button for 10 seconds. After 5 seconds, the scenario will be deleted.
- Cancelling the State of a Scenario Actor: To reset a scenario actor (a device controlled by the scenario) to its factory configuration, the user presses the "LEARN" button on the remote. Then, they press and hold the "LEARN" button again for 10 seconds. After 5 seconds, the product will revert to its factory settings.
Operation:
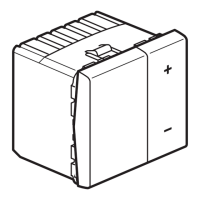
The remote control allows for basic operation of connected devices, such as turning lights on or off, or adjusting their intensity. Pressing a control button for a short duration (less than 2 seconds) might toggle a light on or off. Holding a control button for a longer duration (more than 2 seconds) could be used to dim or brighten a light, indicated by a gradual change in light intensity. The remote features multiple control buttons, labeled A, B, C, and D, suggesting the ability to control multiple devices or scenarios independently. The green transmission indicator LED on the remote provides visual confirmation that a signal is being transmitted when a button is pressed.
Maintenance Features:
The device is designed for ease of use and minimal maintenance. It is powered by a 9V battery (type 6 F 22), which is easily accessible for replacement. The battery compartment is located on the back of the device and can be opened to insert or remove the battery. The device's operating temperature range is between -5°C and +40°C, making it suitable for typical indoor environments. No complex maintenance procedures are described, emphasizing its user-friendly design. The instructions highlight the importance of using only Legrand brand accessories and that any repairs or modifications should only be carried out by trained and approved Legrand personnel to maintain safety and warranty. This suggests that the device is not intended for user-level internal repairs or modifications beyond battery replacement.