continued on next page
Page 127
C8-1 DIAGRAM WITH D5 DIAGRAM
Honeywell W973 Control System and T7067 Thermostat with Modulating Economizer
5-C8-1 Section with D5 Section
An economizer REMD16M/EMDH16M added to a GCS16 with a Honeywell W973 Control al
lows the use of outside air for 1st stage cooling controlled by an enthalpy control and electronic
ramping thermostats. Discharge temperature sensors, return air temperature sensors and/or
remote thermostats and transmitters may also be used.
NOTE - In order to understand how these optional controls affect the operation of the GCS16,
you must first understand how all GCS16 components work. Refer to the operation se
quence for basic unit operation.
NOTE - Use of the Honeywell W973 controller with the GCS16 requires use of the W973
relay kit and CMC3-1 time clock. This arrangement is designed for use with Honeywell T7067
electronic ramping thermostat and Honeywell Q667 subbase or equivalents. A remote set
point transmitter with either a return air temperature sensor or a room temperature sen
sor may be used in place of the room thermostat. None of the thermostat/sensor com
binations affect the following operation sequence.
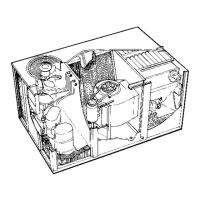
The W973 plugs-in to the GCS16 inside the control make-up area of the GCS16 blower
compartment (see figure 98). Jack J17 connects to unit plug P16. Then plug P17 connects to
jack J16. Jumper plug J19 supplied with the W973 must be connected to plug P19 on the
W973. Jumper plug J12 also supplied with the W973 is not used with GCS16 series units and
may be discarded.
The W973 relay kit mounts inside the control make-up area of the GCS16 blower compartment
next to the W973. No wiring is required. GCS16 jumper plug P3 is removed and discarded.
Warm-up kit harness plug P6 connects directly into GCS16 jack J3 in the blower compartment.
WARNING - CONNECT ONLY RELAY KITS DESIGNED FOR THIS CONTROL SYSTEM.
RELAY KITS DESIGNED FOR OTHER CONTROL SYSTEMS ARE NOT COMPATIBLE
AND CONTROL DAMAGE OR FAILURE WILL RESULT. FOR EXAMPLE, A W7400
RELAY KIT MUST NEVER BE CONNECTED TO A W973 CONTROL SYSTEM.
Operation Sequence:
1-Room temperature is controlled by a thermistor located in A2 (T7067A) thermostat or remote
A2 (T7067B) transmitter (RT2). As room temperature changes, thermistor resistance also
changes. If room temperature goes up, thermistor resistance goes down. If room tempera
ture goes down, thermistor resistance goes up. The thermistor allows 2.5V/F(1.4V/C).
When the cooling setpoint is crossed, the T7067 begins transmitting a cooling ramp from ter
minal 4 through TB1-4 to terminal 4 of A1. As room temperature increases, the cooling ramp
increases from 1 to 16 VDC.
When the heating setpoint is crossed, the T7067 begins transmitting a heating ramp from ter
minal 5 through TB1-5 to terminal 5 of A1. As room temperature increases, the cooling ramp
increases from 1 to 16 VDC.
2- Generally, A1 cooling contacts C1 close when voltage input to A1 terminal 4 reaches 4VDC.
C2 cooling contacts close when voltage input to A1 terminal 4 increases to 5 VDC.
A1 heating contacts H1 close when voltage input to A1 terminal 5 reaches 4 VDC and H2 con
tacts close when the voltage ramp increases to 5 VDC.
3- To provide anticipation, discharge sensor RT1 modifies the voltage that A1 receives at termi
nals 4 & 5. If discharge temperature goes up, RT1 resistance goes down. For every 25F
change in discharge temperature, A1 will offset the setpoint 1F. As a result, RT1 may require
a higher or lower voltage input to A1 terminals 4 or 5 before closing C1, C2, H1 or H2.
Day Operation (Occupied Period):
4- Time clock CMC3-1 contacts open. Relay K38 in relay kit deenergizes.
5- Contacts K38-1 open, removing setback resistor R4 from the circuit.
Contacts K38-2 open, removing setup resistor R5 from the circuit.
Contacts K38-3 close, control of blower B3 is shifted to A2 terminal 10. During day operation
when contacts K38-3 are closed, blower B3 is controlled by A2 terminal 10 and can operate in
ON or AUTO modes.
6- Power is supplied to the economizer continuously through blower relay K3-2. Dampers open
to minimum position during blower operation.
7- Initial heat demand (voltage ramp from A2 terminal 5) closes H1. First stage heat energizes.
8- Increased heating demand (increased voltage from A2 terminal 5) closes H2 (not used in this
application).
Enthalpy Low:
9- Initial cool demand (voltage ramp from A2 terminal4) closes C1.
10- Enthalpy control A6 has determined that outside air can be used for cooling and has switched
relays 1K and 2K internally.
11- Cooling demand is routed through enthalpy control terminal 1 to energize internal relay 1S.
Internal contacts 1S1 close to complete a circuit through damper motor terminals T and T1.
Simultaneously, cooling demand energizes relay K37.
12- When a voltage is applied across terminals T and T1 of damper motor, the damper motor ener
gizes and outdoor dampers open fully. Supply air sensor R1 varies the voltage across T and
T1 and the dampers adjust accordingly. First stage cooling is provided by outdoor air.
13- Contacts K37-1 close to energize blower on cooling speed.
14- Additional cooling demand (voltage ramp from A2 terminal4) closes C2.
15- Demand is routed from A1 terminal C2 through enthalpy control terminals 3 and 5 to energize
the compressor and relay K55. The compressor provides all additional cooling demand.
16- Contacts K55-1 switch to energize relay K37. Contacts K37-1 close to energize blower on
cooling speed (no affect).
 Loading...