Do you have a question about the Lenovo IdeaPad Slim 3 and is the answer not in the manual?
Details the initial setup steps for 14-inch IdeaPad models, including connecting the power adapter and turning on the device.
Outlines the initial setup process for 15-inch and 17-inch IdeaPad models, focusing on power connection and startup.
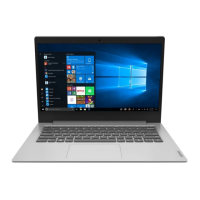
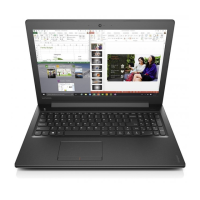
Provides a visual overview of the 14-inch IdeaPad model, labeling key external components and ports.
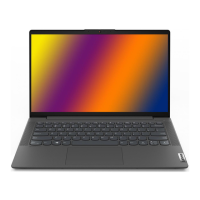
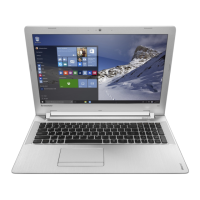
Presents a diagram illustrating the main features and external connections of the 15-inch IdeaPad model.
Displays a detailed overview of the 17-inch IdeaPad model, highlighting its various ports and components.
Explains the device's adherence to EU guidelines for radio wave exposure (SAR) and how to check specific values.
States the device's compliance with the EU Radio Equipment Directive, listing supported models and RF specifications.
This document serves as a comprehensive setup guide and overview for several Lenovo IdeaPad models, specifically the IdeaPad Slim 3 (14", 05), IdeaPad Slim 3 (15", 05), IdeaPad Slim 3 (17", 05), IdeaPad 3 (14", 05), IdeaPad 3 (15", 05), and IdeaPad 3 (17", 05). It outlines the initial setup process, provides detailed diagrams of the device's components, and includes essential regulatory information.
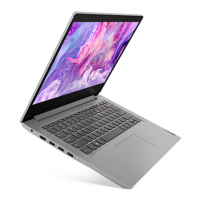
The initial setup process is clearly illustrated across different models. For 14-inch models, the guide demonstrates a four-step process. Step 1 involves connecting the power adapter to the laptop's charging port. This port is typically located on the left side of the device. The adapter itself consists of a brick-like power supply unit and a cable that connects to the laptop. Step 2 shows the connection of the power cable from the wall outlet to the power adapter. This ensures the laptop receives power for charging and operation. Step 3 depicts plugging the power cable into a wall socket, completing the power circuit. Finally, Step 4 illustrates pressing the power button to turn on the laptop. The power button is usually situated on the top-right side of the keyboard deck. This sequence ensures the device is properly powered before its first use.
For 15-inch and 17-inch models, the initial setup follows a very similar pattern, maintaining the same four-step process. The visual representation for these models confirms that the charging port, power adapter connection, wall outlet connection, and power button location are consistent with the 14-inch models. This standardization simplifies the initial user experience across different screen sizes within the IdeaPad 3 and IdeaPad Slim 3 series. The guide emphasizes that all illustrations are for reference only, indicating that minor visual variations might exist between specific sub-models or regions, but the fundamental connection and power-on steps remain the same.
The "Overview" section provides detailed diagrams of the laptop's various components, differentiating between 14-inch, 15-inch, and 17-inch models. Despite the screen size differences, many core components and their functionalities are shared.
Across all models, the top edge of the display houses several crucial components. These include multiple microphones (1), which are essential for audio input during video calls, voice commands, or recordings. A camera (2) is centrally located at the top of the display, enabling video conferencing and capturing images. For privacy and security, a camera cover slider (3) is integrated, allowing users to physically block the camera when not in use. Adjacent to the camera is a camera light (4), which illuminates to indicate when the camera is active. Wireless antennas (5) are strategically placed within the display bezel to ensure robust Wi-Fi and Bluetooth connectivity. The screen (6) itself is the primary visual output for the user.
Moving to the laptop's base, the ventilation slots (7) are positioned to facilitate airflow and prevent overheating, crucial for maintaining optimal performance. The power button (8) is located on the top-right side of the keyboard deck and, for selected models, doubles as a fingerprint reader (9), offering a convenient and secure login method. The power button/fingerprint reader also features an integrated light to indicate its status.
On the right side of the laptop, an SD card slot (10) provides expandable storage options and allows for easy transfer of photos and files from cameras or other devices. A Novo button hole (11) is also present, which, when pressed with a pin, can access the Novo Button Menu for system recovery, BIOS setup, or boot options.
The left side of the laptop is equipped with a variety of ports and indicators. A combo audio jack (12) allows for the connection of headphones or headsets with a microphone. The keyboard (13) is the primary input device, featuring a standard QWERTY layout. For 15-inch and 17-inch models, a numeric keypad (14) is included, enhancing data entry efficiency. The touchpad (15) serves as an alternative pointing device, supporting multi-touch gestures for navigation. Speakers (16) are integrated into the laptop, providing audio output. A power light (17) indicates the device's power status (on, off, sleep). Two USB (3.2 Gen 1) Type-A connectors (18) offer high-speed data transfer for peripherals. A USB 2.0 connector (19) provides compatibility with older devices. An HDMI™ connector (20) allows for external display connections. A charging light (21) indicates the battery's charging status. Finally, the power connector (22) is where the power adapter is plugged in to charge the laptop.
The bottom of the laptop also features speakers (16) for audio output, strategically placed to enhance sound quality.
The guide includes important regulatory information, particularly concerning specific absorption rate (SAR) for the European Union. It states that the device complies with international guidelines for exposure to radio waves, with a Europe 10g SAR limit of 2.0 W/kg. Users can find product-specific SAR values on the Lenovo support website. The document also advises users on how to reduce RF exposure by limiting usage or keeping the device away from the body.
Furthermore, the guide addresses European Union compliance with the Radio Equipment Directive (2014/53/EU). It declares that various IdeaPad 3 and IdeaPad Slim 3 models are in compliance with this directive. The full text of the EU declaration of conformity is available online. A table details the frequency bands and maximum radio-frequency power for WLAN (802.11b/g/n/ax, 802.11a/n/ac/ax) and Bluetooth (BR/EDR/LE). It specifies that WLAN operates in 2400-2483.5 MHz, 5150-5725 MHz, and 5725-5875 MHz bands, with varying maximum transmit powers. Bluetooth operates in the 2400-2483.5 MHz band. A crucial usage feature highlighted is that all radio devices are limited to indoor use in the 5150 MHz to 5350 MHz band (channels 36, 40, 44, 48, 52, 56, 60, 64).
Maintenance features are implicitly covered through the design elements. The camera cover slider (3) is a direct maintenance feature for privacy. The ventilation slots (7) are critical for thermal management, and keeping them clear of obstructions is a key maintenance practice to ensure the longevity and performance of the device. The inclusion of various ports (USB, HDMI, SD card slot, audio jack) facilitates connectivity and allows for the use of external devices, which can be part of a broader maintenance or upgrade strategy. The Novo button hole (11) provides access to system recovery options, which is a vital maintenance and troubleshooting tool.
The guide also includes a note to "Read the statement on USB transfer rate in the User Guide" and to "Refer to the Safety and Warranty Guide for accessing the User Guide." This emphasizes the importance of consulting additional documentation for detailed information on device operation, safety, and warranty, which are all aspects of device maintenance and proper usage. The "Reduce | Reuse | Recycle" icon at the end of the document promotes environmental responsibility, suggesting that the device is designed with end-of-life considerations in mind, encouraging users to dispose of it responsibly.
In summary, this setup guide provides a clear, step-by-step approach to initial device setup, a comprehensive visual and textual overview of the laptop's physical components and their functions, and essential regulatory compliance information. It implicitly guides users towards proper usage and maintenance practices through its detailed component descriptions and references to further documentation.
| Storage | Up to 1 TB PCIe Gen 4 SSD |
|---|---|
| Graphics | AMD Radeon Graphics / Intel Iris Xe Graphics |
| Operating System | Windows 11 Home |
| Audio | Dolby Audio |
| Wireless | Wi-Fi 6 (802.11ax), Bluetooth 5.0 |
| Ports | 1 x USB-C 3.2 Gen 1 (full function), 1 x USB-A 3.2 Gen 1, HDMI 1.4 |