Do you have a question about the LifeFitness G2 and is the answer not in the manual?
Read and follow all warnings and instructions for safe use of the equipment.
Assemble on a flat, level surface. Do not fully tighten frame connections until assembly is complete.
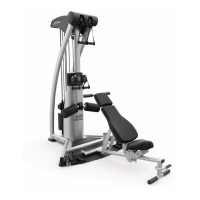
List of tools needed for assembling the leg press adapter kit.
Detailed list of all components included in the leg press adapter kit.
Remove bolts attaching the frame brace and cable to the base, then remove the leg cable.
Secure the front leg using bolts, washers, and lock nuts as shown in the diagram.
Assemble the new leg press cable, ensuring it runs in pulley grooves and above retaining bolts.
Securely assemble a 3-1/2" pulley to the front leg using a bolt and lock nut.
Attach the GLP leg press to the front leg using bolts, washers, and lock nuts.
Route the leg press cable around a pulley and assemble the pulley to the bracket.
Securely attach the bracket from the GLP leg press to the seat frame using bolts, washers, and nuts.
Route the leg press cable around a pulley and assemble the pulley to the bracket on the seat frame.
Route cable around a pulley and assemble pulley to the seat frame using bolt, spacers, and nut.
Route cable around a pulley and assemble pulley to the main arm using bolt, spacers, and nut.
Route cable around pulley and assemble pulley to seat frame using bolt, spacers, and lock nut.
Route cable around pulley and assemble pulley to main arm using bolt, spacers, and lock nut.
Securely assemble the swivel end of the leg press cable to the seat frame using bolt, spacers, and nut.
Visual guide illustrating the correct routing of the leg press cable through pulleys.
Push head plate down, insert pin, perform repetitions to relax cable system and set tension.
| Brand | LifeFitness |
|---|---|
| Model | G2 |
| Category | Fitness Equipment |
| Language | English |