26
X SECTION 2 (CONTINUED) / SECTION 2 (SUITE) / SECCIÓN 2 (CONTINUACIÓN)
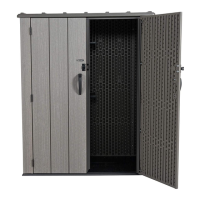
TOOLS & HARDWARE REQUIRED / OUTILS ET QUINCAILLERIE REQUIS / INSTRUMENTAL Y HERRAJE REQUERIDOS
HARDWARE IS SHOWN TO SCALE, UNLESS NOTED OTHERWISE (*) / LA QUINCAILLERIE EST ILLUSTRÉE À L’ÉCHELLE, SAUF INDICATION CONTRAIRE (*) / SE MUESTRA EL HERRAJE A ESCALA, A
MENOS QUE SE INDIQUE LO CONTRARIO (*)
2.2
2.3
• While one adult holds the Channel tight against the Door, insert four (4) Screws (ADZ) to secure the Channel in place.
• Pendant qu’un adulte garde le canal contre la porte, insérer quatre (4) vis (ADZ) pour le fi xer en place.
• Mientras que un adulto mantiene bien el canal contra la puerta, insertar cuatro (4) tornillos (ADZ) para fi jarlo en su lugar.
• Set the Lateral Door Channel (FEM) into the groove along the edge of the Door. The notch fi ts over the nub.
• Mettre le canal latéral de la porte (FEM) dans la rainure le long du bord de la porte. L’encoche va au-dessus de la protubérance.
• Meter el canal lateral de la puerta (FEM) en la ranura a lo largo del borde de la puerta. La muesca va encima de la protuberancia.
• Notch
• Encoche
• Muesca
• Nub
• Protubérance
• Protuberancia
ADZ (x4)
FEM
ADZ
ADZ
ADZ
ADZ
ADZ
GEE