4
TOOLS AND HARDWARE REQUIRED
SECTION 1 (CONTINUED)
1.1
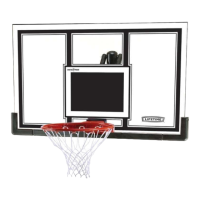
• Lay the backboard on a table or bench. Insert the U-Bolt (BNP) through the upper part of the opening on the backside of
the Backboard (AJI) and two (2) carriage bolts (ACS) through the lower part of the opening as shown. Insert the spacers (ACS)
between the backboard brackets and the backboard.
• Before beginning this assembly, follow the instructions included with your Mounting Kit
(or original basketball system if this is to replace an existing system) to assemble the
Backboard Brackets. To ensure a good fi t, use the U-Bolt (BNP) included with this system when
assembling the brackets. For further details, see page 9.
AAR
AAR
APY
• The Backboard Brackets shown here are
provided with the Mounting Kit (sold
separately) or with your original unit. The
actual Brackets may vary, but the assembly
steps still apply. See page 9 for more details.
!
1/2" (≈13 mm)
(x2)
• Backboard Brackets are included in the
Mounting Kit (sold separately) and may
vary from those shown here.
!
AAR (x2)
BNP
ABK
ALD
ACS
ACS
AJI
• The Backboard Brackets shown represent Lifetime Products
®
components and are for illustration purposes only. If using
Brackets other than the Lifetime Products
®
models shown here,
refer to the instructions provided with the Brackets.
!
ABK
ABK (x2)
BNP (x1)
25% of actual size
ACS (x2)