Do you have a question about the Lifetime 79910 and is the answer not in the manual?
Lists the necessary tools for assembling the basketball system.
Explains the meaning of symbols used throughout the assembly instructions.
Provides critical safety guidelines and warnings for assembly and operation.
Details the specific hardware components needed for attaching the backboard to the rim.
Lists the specific parts required for attaching the backboard to the rim.
Specifies the tools needed for the backboard to rim assembly steps.
Details the required mounting kits and how to order them.
Provides instructions for checking hardware, wear, corrosion, and paint.
Explains the benefits and process of registering the product.
Outlines the terms, conditions, and limitations of the product's warranty.
This document is an assembly instruction manual for the Lifetime Backboard & Rim Basketball System, Model 79910. It provides comprehensive guidance for assembling, installing, and maintaining the basketball system, emphasizing safety and proper usage.
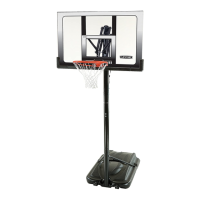
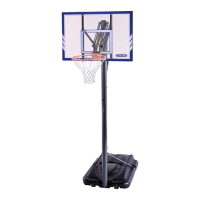
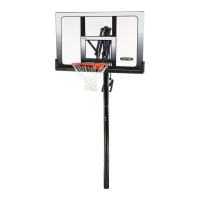
The Lifetime Backboard & Rim Basketball System, Model 79910, is designed to provide a complete basketball hoop setup for recreational use. It consists of a backboard, a rim, and the necessary hardware for assembly. The system is intended to be mounted to a roof, wall, or an existing pole, offering flexibility in installation location. The core function of the system is to allow users to play basketball by providing a sturdy backboard and a durable rim for shooting and dunking. The design incorporates features aimed at ensuring stability and longevity, making it suitable for regular use.
The assembly process for the Backboard & Rim Basketball System requires attention to detail and adherence to the provided instructions. Users are advised to decide on the mounting location (roof, wall, or existing pole) before starting assembly. A separate mounting kit is required for roof and wall mounts, which can be obtained through the Customer Service Department. The manual explicitly states that the mounting kit is not included with the backboard and rim system itself.
The assembly is estimated to take approximately 2-3 hours and requires two people to complete, highlighting the need for assistance during installation. The minimum operational height for the bottom of the backboard is 6 ft 6 in (1.98m), ensuring a safe and appropriate playing height.
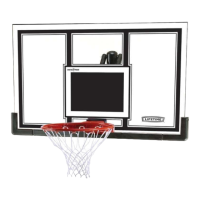
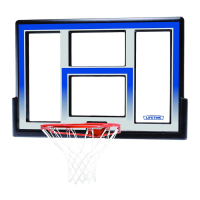
The manual details the backboard-to-rim assembly in several steps. It begins with attaching the U-Bolt and carriage bolts to the backboard, followed by securing the backboard brackets. These brackets, while essential for mounting, are also part of the separately sold mounting kit. The instructions emphasize that the backboard brackets may vary depending on the mounting kit or original unit, but the assembly steps remain consistent.
A key feature of the rim assembly involves pressing a Push Nut onto the Axle, ensuring it rests about 1/4" from the end. This step is crucial for securing the rim to the backboard. The manual also describes how to position the rim inside the plastic guard and secure it with another Push Nut.
For tension adjustment, the system includes Jam Nuts and Springs. Users are instructed to thread the Jam Nuts onto the U-Bolt and then slide the Springs into place, securing them with additional hardware. A critical note advises against completely tightening the flange nuts in this step, as tightening them too much will adjust the rim tension. The goal is to tighten them just enough so the rim does not wobble, allowing for later tension adjustments.
The final steps of assembly involve attaching the Rim Cover Plate, removing the plastic film from the backboard, and attaching the Center Frame Pad and Corner Frame Pads. These pads are secured with ADP hardware, and the Corner Frame Pads are designed to overlap the Center Frame Pad. Finally, the net is attached to the rim. The manual notes that replacement nets are available through customer service and are designed to be shorter than average to reduce the risk of entanglement.
The manual provides detailed maintenance instructions to prolong the life of the basketball system and ensure safety. It highlights that factors such as climate, exposure to corrosives (salt, pesticides, herbicides), and excessive use can contribute to pole failure, leading to property damage or personal injury.
Users are advised to frequently check the basketball system for loose hardware, excessive wear, and signs of corrosion. Preventive measures include:
The manual also includes a section for product registration, encouraging users to register their product online or by phone. Registration allows Lifetime Products to provide new product notifications, promotions, and direct notifications in case of a product recall or safety modification. It also offers an opportunity for customers to provide feedback. The company assures users that their privacy is maintained and personal data will not be sold or provided to third parties.
Overall, the Lifetime Backboard & Rim Basketball System is designed for ease of assembly and long-term use, with clear instructions for both initial setup and ongoing maintenance to ensure safety and durability.
| Product Type | Portable Basketball System |
|---|---|
| Color | Black |
| Assembly | Required |
| Sport Type | Basketball |
| Adjustable Height | Yes |
| Backboard Size | 44 inches |
| Pole Material | Steel |
| Base Type | Portable |
| Base Capacity | 35 Gallons |
| Shape | Rectangular |
| Capacity | 35 Gallons |
| Recommended Uses | Outdoor |
| Manufacturer | Lifetime |
| Model Number | 79910 |
| Height Adjustment | 8 to 10 feet |
| Included Components | Basketball System |