EasyManua.ls Logo

Lifetime 9594 User Manual

Lifetime 9594
18 pages
To Next Page IconTo Next Page
Page #1 background imageLoading...
Page #1 background image
1
®
1/14/2009
VISIT THE LIFETIME WEB SITE:
WWW.LIFETIME.COM
INSTRUCTION #1032615 B
To ensure your safety, do not attempt to assemble the universal system without reading and following all instructions carefully. Identify and inventory
the parts using the parts list on Page 2.
Um Ihre sicherheit zu wahren, sollten sie nicht versuchen, das Universal System zu montieren, ohne alle anleitungen gründlich gelesen und befolgt
zu haben. Identifizieren und überprüfen sie die bestandteile auf ihre vollständigkeit, indem sie die bestandteilliste auf Seite 2 benutzen.
Pour garantir votre sécurité, ne tentez pas d’assembler le système
universel sans lire et suivre toutes les instructions avec attention.
Identifiez et faites l’inventaire des pièces en utilisant la liste des pièces
en Page 2.
Para su seguridad personal, no trate de armar el sistema universal sin
leer y seguir cuidadosamente todas las instrucciones y advertencias.
SOPORTE DE EXTENSIÓN
UNIVERSAL PARA LOS TABLEROS DE
BALONCESTO.
Nº DE MODELO 9594
INSTRUCCIONES DE ENSAMBLAJE Y MANUAL DEL
USUARIO
UNIVERSAL BASKETBALL
ZIELBRETTTRÄGER
MODELL NR. #9594
MONTAGE-ANTEILUNGEN UND GEBRAUCHSANWEISUNG
UNIVERSAL
MOUNTING KIT
MODEL #9594
ASSEMBLY INSTRUCTIONS AND OWNER’S
MANUAL
4
SUPPORT D’EXTENSION POUR LE PANNEAU DE BASKET-BALL UNI-
VERSEL
MODÈLE No. 9594
INSTRUCTIONS D’ASSEMBLAGE ET MANUEL DE L’UTILISATEUR
**U.S. and Canada customers ONLY**
IF ASSISTANCE IS NEEDED,
DO NOT CONTACT THE STORE!!!
CALL OUR CUSTOMER SERVICE DEPARTMENT at 1 (800) 225-3865
HOURS: 7:00 a.m. to 5:00 p.m. Monday through Friday (Mountain Standard Time)
**For customers outside the U.S. or Canada, please contact the store for assistance.**
7!2.).'s!$6%24%.#)!s!6%24)33%-%.4sWARNUNGs
#9594
Copy

Other manuals for Lifetime 9594

Question and Answer IconNeed help?

Do you have a question about the Lifetime 9594 and is the answer not in the manual?

Lifetime 9594 Specifications

General IconGeneral
BrandLifetime
Model9594
CategoryRacks & Stands
LanguageEnglish

Summary

Option 1: Wall Mount Assembly

Step 4: Wall Mounting - Stud Location and Height Marking

Locate wall studs and mark horizontal lines for precise backboard height placement.

Step 5: Wall Mounting - Attaching Extension Brackets

Secure Extension Brackets to Stud Brackets using specified bolts and washers.

Step 6: Wall Mounting - Securing Diagonal Supports

Attach Diagonal Supports to Extension Brackets using bolts and nuts for stability.

Step 7: Wall Mounting - Installing Stabilizers

Connect Stabilizers to Extension Brackets and Stud Brackets for structural integrity.

Step 8: Wall Mounting - Attaching the Backboard

Lift and securely fasten the Backboard to the assembled wall mounting brackets.

Option 2: Roof Mount Assembly

Step 4: Roof Mounting - Bracket Placement and Securing

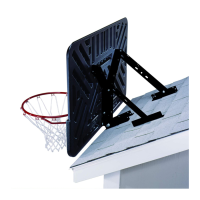
Position Extension Brackets on the roof edge and fasten them with appropriate hardware.

Step 5: Roof Mounting - Backboard Attachment

Secure Backboard Brackets, lift the Backboard, and connect it to the roof-mounted Extension Brackets.

Step 6: Roof Mounting - Stud Bracket Connection

Attach Stud Brackets to the Brace Angle Piece on the Backboard Brackets.

Step 7: Roof Mounting - Final Bracket Securing

Connect Extension Brackets to Stud Brackets and ensure the assembly is secured to the roof.

Option 3: Pole Mount Assembly

Step 4: Pole Mounting - Pole and Bracket Setup

Mark the pole, install U-Bolts, Saddle Brackets, and Pole Mount Brackets.

Step 5: Pole Mounting - Extension Bracket Installation

Place and secure Extension Brackets into the Pole Mount Brackets using bolts.

Step 6: Pole Mounting - Diagonal Support Attachment

Attach Extension Bracket to Pole Mount Bracket and connect the Diagonal Support.

Step 7: Pole Mounting - Backboard Assembly

Lift the Backboard and attach it to the Pole Mount Assembly with the necessary brackets.