EasyManua.ls Logo

Lifetime ADIRONDACK 60335 User Manual

Lifetime ADIRONDACK 60335
16 pages
To Next Page IconTo Next Page
Page #1 background imageLoading...
Page #1 background image
Scan the code, or visit go.lifetime.com/adironchair
OR WATCH THE HOW-TO ON YOUTUBE
3D ANIMATION
OF THE FULL ASSEMBLY
WATCH
SCAN THE
CODE
OR SEARCH
1201125
YouTube
®
and the YouTube logo are trademarks of Google, LLC.
Icon Legend...............................4
Warnings & Notices.....................5
Chair Assembly...........................6
Cleaning & Care........................11
Registration............................12
Warranty.............................13
TOOLS REQUIRED TABLE OF CONTENTS
CONTACT LIFETIME CUSTOMER SERVICE:
Call: 1-800-225-3865
7:00 am–5:00 pm (Monday–Friday) MST
and 9:00 am–1:00 pm Saturday MST
Live Chat: www.lifetime.com
(click on “LIVE CHAT” tab)
QUESTIONS?
MODEL# AND PRODUCT ID (you will need both when contacting us)
Model Number: 60335
Product ID:
BEFORE ASSEMBLY:
Assemble on a level surface
At least 2 people recommended for assembly
Pour le français, voir la page 2. Para el español, ver la página 3.
ASSEMBLY INSTRUCTIONS
ADIRONDACK
CHAIR
MODEL 60335
CWT (x1)
(Included)
FYE (x1)
(Included)
(x2)
(x1)
For Customer Service in Mainland Europe and the United Kingdom,
E-mail: cs@lifetimeproducts.eu
COPY
Question and Answer IconNeed help?

Do you have a question about the Lifetime ADIRONDACK 60335 and is the answer not in the manual?

Lifetime ADIRONDACK 60335 Specifications

General IconGeneral
BrandLifetime
ModelADIRONDACK 60335
CategoryIndoor Furnishing
LanguageEnglish

Summary

Icon Legend

Warnings & Notices

Chair Assembly

1.1 Attach Outer Back Rest Panels

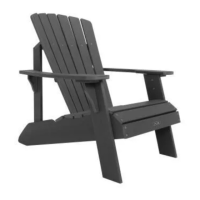
Attach the two Outer Back Rest Panels to the Back Rest using six Screws.

1.2 Attach Back Rest to Seat

Attach the Back Rest to the Seat using four Screws. Do not fully tighten.

1.3 Attach Panel to Backrest Supports

Attach the Panel to the Backrest Supports using four Screws.

1.4 Attach Backrest Supports

Attach the Backrest Supports to the Backrest and Seat using twelve Screws.

1.5 Attach Right Front Leg

Attach the Right Front Leg to the Seat using five Screws.

1.6 Attach Right Arm Rest

Attach the Right Arm Rest to the Right Front Leg using four Screws.

1.7 Repeat Steps for Left Side

Repeat steps 1.5-1.6 for the Left Front Leg and Left Armrest.

1.8 Attach Armrests to Backrest Supports

Attach the Armrests to the Backrest Supports using four Screws. Tighten all Screws now.

Cleaning & Care

Register Your Product Online

2-Year Limited Factory Warranty

Related product manuals