Do you have a question about the LIGHT MY BRICKS 75336 and is the answer not in the manual?
Proper technique for routing cables between and under LEGO studs to prevent damage.
Correctly inserting connectors into expansion board ports, aligning wires with the indicated symbol.
Ensuring correct orientation when connecting cables to strip lights, with wires facing down.
Guidance on connecting micro bit lights to micro expansion board ports, emphasizing correct orientation.
How to install bit lights under LEGO plates, ensuring the LED component faces the correct way.
Explanation of symbols and the importance of identifying specific light kit components for installation.
A visual schematic showing the layout and connections of all lights and expansion boards for the model.
A guide to the symbols and icons used throughout the installation process for clear understanding.
Preparing the LEGO model and installing the 30cm blue large bit lights.
Detailed instructions for routing cables and connecting various lighting components within the model.
Continuing cable management and connecting the Pulse Effects Board and associated cable.
Installing the 6-port expansion board, technic pins, and red 30cm bit lights.
Specific instructions for connecting bit lights to technic pins for proper illumination.
Integrating the installed lighting components and cables seamlessly into the LEGO model's structure.
Instructions for attaching red 30cm bit lights and black technic pins to designated areas.
Connecting 15cm cables to the 2-port expansion boards for further light distribution.
Connecting the Gun Effects Board and its associated 5cm cable to the main lighting system.
Finalizing the power connection by attaching the USB power cable to the system.
Steps involving the attachment of specific LEGO plates, like the 2x8 black plate, to the model.
Instructions for preparing and securely attaching red strip lights using adhesive.
Securing all internal lighting components and cables within the model's structure.
Threading a 15cm connecting cable through a specific technic bar on the LEGO model.
Detailed steps for preparing red strip lights and attaching them to the model.
Completing the installation of red strip lights by ensuring secure placement and connections.
Connecting various internal wiring harnesses and securing them within the model.
Attaching the 6x6 light grey plate and completing the external assembly with lights.
Installing white 30cm micro bit lights into minifigure lightsabers for illuminated effect.
Connecting minifigure lights to the 8-port micro expansion board using a 50cm cable.
Disconnecting the USB power cable from the 6-port expansion board as a step in the process.
Connecting the USB power cable to the designated power source (e.g., power bank, adapter).
Optional steps for illuminating minifigure lightsabers using micro bit lights and expansion boards.
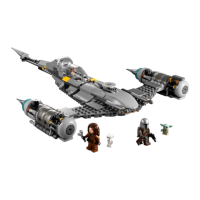
Visual representation of the LEGO Inquisitor Transport Scythe with the lighting kit fully installed.
Advice on handling small, delicate lighting components to prevent damage.
Steps to verify battery installation and power supply for the lighting kit.
How to inspect wires for damage, detachment, or pinching that may cause malfunctions.
Guidance on checking expansion board, strip light, and effects board ports for correct orientation and pin alignment.
Information on contacting customer support and accessing FAQs for assistance.
| Product Type | LED Lighting Kit |
|---|---|
| Power Source | USB |
| Category | Lighting Equipment |
| Compatibility | LEGO® |
| Installation | DIY |