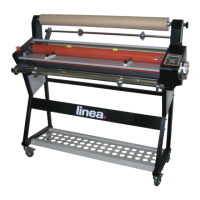
The Linea DH-1100 is a roll-fed laminator designed for user-friendly operation, suitable for both hot and cold lamination. It is recommended to read the manual thoroughly to ensure correct operation and to keep it safe for future reference.
Function Description:
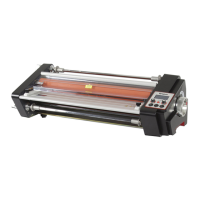
The Linea DH-1100 is primarily used for laminating documents and other materials with a protective film. It employs hot press technology for hot lamination, where heat melts the adhesive on the film to bond it to the material. It also supports cold lamination for heat-sensitive materials. The machine features a control panel with an LCD display that shows current speed, temperature, and set temperature. It allows for adjustment of laminating speed and temperature, and includes a FWD/REV switch to change the motor's direction, useful for removing mistakenly inserted objects. A HOT/COLD switch toggles between hot and cold lamination modes. The RUN/STOP switch controls the motor's operation. A LOAD button enables the machine to run at minimum speed for film loading or roller cleaning when the safety shield or feeding table is removed. An emergency stop button is present on the front of the laminator to immediately stop rollers and heating in critical situations.
Important Technical Specifications:
- Model: 1100
- Operate mode: Electric
- Max. laminating width: 1050 mm
- Max. laminating thickness: 5 mm
- Max. laminating temperature: 140°C
- Max. Laminating speed: 1.8 M/min
- Recommended film: Up to 250 mic
- Temperature control: 8-bit microprocessor
- Heating method: Heating roll
- Power supply: AC100, 110, 220-240V/50, 60Hz
- Power consumption: 2700W
- Dimensions (L x W x H): 1350 × 600 × 1170 mm
- Weight: 155 kg
Usage Features:
- Installation: The laminator comes fully assembled on a stand. Users need to screw the wheels onto the stand, put the stand upright, connect the tie bar and stand with bolts, and then place the laminator on the assembled stand. Operation begins after turning the wheel stop switch to "OFF".
- Power Connection: Ensure the rated voltage of the machine matches the power source and that the plug conforms to the socket. The power plug should be inserted into a properly grounded socket. Turning on the power switch illuminates the LCD, indicating power connection.
- Motor Overload Circuit Breaker: The machine is equipped with a motor overload circuit breaker to protect the motor. If overloaded, the circuit breaker will trip, cutting off motor power. After the overload is cleared (approximately one minute), pressing the circuit breaker button will restart the motor.
- Film Threading (Hot Film):
- Raise the safety shield by removing its active bolt.
- Take out the feed table by removing its active bolt. (Note: The machine will power off if the safety shield and feed table are not in their proper positions).
- Thread the film according to the provided diagram. The shiny (polyester) side of the film should contact the roller, and the dull (adhesive) side should face away. For matte film, careful identification of sides is necessary.
- Slide the roll film onto the roll shaft, ensuring correct orientation. Secure the roll film with core adapters and bolts, then place the rolls on the brackets.
- Unwind about half a turn from both top and bottom supply rolls to provide slack.
- Slide the feed table into position and lock the active bolt.
- Position the safety shield forward toward the roller and lock the active bolt. (Note: The machine will not power on without the feed table and safety shield in proper positions).
- Ensure sufficient slack in the film. Close the rollers using the knob. Push one edge of a threading card (or card stock/poster board) between the heating rollers to firmly position the film.
- Set the FWD/REV switch to FWD and the RUN/STOP switch to RUN. Once the threading card clears the back of the machine, set the RUN/STOP switch to STOP.
- Film Threading (Cold Film):
- Raise the safety shield and remove the active bolt.
- Thread the film as per the diagram, ensuring the adhesive side faces away from the roller.
- Insert a wide piece of cardboard (guiding paper) between the rollers. Pull the film from the top roller over the top stabilizer bar to the top roller.
- Attach the back paper of the cold film to the take-up bobbin to rewind it. Allow some cold film with melted resin to stick to the guiding paper.
- Position the safety shield forward and lock the active bolt.
- Close the rollers, set FWD/REV to FWD, and RUN/STOP to RUN.
- Hot Laminating Operation:
- Turn on the machine, set RUN/STOP to STOP, and HOT/COLD to HOT. The machine will begin heating. Adjust the temperature knob to the desired temperature for the film being used.
- The laminator will be ready in approximately 10 minutes.
- Trial Lamination: For first-time film use, trial lamination is recommended. Once the roller reaches the set temperature, close the rollers, set FWD/REV to FWD, and RUN/STOP to RUN. Allow at least 250mm of film to pass through before inserting items. Examine the film and adjust settings for optimal results.
- After successful trial lamination, position feed guides according to item width and feed the item into the film web.
- Maintain clear space behind the machine to prevent laminated items from winding onto the rubber roller. If stopping for a long period, decrease temperature by 5-10°C to prolong machine life. Stop the machine after the item fully passes through the rollers to avoid imprints.
- Cold Laminating Operation:
- Set the HOT/COLD switch to COLD.
- Set the speed to the required level.
- Place the document on the feed table.
- Set the FWD/REV switch to FWD and the RUN/STOP switch to RUN.
- Stop the machine after the document passes completely through the rollers.
- Caution: The adhesive side of the film must face away from the roller during cold lamination.
Maintenance Features:
- General Maintenance:
- Avoid laminating metal or other hard items to prevent damage to rubber rollers.
- When stopping lamination, lift the top rubber roller with the knob to prevent it from becoming stiff and shortening its lifespan.
- Regular cleaning helps prevent dirt or adhesive build-up on rollers, improving performance.
- Cleaning the Rubber Rollers:
- Excess adhesive may cling to the rubber rollers during normal lamination.
- To clean, lift the rubber roller, remove film, and heat the machine to 30-40°C. Warm rollers make adhesive removal easier.
- Raise the safety shield and remove the feed table.
- Use a clean, soft, ethanol-dampened cloth to gently rub adhesive off the rollers.
- Caution: Never use abrasive or sharp metal materials, or rub too hard, as this can damage the rubber surface.
- Set the speed to minimum, press the LOAD button, and let the roller run to clean it. After cleaning, reposition the feed table and safety shield.
- Troubleshooting (Problem Solution):
- No power: Check power at the outlet and ensure power cord is firmly engaged. Inspect the three fuses (one near power switch, two under laminator bottom).
- Wrinkling of film: This is normal, especially with thicker material, and will be trimmed away. It occurs because rollers are held apart by paper, causing uneven pulling on plastic.
- Plastic adhesive to one piece but not another (when laminating side-by-side): This can happen with items of unequal thickness. Arrange items with similar thickness when laminating side-by-side.
- Film wrapped around rollers (hot laminating):
- Incorrect film threading (adhesive side facing roller). Re-thread correctly.
- Laminating temperature too high. Decrease temperature.
- Immediately set RUN/STOP to STOP and HOT/COLD to COLD. After rollers cool, cut film in front of stabilizer bars. Reverse rollers at low speed to back out film, then pull it off. Clean adhesive from rollers.
- Wrinkling of plastic on laminated material: Check film tension and ensure proper threading.
- Film not properly adhered: Laminating temperature too low. Increase temperature.
- Irregular surface on laminated material: Caused by adhesive build-up or dirt on rubber rollers. Inspect and clean rollers. Damages to rubbers can also cause irregularities.
- General haziness or cloudiness in film after lamination: Incomplete adhesion. Increase temperature or decrease speed. If using thicker film on a variable speed machine, it may be running too fast.
Safety Precautions:
- Warning: Do not use broken, aging, or self-made electrical wires or damaged supply cords. Do not excessively draw, twist, or entangle electrical wires to prevent fire or electric shock. Use power supply according to rated voltage.
- No Disjoint: Do not disassemble, modify, or repair the machine yourself. If problems occur, send it to the dealer for repair. If the supply cord is damaged, it must be replaced by the manufacturer or qualified persons.
- Entanglement Caution: Keep hands, long hair, loose clothing, ties, and necklaces away from heating and pull rollers. If articles become entangled, press FWD/REV switch to REV. If not workable, cut off power supply and contact dealer.
- Electric Shock Caution: Do not expose electrical wire, plug, or machine to water or other liquids. Do not operate with wet hands. Do not press the machine on electrical wires. Cut off power supply when moving the machine. Do not operate with the cover open. The power socket must be properly grounded.
- High Temperature Caution: Do not place articles on the laminator while working to disperse heat. Do not insert easily burnt or softened materials that may melt and cause smoke. Do not touch the cover, heating roller, or heating parts while working to avoid heat injury.
- Working Place Caution: Place the machine in a dry, clean, horizontal, and firm location, away from dampness or cooling appliance exits. Ensure sufficient space in front and rear for document entry and exit. Do not place articles on the machine.
- Laminating Film Caution: Use good quality laminating film for best results and to avoid entanglement.
- Object Caution: The machine uses hot press technology. Do not laminate easily burnt/softened materials, heat-sensitive paper, articles that fade/transform after heating, or articles with drape, breakage, dampness, or deformation. Do not laminate coins or other hard articles. (Note: These restrictions do not apply to cold laminating). Do not laminate articles exceeding the total recommended material thickness.
- Machine Operation Caution: Do not use the machine for purposes other than stated in the manual. Do not use the machine outdoors. Cut off power supply when not in use. If problems occur, do not use it and send it to the dealer for repair.
- Advices: Mind children nearby during operation. Do not suspend electrical wires where children can touch them or where people might stumble. Using non-recommended accessories may damage the machine. Laminated photos/documents become permanent. Avoid laminating rare articles that might be needed later.