Do you have a question about the Little Tikes Easy Store Slide & Explore and is the answer not in the manual?
Essential advice before starting assembly, including reading instructions and preparing space.
Covers adult assembly, choking hazards, injury prevention, and supervision requirements.
Details on age, weight limits, safe placement, and proper use to prevent accidents.
Instructions for regular checks, lubrication, and part inspection to ensure product safety.
Guidelines for safely disassembling and disposing of the equipment.
Lists the tools needed for assembly, noting that they are not included.
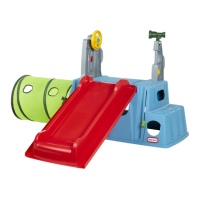
Visual guide to identify all components required for product assembly.
Information on the product's warranty period, coverage, and limitations.
How to contact Little Tikes for support, service, or replacement parts.
Detailed instructions for attaching the grasshopper front and back parts.
Guide for installing spider clickers on the wall and mounting the telescope.
Instructions for attaching the ladybug clickers to the walls.
Procedure for assembling and securing the steering wheel mechanism.
Steps for attaching the tunnel using straps and ensuring a secure fit.
Instructions for attaching the slide component to the main base.
How to detach the side walls from the main unit for storage.
Procedure for detaching the steering wheel and aligning for storage.
Guide for placing all parts inside the base and securing with the slide.
| Brand | Little Tikes |
|---|---|
| Model | Easy Store Slide & Explore |
| Category | Play Sets & Playground Equipment |
| Language | English |