Do you have a question about the Little Tikes My First Pet Checkup Set and is the answer not in the manual?
| Brand | Little Tikes |
|---|---|
| Model | My First Pet Checkup Set |
| Category | Toy |
| Language | English |
Covers reading instructions, checking parts, and general advice before starting assembly.
Highlights adult assembly needs, choking hazards, and material safety.
Essential guidelines for safe battery installation, usage, and disposal.
Details FCC regulations and instructions for proper product and battery disposal.
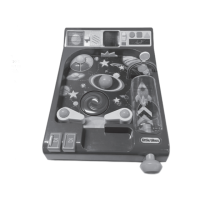
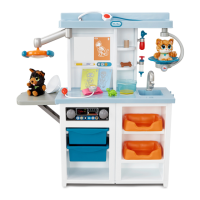
Visual identification of all parts included for assembly.
Inventory of accessories provided with the pet checkup set.
Adult supervision required for installing batteries into the toy.
Connect left and right front wall components using screws.
Snap the side panels onto the assembled front walls.
Secure the unit by snapping it onto the bottom platform.
Connect the countertop to the main unit assembly.
Install the side exam table support, ensuring correct orientation.
Pop the side exam table into the countertop slot.
Swing and snap the table support underneath the exam table.
Insert the faucet and secure it using the fastener from the back.
Fit the light arm and top shelf onto the back wall structure.
Secure the assembled top back wall onto the countertop.
Insert the scale and attach the light to the light arm.
Fit and secure the clear panel onto the rear of the back wall.
Insert clips into the side, next to the scale.
Apply decals to the back wall before installing knobs.
Push the knobs onto the front control panel.
Plug the remaining open holes with the provided hole plugs.
Add bins, pet beds, marker, and learn to use the x-ray slide.