RECALLING PRESET STATIONS
1. Press the ‘SOURCE’ button to select AM Radio or FM Radio.
2. Press and hold the PRESET/DISPLAY button for 2 seconds
3. Press the TUNING/CH ▲▼ buttons on the unit or ‘RW/TNUER-’, ‘FF/TUNER+’ buttons
on the remote control to select between the preset frequencies.
4. The stored radio frequency will be automatically selected after 2 seconds.
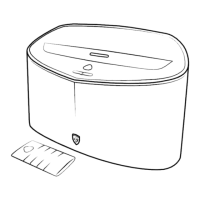
iPod
1. Remove the dock blanking plate on the top of the unit.
2. Fit the appropriate dock cradle required for your iPod. The MIP190 is provided with a
selection of different universal dock cradles and 1 blanking plate for use with other
portable audio devices..
3. Dock your iPod onto the 30pin dock connection. Press the ‘SOURCE’ button to select the
‘iPod’ function. The iPod symbol will appear on the front display.
4. The iPod will automatically begin to recharge.
5. Use the iPod click wheel to navigate between the iPod menu screens.
6. Press the TUNING/CH ▲▼ buttons on the unit or the ‘RW/TUNER-’, ‘FF/TUNER+’
buttons on the remote control to select between songs.
7. Press the VOLUME ▲▼ buttons on the unit or the ‘VOL+’, ‘VOL-’ buttons on the remote
control to adjust the volume level.
8. Use the remote control to control the play/pause, repeat, shuffle functions of the iPod
wirelessly.
MUTE CONTROL (REMOTE CONTROL ONLY)
1. Press the ‘MUTE’ button on the remote control, the audio music will switch off and the
MUTE indicator will appear on the front display.
2. To cancel the Mute function and restore the music press the MUTE button again or press
the VOLUME ▲▼ buttons on the unit or ‘VOL+’ , ‘VOL-‘ on the remote control. The
MUTE indicator will disappear.
IPOD SYNCHRONIZATION
The MIP190 offers the facility to allow data synchronization to your iPod by using a mini-USB
to USB Cable (not supplied).
1. Connect a mini USB cable into the mini-‘USB’ port on the back of the MIP190.
2. Connect the USB connector to an available USB port on your PC.
3. The iPod will now be recognised as an external device to allow you to synchronize your
iPod
 Loading...