Do you have a question about the Logik LCRAN12 and is the answer not in the manual?
Inspect unit for damage after unpacking. Do not operate if doubtful.
Place on flat, stable surface away from vibrations and heat sources.
Avoid extreme temperatures and heat sources like radiators or fires.
Never place candles or naked flames near the unit.
Protect from rain, moisture, splashing. Do not operate with wet hands.
Ensure ventilation vents are not obstructed by materials.
Ensure mains cable is not damaged and plug is accessible for disconnection.
Avoid placing near appliances causing electromagnetic interference.
Handle batteries with care, keep away from children, and dispose properly.
Supervise children to prevent them playing with the unit or inserting objects.
Do not remove screws; leave maintenance to qualified personnel.
Unplug before cleaning; use a soft, damp cloth. Avoid liquids and abrasives.
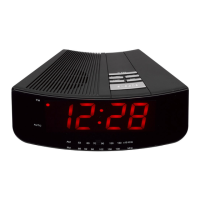
Overview of the clock radio's front display and indicators.
Identification of buttons located on the top of the unit.
Details of the FM aerial and mains cable connection.
Control for switching between alarm, radio off, and radio on modes.
Switch to select between AM and FM radio bands.
Control used for tuning into radio stations.
Control for adjusting volume or muting the buzzer.
Instructions for connecting the unit to the mains socket.
Procedure for installing a 9V battery for backup power.
How to switch the unit on, to standby, or disconnect power.
Using the BUZZ/VOL control to set the volume level.
Step-by-step guide to setting the current time on the clock.
Instructions for setting the alarm time and type (buzzer/radio).
How to activate the snooze feature when the alarm sounds.
Procedure to set a timer for the unit to switch to standby.
Instructions for cleaning the clock radio safely and effectively.
| Brand | Logik |
|---|---|
| Model | LCRAN12 |
| Category | Clock Radio |
| Language | English |