EasyManua.ls Logo

Logitech Alert 700n - User Manual

Logitech Alert 700n
2 pages
Print Icon
To Next Page IconTo Next Page
Loading...
Before you begin the installation, read
all instructions.
Legal Warning
Certain uses of security camera
products and audio devices,
such as employee monitoring,
surreptitious viewing and
recording of images and/or
audio, or the use, publication or
distribution of image and/or
audio recordings, are prohibited
or restricted by country, state
and local laws.
Be sure to comply with the laws
in your country, state, and
locality when using Logitech
Alert products and services.
1) Be sure that Logitech Alert Commander
sotware is running on the PC before
beginning installation of camera.
When prompted to connect your camera:
1) Remove the hatch from the back of the camera. 1a) Plug the yellow
cable connector into the port.
1b) Use the lock slider to lock the connector in place.
Shortly after connecting, your camera will appear in Alert Commander software. You can now move the camera to its
desired location.
1 Logitech Alert Camera
2 Camera power supply
3 Power supply cable (yellow tips)
4 Mounting accessories
5 Suction cup
6 Desktop stand
7 Cable extender
8 System Requirements Guide
Wall/Ceiling Mounting Instructions
2
1
5
2
6
3
7
4
Getting started with
Logitech
®
Alert
700n
Add-On Camera
1
3
!
Plug in Your Camera
Choose Your Camera Location
Logitech Alert Master System required.
!
8
2
2a
3
1
2a
2b
mounting arm (optional)
1
1a
1b
Run Logitech Alert
Commander
2a) Thread the ball joint into the camera. 2b) Place the ball
joint end into the wall mount clamp and tighten, using the
wing nut.
3) Attach the camera to the mounting arm.
The wall mount allows you to easily
fasten your camera to a ceiling or
wall. 1) Start by pre-drilling holes
into the wall and screwing in the
mounting base.
2) Plug the yellow cable into the power supply port.
2a) Plug the power supply into an outlet near the PC where
the software is installed.
PC
Quick-start
guide
Logitech
Alert
700i/750i
System Requirements
& Support Guide
Network Adapter / Power Supply Install Note
Caution should be used when plugging the Logitech Alert
network adapter or camera power supply into a surge
protector, power strip, extension cord or UPS (un-interuptable
power supply) because they may filter, interfere with or even
block signal transmission. To eliminate any potential issues we
recommend plugging the network adapter or power supply
directly into your wall outlet.
Note: Logitech Alert network adapters and power supplies have
their own built-in surge protectors.
!
Using In-the-box Accessories
You can use the mini-suction cup and
cable wall clips to help route the power
supply cable (yellow connector) along
the window’s edge and provide addi-
tional security to that camera.
On a desk or table
On a window looking in
Clean the window's surface and the inside area
of the suction cup before applying it to the
window. Periodically press the suction cup
against the glass to strengthen its bond to the
window.
Warning
Using camera to look out
a window
!
Only use for non-night vision applications
or when a secondary outdoor lighting
source is available. Infrared illumination
used in night vision cameras cannot
penetrate glass and can adversely aect
picture quality.
You can turn o night vision in the Settings
> Camera> Advanced>Night Vision O
OR

Other manuals for Logitech Alert 700n

Question and Answer IconNeed help?

Do you have a question about the Logitech Alert 700n and is the answer not in the manual?

Summary

Run Logitech Alert Commander

Plug in Your Camera

Choose Your Camera Location

On a Desk or Table

Place the Logitech Alert camera on a flat surface for stable positioning.

On a Window Looking In

Mount camera to a window using the suction cup for indoor viewing.

Wall;Ceiling Mounting Instructions

Troubleshooting Camera Connection

Camera or Video Disappears

Steps to resolve issues when the camera feed is lost or not visible.

Power Supply Cable Length

Solutions for a short power supply cable, including extenders.

FAQs and Support Information

Commander Help Access

How to access the online Help system within the Alert Commander software.

Knowledge Base and Forums

Resources for troubleshooting and best practices for Logitech Alert products.

Customer Support Contact

Phone number for contacting Logitech customer support for assistance.

Understanding Diagnostic LEDs

Motion LED Indicators

Interpreting the Motion LED for camera recording status.

Camera Diagnostic LED Meanings

Deciphering camera LED colors to diagnose operational and connectivity status.

Power Supply;Network Adapter LEDs

Understanding the status lights on the power supply and network adapter.

Remote Camera Access

Overview

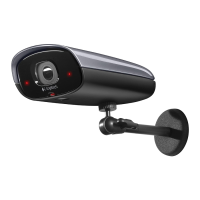
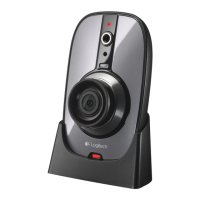
The Logitech Alert 700n is an add-on camera designed to expand an existing Logitech Alert Master System, providing enhanced security and monitoring capabilities. This camera is primarily intended for indoor use, offering a range of features for both local and remote surveillance.

Function Description:

The Logitech Alert 700n camera captures video footage, which can be viewed live or recorded. It integrates seamlessly with the Logitech Alert Commander software, allowing users to manage camera settings, view feeds, and access recorded content. The camera is equipped with motion detection, triggering recordings when activity is detected. It also features night vision capabilities, though its effectiveness through glass for outdoor viewing is limited due to infrared illumination. The system supports remote viewing via a secure web portal (alert.logitech.com) or dedicated smartphone apps for iPhone, iPad, Android, and BlackBerry devices, enabling users to monitor their premises from anywhere with an internet connection.

Important Technical Specifications:

The camera connects to the system via a power supply cable (yellow connector) that plugs into the camera and then into a power supply unit. This power supply unit, which also acts as a network adapter, connects directly to a wall outlet. The system uses diagnostic LEDs on both the camera and the power supply/network adapter to indicate operational status and connectivity.

  • Camera Diagnostic LEDs:
    • Green: Connected to Internet
    • Purple: Connected to Alert Commander
    • Blue: Connected to Alert Commander & Internet
    • White: Upgrading Firmware
    • Yellow: Camera in standalone mode
    • Light Blue: Not connected to Alert Commander or Internet
    • Red (blinking): Camera boot-up failed
    • Alternating Red/Yellow (blinking): microSD card read/write failure or no microSD card
  • Motion LED:
    • Red: Camera is ready to record
    • Red (blinking): Camera is recording
  • Power Supply / Network Adapter Diagnostic LEDs:
    • Green (Traffic and data): Indicates data flow
    • Green (Connection): Indicates connection with Ethernet/LAN
    • Green (Link): Indicates link to Power Supply
    • Blue (Network traffic): Shows network traffic

The camera's power supply and network adapter are designed with built-in surge protectors. For optimal performance, it is recommended to plug these components directly into a wall outlet rather than through surge protectors, power strips, extension cords, or UPS devices, as these can filter, interfere with, or block signal transmission.

Usage Features:

  • Installation: The camera installation begins by running the Logitech Alert Commander software on a PC. The camera connects to its power supply via a yellow cable connector that locks into a port on the back of the camera. The power supply then plugs into an outlet near the PC.
  • Mounting Options:
    • Desk or Table: The camera can be placed on a flat surface using the included desktop stand.
    • Window (Looking In): For indoor placement looking out a window, a suction cup mount is provided. Users should clean both the window surface and the suction cup area before application and periodically press the suction cup to maintain its bond. Note that night vision is not effective through glass.
    • Wall/Ceiling Mounting: A wall mount allows the camera to be fastened to a ceiling or wall. This involves pre-drilling holes, screwing in the mounting base, threading a ball joint into the camera, and then securing the ball joint into the mount clamp with a wing nut. An optional mounting arm can also be used.
  • Cable Management: The included mini-suction cup and cable wall clips can be used to route the power supply cable along window edges, providing additional security. A cable extender is provided for situations where the power supply cable is too short; alternatively, a longer CAT-5e Ethernet cable can be purchased.
  • Night Vision: The camera has night vision capabilities, but it is advised for non-night vision applications or when a secondary outdoor lighting source is available, especially when looking through a window, as infrared illumination cannot penetrate glass effectively. Night vision can be turned off in the Settings > Camera > Advanced > Night Vision Off menu.
  • LED Control: Motion and diagnostic LEDs on the camera can be turned off via the Settings > Cameras > Camera > Show LED for... menu. Diagnostic LEDs on the power supply/network adapter can be disabled using a switch located on its side.
  • Remote Access: Live video feeds from the camera can be accessed remotely through the Logitech Alert secure web viewer (alert.logitech.com) or dedicated smartphone applications.

Maintenance Features:

  • Troubleshooting:
    • Camera Disappears/Video Loss: Solutions include testing different outlets, verifying direct power supply/network bridge connection to a wall outlet, checking firewall settings, using the "Find Cameras" function in Commander (Settings > Cameras > Add/Find), or resetting the camera.
    • Camera Reset: To reset the camera to factory settings (without deleting microSD card recordings), insert a paper clip into the reset hole on the back of the camera, press gently for 5 seconds, and then release. Alternatively, use the Settings > Reboot/Reset > Reset option in the software. If the camera still doesn't operate after a reset, technical support should be contacted.
  • Firmware Updates: The camera indicates firmware upgrades through a white diagnostic LED.
  • Support Resources: Users can find additional information through Commander Help (F1 key), the Logitech Knowledge Base (www.logitech.com/support), Logitech Forums (www.forums.logitech.com), and Customer Support (1.888.469.4543).

Logitech Alert 700n Specifications

General IconGeneral
BrandLogitech
ModelAlert 700n
CategorySecurity Camera
LanguageEnglish

Related product manuals