EasyManua.ls Logo

Lomanco LomanCool 2000 User Manual

Lomanco LomanCool 2000
2 pages
To Next Page IconTo Next Page
Page #1 background imageLoading...
Page #1 background image
Find us on
Facebook
Follow us on
Twitter
OMANCO
OMANCO


Power Vent Installation Instructions
INSTALLATION
1. Determine approximately where on your
roof you will place your Power Ventilator.
•At the highest point in your attic or
air space. Best if centered on roof
length, and less conspicuous if
placed on side away from street.
•IMPORTANT: Keep the highest
part of the dome lower than
the ridge line to ensure that the
dome's edge is NOT above ridge
line. (Typically, the center of the
vent should be about 24 inches
down from the ridge.)
•Establish your position with
accuracy (because you will want
to duplicate it inside your attic) by
measuring down from the ridge
and over from the roof edge.
2. Working now from the inside, mark your
planned opening (as you established
position when on roof) and relocate
your position to be centered between
two rafters. Drive a nail into the roof so
that it can be easily found when you
return to the roof. Before you return
to the roof, be sure that you have:
(a) string or compass, (b) drill and drill
bit, (c) keyhole or electric jig (saber)
saw with a sharp coarse blade, (d)
ventilator and base, (e) roong nails
and hammer, and (f) roong cement
and applicator.
3. Using the nail driven from the inside
as center, scribe a 14” diameter circle
using string or compass. Care should
be taken not to make the hole too large.
4. Drill a starting hole for sawing inside
the scribed circle.
5. Starting in the drilled hole, cut circular
opening, following the scribed line. Use
either keyhole or an electric jig (saber)
saw with a sharp coarse blade to cut
shingles and roof boards at one time.
If you do not have a coarse blade, cut
away shingles inside the circle with
utility knife before cutting roof boards.
6. Carefullyremoveroongnailsfromtop
rowofshinglessothattheashingof
the ventilator will slide under top row.
Slide ventilator carefully into place with
arrow pointing up, letting thermostat
hang down into opening. Fasten the
aluminum base to roof boards with
roongnails.Keepheadsofnailsunder
shingles wherever possible.
7. Finish the exterior mounting by sealing
all seams and nails with roong
cement. Use cement also to fasten
down loose edges of shingles. Return
to the attic. You now have to mount
the thermostat and connect the wiring.
20500_0512
WARNING —TO REDUCE THE RISK OF
FIRE, ELECTRIC SHOCK, OR INJURY TO
PERSONS, OBSERVE THE FOLLOWING:
A. Use this unit only in the manner intended by the
manufacturer. If you have any questions, contact the
manufacturer.
B. Before servicing or cleaning unit, switch power off at
service panel and lock service panel to prevent power
from being switched on accidentally. When the service
panel cannot be locked, securely fasten a prominent
warning device, such as a tag to the service panel.
C. Installation work and electrical wiring must be done by
qualied person(s) in accordance with all applicable
codesandstandards,includingre-ratedconstruction.
D. Sufcient air is needed for proper combustion and
exhaustingofgasesthroughtheue(chimney)offuel-
burning equipment to prevent back drafting. Follow
the heating equipment manufacturer’s guide lines
and safety standards, such as those published by the
National Fire Protection Association (NFPA) and the
American Society for Heating, Refrigeration and Air
Conditioning Engineers (ASHRAE), and the local code
authorities.
E. When cutting or drilling into wall or ceiling, do not
damage electrical wiring or other hidden utilities.
F. Ducted fans must always be vented to the outdoors.
G. If this unit is to be installed over a tub or shower, it must
be marked as appropriate for the application.
H. NEVER-placeaswitchwhereitcanbereachedfrom
a tub or a shower.
CAUTION - For general ventilating use only. Do not
use to exhaust hazardous or explosive materials and
vapors.
CAUTION- This unit has an unguarded fan blade.
Do not use in locations readily accessible to people
or animals. This fan is intended for use facing an
unoccupied space only.
Be sure your fan is properly installed. Your fan is
designed to operate on 120 VAC 60 Hz.
Sharp edges are exposed during installation. Use
gloves and other safety equipment to avoid accidents.
WARNING -Toreducetheriskofreorelectricshock,
do not use this fan with any solid state speed control.
IMPORTANT
With the power vent installed, at least 780 square
inches of inlet area must be provided. This is achieved
by installing 12, 8” x 16” intake vents, measuring 65
square inches each.
OPERATION
Your ventilator will operate automatically as needed.
The adjustable thermostat has been set at the factory
to come on at 100°F., off at 85°F. The motor has been
permanently lubricated and does not require additional
lubrication.
Question and Answer IconNeed help?

Do you have a question about the Lomanco LomanCool 2000 and is the answer not in the manual?

Lomanco LomanCool 2000 Specifications

General IconGeneral
BrandLomanco
ModelLomanCool 2000
CategoryFan
LanguageEnglish

Summary

General Safety and Warnings

Use unit as intended

Use unit only as intended by manufacturer. Contact manufacturer for questions.

Power off and lock panel

Switch power off at service panel and lock it to prevent accidental power-on.

Qualified installation

Installation and electrical wiring must be done by qualified persons per codes.

Air for combustion

Ensure sufficient air for combustion and gas exhausting to prevent back drafting.

Avoid utilities

Do not damage electrical wiring or utilities when cutting into wall or ceiling.

Outdoor venting

Ducted fans must always be vented to the outdoors.

Tub/shower installation

If installed over a tub or shower, it must be marked as appropriate.

Switch placement

Never place a switch where it can be reached from a tub or shower.

Caution: Hazardous materials

For general ventilating use only. Do not exhaust hazardous or explosive materials.

Caution: Unguarded fan

Unit has an unguarded fan blade; keep away from people or animals.

Warning: Speed control

Do not use this fan with any solid state speed control to reduce fire risk.

Important: Inlet area requirement

At least 780 sq. in. of inlet area must be provided with the power vent installed.

Operation overview

Ventilator operates automatically via thermostat. Motor is permanently lubricated.

Installation Steps

Determine roof placement

Determine placement on roof, ideally centered and below ridge line for best appearance.

Mark inside opening

Working from inside, mark the planned opening, centering between rafters.

Scribe opening circle

Using a nail as center, scribe a 14" diameter circle for the opening.

Drill starting hole

Drill a starting hole inside the scribed circle for sawing.

Cut circular opening

Cut the circular opening following the scribed line using a saw.

Slide ventilator and fasten

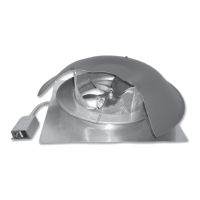
Remove shingles, slide ventilator into opening, and fasten aluminum base with roofing nails.

Seal exterior seams

Seal all seams and nails with roofing cement to prevent leaks.

Position thermostat and wire

Position thermostat base high, ensure flexible cable doesn't touch roof/rafters. Wire as shown.

Connect power and test

Turn off power, connect wires to ventilator, then turn power on. Test unit with switch.

Warranty and Approvals

Limited Warranty

Five-year warranty against defects. Online registration required within ten days.

Online Warranty Registration

Register product online at lomanco.com or call for assistance.

County and State Approvals

Miami-Dade County Approved and Texas Department of Insurance Windstorm Approved.

Safety Certifications

Includes UL and CSA certifications for safety and performance.

Attic Ventilation Best Practices

Guidelines for installing exhaust vents, intake vents, and balanced systems.

Related product manuals