Reductor
Reducer
03
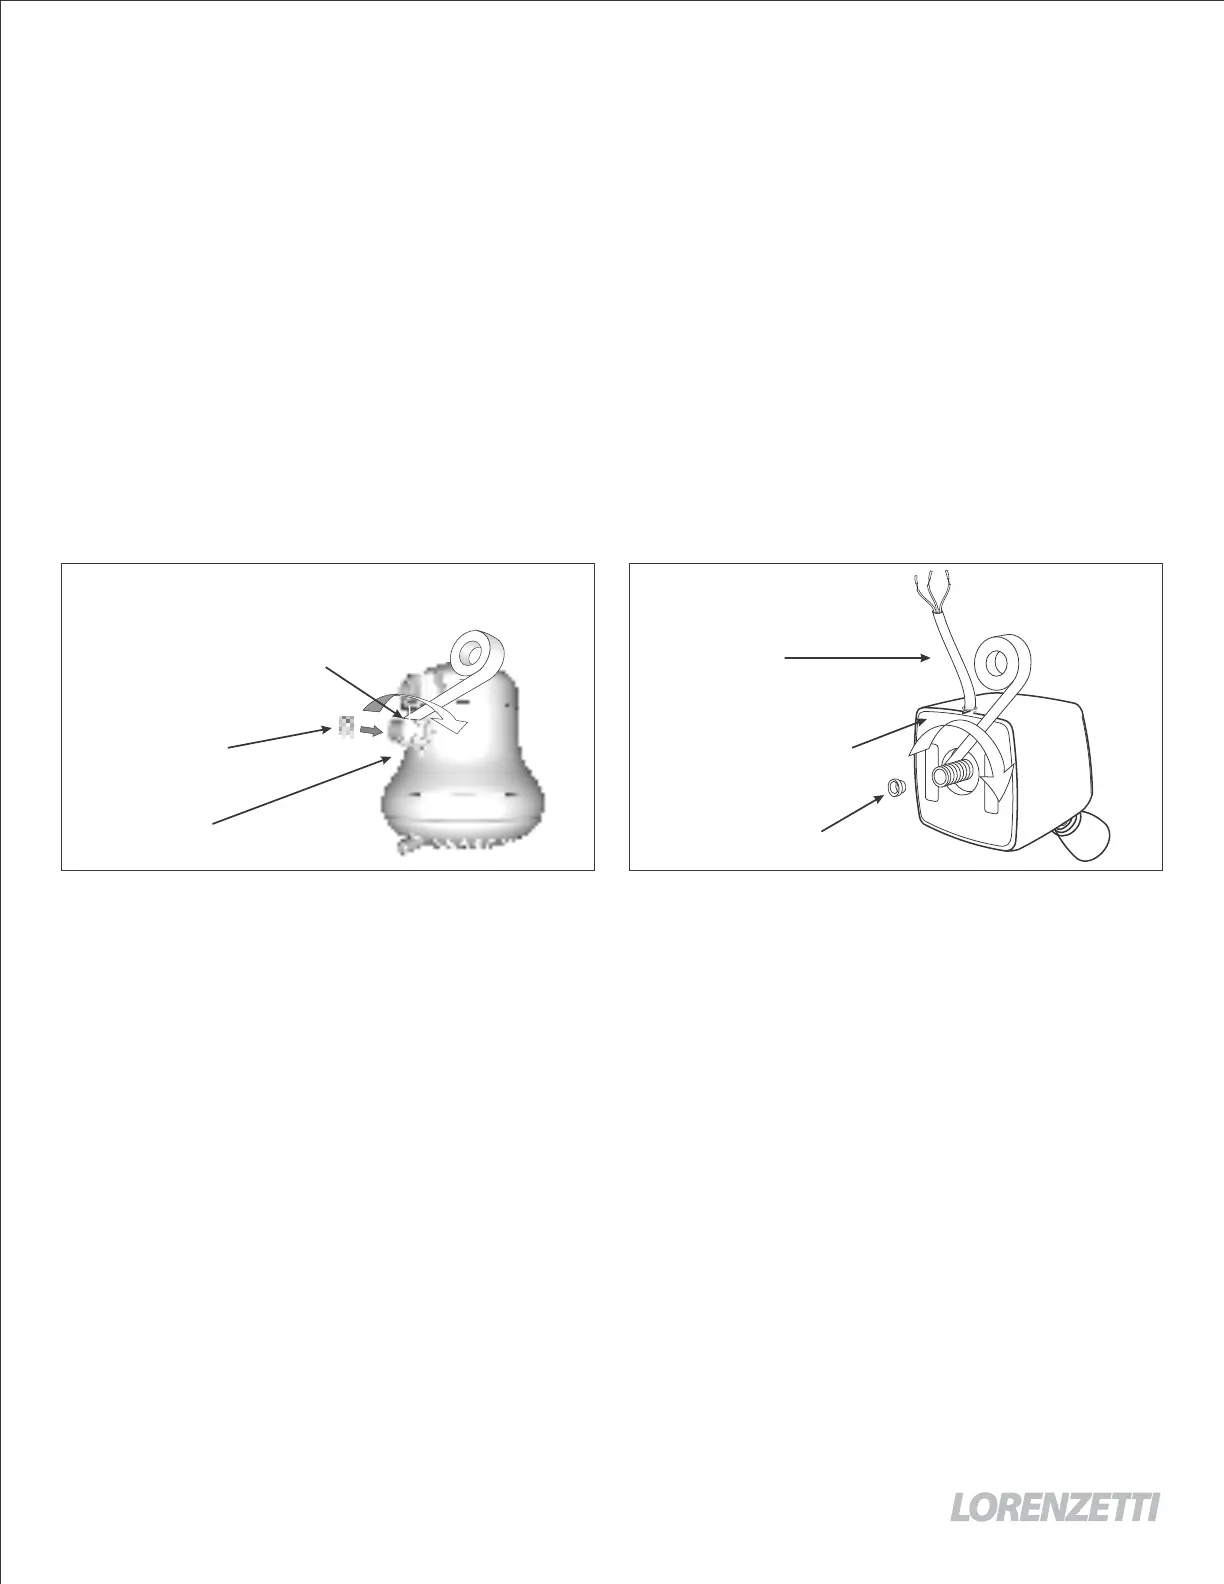
Niple de entrada de agua
Water inlet Nipple
Rosca
Thread
Tubo
Tube
Tapa trasera
Back cover
Reductor
Reducer
XI SHOWER / MAXI DUCHA / LOREN BELLO
DUCHA RELAX
plumbing installation must be completed before the electrical installation.
esistivity of water at 15°C should not be less than 1300 ohms X cm.
minimum income water pressure to activate the appliance is 1.0 mca (1.5 Psi or 10 kPA or 0.10 Bar)
.02)
maximum income water pressure is 40 mca (58Psi or 400kPa or 4Bar). Residential plumbing systems
unstable pressure or pressure above than recommended require the installation of a pressure
stabilizer valve.
quality and pressure may have an impact on the life span of the heating element, as well as on the
appliance. These factors are not covered under the manufacturer's warranty.
e installing the appliance, let the water run out to drain out all plumbing dirt and to purge out any air
bubbles/pockets and make sure there are no leaks.
height from the water outlet point (where the shower will be installed) to the oor or bathtub should
approximately 2 meters (Fig. 02).
water outlet (DN15 1/2” BSP thread) must to be at level to the wall. If it´s too deep inside the wall
than 3mm), install an extension device (does not come with the product).
water pressure is less than 8mca (80kPa or 12PSI), remove the water ow reducer installed in the
inlet nipple of the appliance.
04
anual de Instalación / Installation Manual
DUCHA 3 TEMPERATURAS / 3 TEMPERATURES SHOWER HEAD
X ULTRA
la tapa trasera del producto y estire hacia fuera el tubo de revestimiento con los cables eléctricos.
Páselo por el hueco en la parte superior de la tapa trasera y deslícelo para que encaje correctamente en la
cavidad superior del cuerpo del aparato.
Aplique cinta PTFE (teón) alrededor del niple de la ducha (Fig. 04).
nstale el aparato girándolo suavemente. No use el esparcidor multidireccional como palanca durante la
instalación.
tante:
correr agua por el aparato antes de conectarlo a la electricidad: Abra la llave de paso para que pase
y deje llenar la cámara de calentamiento para evitar que se queme la resistencia eléctrica. Verique
fugas de agua y cierre la llave de paso.
Repita esta operación siempre que el producto es retirado y reinstalado.
04
Reductor
Reducer
03
Niple de entrada de agua
Water inlet Nipple
Rosca
Thread
Tubo
Tube
Tapa trasera
Back cover
Reductor
Reducer
MAXI SHOWER / MAXI DUCHA / LOREN BELLO
DUCHA RELAX
The plumbing installation must be completed before the electrical installation.
The resistivity of water at 15°C should not be less than 1300 ohms X cm.
The minimum income water pressure to activate the appliance is 1.0 mca (1.5 Psi or 10 kPA or 0.10 Bar)
ig.02)
The maximum income water pressure is 40 mca (58Psi or 400kPa or 4Bar). Residential plumbing systems
with unstable pressure or pressure above than recommended require the installation of a pressure
stabilizer valve.
ater quality and pressure may have an impact on the life span of the heating element, as well as on the
appliance. These factors are not covered under the manufacturer's warranty.
ore installing the appliance, let the water run out to drain out all plumbing dirt and to purge out any air
bubbles/pockets and make sure there are no leaks.
The height from the water outlet point (where the shower will be installed) to the oor or bathtub should
approximately 2 meters (Fig. 02).
The water outlet (DN15 1/2” BSP thread) must to be at level to the wall. If it´s too deep inside the wall
er than 3mm), install an extension device (does not come with the product).
the water pressure is less than 8mca (80kPa or 12PSI), remove the water ow reducer installed in the
water inlet nipple of the appliance.
04
anual de Instalación / Installation Manual
DUCHA 3 TEMPERATURAS / 3 TEMPERATURES SHOWER HEAD
RELAX ULTRA
Retire la tapa trasera del producto y estire hacia fuera el tubo de revestimiento con los cables eléctricos.
Páselo por el hueco en la parte superior de la tapa trasera y deslícelo para que encaje correctamente en la
cavidad superior del cuerpo del aparato.
Aplique cinta PTFE (teón) alrededor del niple de la ducha (Fig. 04).
nstale el aparato girándolo suavemente. No use el esparcidor multidireccional como palanca durante la
instalación.
Importante:
Haga correr agua por el aparato antes de conectarlo a la electricidad: Abra la llave de paso para que pase
agua y deje llenar la cámara de calentamiento para evitar que se queme la resistencia eléctrica. Verique
hay fugas de agua y cierre la llave de paso.
Repita esta operación siempre que el producto es retirado y reinstalado.
04
Reductor
Reducer
03
Niple de entrada de agua
Water inlet Nipple
Rosca
Thread
Tubo
Tube
Tapa trasera
Back cover
Reductor
Reducer
MAXI SHOWER / MAXI DUCHA / LOREN BELLO
DUCHA RELAX
The plumbing installation must be completed before the electrical installation.
The resistivity of water at 15°C should not be less than 1300 ohms X cm.
The minimum income water pressure to activate the appliance is 1.0 mca (1.5 Psi or 10 kPA or 0.10 Bar)
(Fig.02)
The maximum income water pressure is 40 mca (58Psi or 400kPa or 4Bar). Residential plumbing systems
with unstable pressure or pressure above than recommended require the installation of a pressure
stabilizer valve.
Water quality and pressure may have an impact on the life span of the heating element, as well as on the
appliance. These factors are not covered under the manufacturer's warranty.
Before installing the appliance, let the water run out to drain out all plumbing dirt and to purge out any air
bubbles/pockets and make sure there are no leaks.
The height from the water outlet point (where the shower will be installed) to the oor or bathtub should
be approximately 2 meters (Fig. 02).
The water outlet (DN15 1/2” BSP thread) must to be at level to the wall. If it´s too deep inside the wall
(over than 3mm), install an extension device (does not come with the product).
If the water pressure is less than 8mca (80kPa or 12PSI), remove the water ow reducer installed in the
water inlet nipple of the appliance.
04
Manual de Instalación / Installation Manual
DUCHA 3 TEMPERATURAS / 3 TEMPERATURES SHOWER HEAD
RELAX ULTRA
Retire la tapa trasera del producto y estire hacia fuera el tubo de revestimiento con los cables eléctricos.
Páselo por el hueco en la parte superior de la tapa trasera y deslícelo para que encaje correctamente en la
cavidad superior del cuerpo del aparato.
Aplique cinta PTFE (teón) alrededor del niple de la ducha (Fig. 04).
Instale el aparato girándolo suavemente. No use el esparcidor multidireccional como palanca durante la
instalación.
Importante:
Haga correr agua por el aparato antes de conectarlo a la electricidad: Abra la llave de paso para que pase
agua y deje llenar la cámara de calentamiento para evitar que se queme la resistencia eléctrica. Verique
si hay fugas de agua y cierre la llave de paso.
Repita esta operación siempre que el producto es retirado y reinstalado.
04
 Loading...