MAXI DUCHA, MAXI SHOWER, LOREN BELLO
The appliance needs to be installed in a shower tube or arm (not included) that will be installed at the
water outlet. Place PTFE tape (Teon) around the nipple thread (Fig.03)
Screw the appliance gently at the water outlet thread. Do not use tools (Fig.03)
The appliance need to be horizontally leveled (Fig. 03).
RELAX ULTRA
Remove the back cover of the product and stretch out the tube
jacket with the electric cables. Pass it through the hole in the upper
side of the back cover and slide it to t correctly in the upper cavity
of the appliance body.
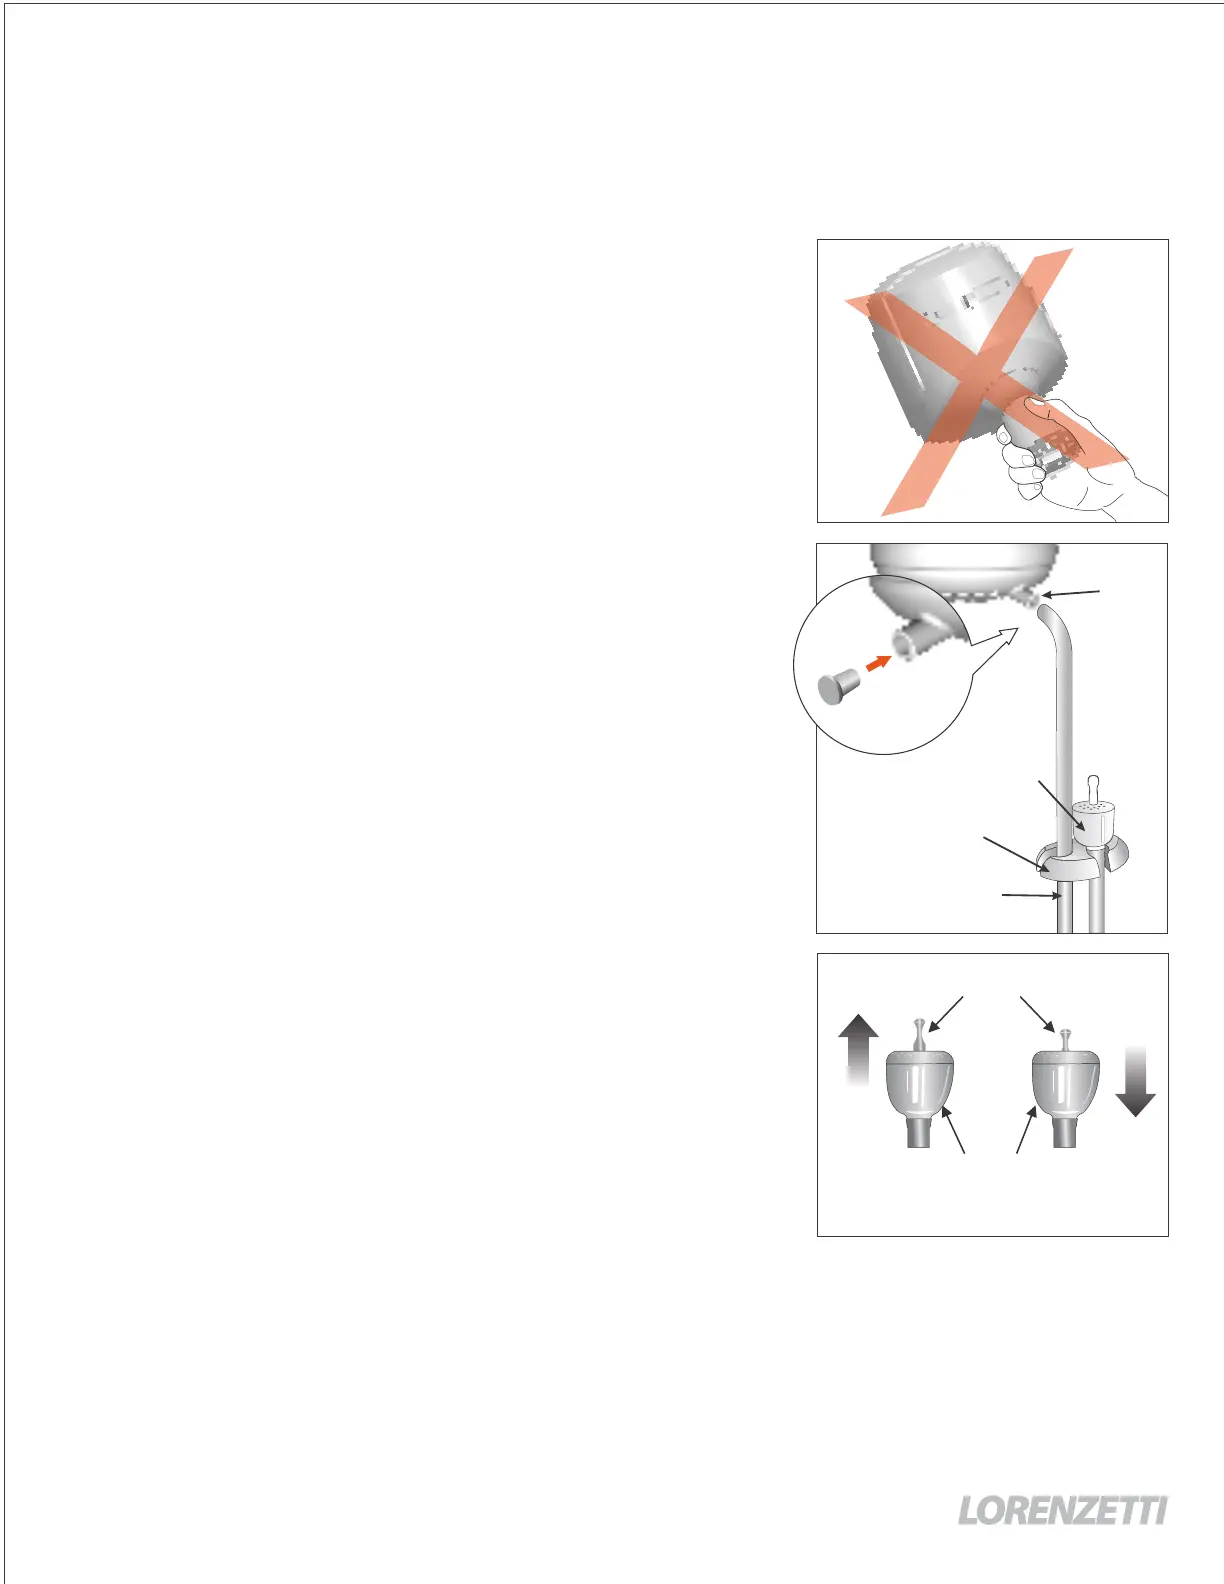
Place PTFE tape (Teon) around the nipple thread (Fig. 04).
Install the appliance by turning it gently. Do not use the
multidirectional spreader as a lever during installation (Fig. 05).
Warning:
Before connect it to the cables and to prevent the burning of
the heating element, open the shower tap to run water through
and to ll up the inner heater chamber .
Check for any water leakage and shut the shower tap o.
Repeat this operation whenever the product is removed and
reinstalled.
5. Hand shower and hose1 Instalación de la duchita manual /
Installation
Instale el soporte de la manguera en la pared de manera que no
bloquee su ujo de agua a través de él y a una altura fácilmente
al alcance de la mano. Nota: Verique la posición de las tuberías
en la pared para asegurarse de que no sean perforados por el taladro
durante la instalación del soporte de la manguera (Fig. 06).
Caso no desee instalar la manguera y la duchita manual, coloque el
tapón para cerrar la salida de agua (Fig. 06).
Install the hose holder on the wall in a way that it does not block
the water owing through it, and at a
height easily by hands reach.
Note: Check the pipes position into the wall to assure they
won´t be drilled during the hose holder installation ( Fig.06).
In case of not install the hose and hand shower, place the hose plug to shut the water outlet. (Fig. 06).
5.2 Uso de la duchita manual How to use the hand shower /
Empuje y tire del pin central (abra y cierre) de la ducha de mano. Cierre la duchita manual después de su
uso (Fig. 07).
Push and pull the center pin (open and close) of the hand shower. Close the hand shower after use
(Fig. 07).
05
05
Manual de Instalación / Installation Manual
DUCHA 3 TEMPERATURAS / 3 TEMPERATURES SHOWER HEAD
Manguera
Hose
Soporte
Support
Ducha Manual
Hand Shower
06
Tapón
Hose Plug
07
Abrir
Open
Cerrar
Close
Ducha Manual
Hand Shower
Pin central / Central Pin
Salida
de agua
Water
outlet
MAXI DUCHA, MAXI SHOWER, LOREN BELLO
The appliance needs to be installed in a shower tube or arm (not included) that will be installed at the
water outlet. Place PTFE tape (Teon) around the nipple thread (Fig.03)
Screw the appliance gently at the water outlet thread. Do not use tools (Fig.03)
The appliance need to be horizontally leveled (Fig. 03).
RELAX ULTRA
Remove the back cover of the product and stretch out the tube
jacket with the electric cables. Pass it through the hole in the upper
side of the back cover and slide it to t correctly in the upper cavity
of the appliance body.
Place PTFE tape (Teon) around the nipple thread (Fig. 04).
Install the appliance by turning it gently. Do not use the
multidirectional spreader as a lever during installation (Fig. 05).
Warning:
Before connect it to the cables and to prevent the burning of
the heating element, open the shower tap to run water through
and to ll up the inner heater chamber .
Check for any water leakage and shut the shower tap o.
Repeat this operation whenever the product is removed and
reinstalled.
5. Hand shower and hose1 Instalación de la duchita manual /
Installation
Instale el soporte de la manguera en la pared de manera que no
bloquee su ujo de agua a través de él y a una altura fácilmente
al alcance de la mano. Nota: Verique la posición de las tuberías
en la pared para asegurarse de que no sean perforados por el taladro
durante la instalación del soporte de la manguera (Fig. 06).
Caso no desee instalar la manguera y la duchita manual, coloque el
tapón para cerrar la salida de agua (Fig. 06).
Install the hose holder on the wall in a way that it does not block
the water owing through it, and at a
height easily by hands reach.
Note: Check the pipes position into the wall to assure they
won´t be drilled during the hose holder installation ( Fig.06).
In case of not install the hose and hand shower, place the hose plug to shut the water outlet. (Fig. 06).
5.2 Uso de la duchita manual How to use the hand shower /
Empuje y tire del pin central (abra y cierre) de la ducha de mano. Cierre la duchita manual después de su
uso (Fig. 07).
Push and pull the center pin (open and close) of the hand shower. Close the hand shower after use
(Fig. 07).
05
05
Manual de Instalación / Installation Manual
DUCHA 3 TEMPERATURAS / 3 TEMPERATURES SHOWER HEAD
Manguera
Hose
Soporte
Support
Ducha Manual
Hand Shower
06
Tapón
Hose Plug
07
Abrir
Open
Cerrar
Close
Ducha Manual
Hand Shower
Pin central / Central Pin
Salida
de agua
Water
outlet
MAXI DUCHA, MAXI SHOWER, LOREN BELLO
The appliance needs to be installed in a shower tube or arm (not included) that will be installed at
water outlet. Place PTFE tape (Teon) around the nipple thread (Fig.03)
Screw the appliance gently at the water outlet thread. Do not use tools (Fig.03)
The appliance need to be horizontally leveled (Fig. 03).
RELAX ULTRA
Remove the back cover of the product and stretch out the tube
jacket with the electric cables. Pass it through the hole in the upper
side of the back cover and slide it to t correctly in the upper cavity
of the appliance body.
Place PTFE tape (Teon) around the nipple thread (Fig. 04).
Install the appliance by turning it gently. Do not use the
multidirectional spreader as a lever during installation (Fig. 05).
Warning:
Before connect it to the cables and to prevent the burning of
the heating element, open the shower tap to run water through
and to ll up the inner heater chamber .
Check for any water leakage and shut the shower tap o.
Repeat this operation whenever the product is removed and
reinstalled.
5. Hand shower and hose1 Instalación de la duchita manual /
Installation
Instale el soporte de la manguera en la pared de manera que no
bloquee su ujo de agua a través de él y a una altura fácilmente
al alcance de la mano. Nota: Verique la posición de las tuberías
en la pared para asegurarse de que no sean perforados por el taladro
durante la instalación del soporte de la manguera (Fig. 06).
Caso no desee instalar la manguera y la duchita manual, coloque el
tapón para cerrar la salida de agua (Fig. 06).
Install the hose holder on the wall in a way that it does not block
the water owing through it, and at a height
easily by hands reach.
Note: Check the pipes position into the wall to assure they
won´t be drilled during the hose holder installation ( Fig.06).
In case of not install the hose and hand shower, place the hose plug to shut the water outlet. (Fig. 06).
5.2 Uso de la duchita manual How to use the hand shower /
Empuje y tire del pin central (abra y cierre) de la ducha de mano. Cierre la duchita manual después de
uso (Fig. 07).
Push and pull the center pin (open and close) of the hand shower. Close the hand shower after use
(Fig. 07).
Manual de Instalación / Installation Manual
DUCHA 3 TEMPERATURAS / 3 TEMPERATURES SHOWER HEAD
Manguera
Hose
Soporte
Support
Ducha Manual
Hand Shower
Tapón
Hose Plug
Abrir
Open
Cerrar
Close
Ducha Manual
Hand Shower
Pin central / Central Pin
Salida
de agua
Water
outlet
MAXI DUCHA, MAXI SHOWER, LOREN BELLO
The appliance needs to be installed in a shower tube or arm (not included) that will be installed
water outlet. Place PTFE tape (Teon) around the nipple thread (Fig.03)
Screw the appliance gently at the water outlet thread. Do not use tools (Fig.03)
The appliance need to be horizontally leveled (Fig. 03).
RELAX ULTRA
Remove the back cover of the product and stretch out the tube
jacket with the electric cables. Pass it through the hole in the upper
side of the back cover and slide it to t correctly in the upper cavity
of the appliance body.
Place PTFE tape (Teon) around the nipple thread (Fig. 04).
Install the appliance by turning it gently. Do not use the
multidirectional spreader as a lever during installation (Fig. 05).
Warning:
Before connect it to the cables and to prevent the burning of
the heating element, open the shower tap to run water through
and to ll up the inner heater chamber .
Check for any water leakage and shut the shower tap o.
Repeat this operation whenever the product is removed and
reinstalled.
5. Hand shower and hose1 Instalación de la duchita manual /
Installation
Instale el soporte de la manguera en la pared de manera que no
bloquee su ujo de agua a través de él y a una altura fácilmente
al alcance de la mano. Nota: Verique la posición de las tuberías
en la pared para asegurarse de que no sean perforados por el taladro
durante la instalación del soporte de la manguera (Fig. 06).
Caso no desee instalar la manguera y la duchita manual, coloque el
tapón para cerrar la salida de agua (Fig. 06).
Install the hose holder on the wall in a way that it does not block
the water owing through it, and at a height easily
by hands reach.
Note: Check the pipes position into the wall to assure they
won´t be drilled during the hose holder installation ( Fig.06).
In case of not install the hose and hand shower, place the hose plug to shut the water outlet. (Fig.
5.2 Uso de la duchita manual How to use the hand shower /
Empuje y tire del pin central (abra y cierre) de la ducha de mano. Cierre la duchita manual después
uso (Fig. 07).
Push and pull the center pin (open and close) of the hand shower. Close the hand shower after use
(Fig. 07).
Manual de Instalación / Installation Manual
DUCHA 3 TEMPERATURAS / 3 TEMPERATURES SHOWER HEAD
Manguera
Hose
Soporte
Support
Ducha Manual
Hand Shower
Tapón
Hose Plug
Abrir
Open
Ducha Manual
Hand Shower
Pin central / Central P
 Loading...