EasyManua.ls Logo

Lortone LSS-14P - User Manual

Default Icon
7 pages
Print Icon
To Next Page IconTo Next Page
Loading...
1/12
Page 1
Copyright © 2008 Lortone, Inc
LORTONE, inc • 12130 Cyrus Way, Mukilteo, WA 98275 U.S.A
Phone: 425-493-1600 • www.lortone.com
LSS-14P
InStructIonS and PartS LISt
The LSS-14P is a quiet, clean 14” slab saw in a compact bench-top design.
Equipped with a fast, powerful screw-feed and a 5-1/2” capacity vise. Properly
set up, operated and maintained, the Panther will cut rock at twice the speed of
standard screw-feed saws. Oil coolant required.
• 14” Blade for Larger Cuts
• Bench-Top Design
• Fast Power Screw-Feed
• Sturdy Welded Steel Frame Won’t Crack or Warp
• Built-in Blade Sharpener
• Hinged Hood with Tempered Glass Window
LSS-14P Item # 058-090
LortonE
Question and Answer IconNeed help?

Do you have a question about the Lortone LSS-14P and is the answer not in the manual?

Summary

Setup and Installation Procedures

Motor Installation

Steps for mounting the motor, pulley, and belt alignment.

Belt Guard Installation

Procedure to attach the saw's belt guard securely.

Slab Catcher & Blade Sharpener Setup

Adjusting catcher clearance and positioning sharpener handle.

Electrical Connection

Safely connecting the saw to the power source and controls.

Operation, Coolant, and Blade Care

Coolant Management

Proper coolant types, fill level, and safety cautions.

Blade Care and Dressing

Instructions for maintaining blade sharpness and preventing damage.

Operation Steps

Procedures for starting, cutting, and completing cuts safely.

Cleaning and Maintenance

Cleaning Maintenance

Routine steps for cleaning sediment from the saw and pan.

Overview

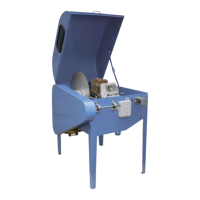
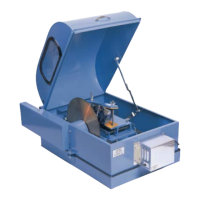
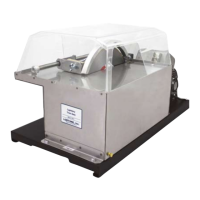
The LORTONE LSS-14P is a compact, bench-top 14-inch slab saw designed for quiet and clean operation, specifically engineered for cutting rock. It features a fast, powerful screw-feed mechanism and a 5-1/2 inch capacity vise, enabling it to cut rock at twice the speed of standard screw-feed saws when properly set up, operated, and maintained. The saw requires oil coolant for operation.

Key Technical Specifications and Features:

  • Blade: Utilizes a 14-inch blade, suitable for larger cuts.
  • Design: Bench-top design, making it suitable for various workspaces.
  • Feed System: Fast power screw-feed for efficient cutting.
  • Frame: Sturdy welded steel frame, designed to prevent cracking or warping, ensuring durability and stability during operation.
  • Blade Sharpener: Built-in blade sharpener for maintaining blade performance.
  • Hood: Hinged hood equipped with a tempered glass window, providing visibility and safety.
  • Motor: Powered by a 1/2 HP drive motor (shipped separately).
  • Vise Capacity: 5-1/2 inches.
  • Coolant Requirement: Approximately 2 gallons of neutral petroleum base oil with a high flash point and no additives, covering the blade by 1/4 to 1/2 inch. LORTONE Cutting Oil #086-010 is recommended.

Setup and Installation:

The LSS-14P comes with several components that require assembly. The setup process involves:

  1. Unpacking: Removing the saw from its packing and placing it on a sturdy, flat, level surface.
  2. Motor Installation: Securing the motor to the motor mount using provided bolts, installing adjustment bolts, and attaching the motor to the saw frame. The motor pulley is then placed on the motor shaft and secured with a set screw.
  3. Belt Installation: Installing the drive belt and adjusting the motor to achieve correct belt alignment and tension. It's crucial not to overtighten the belt to avoid excessive noise and premature bearing wear.
  4. Belt Guard Installation: Placing the belt guard over the belt, motor pulley, and frame, then securing it with two mounting screws.
  5. Slab Catcher Adjustment: Loosening hold-down screws and adjusting the slab catcher to clear the blade by 1/8 inch.
  6. Blade Sharpener Setup: Loosening the set screw on the blade sharpener handle, rotating the handle to an upright position, and tightening the set screw.
  7. Electrical Connection: Ensuring all switches on the motor and control box are in the OFF position, closing the hood, plugging the motor cord into the control box outlet, and plugging the saw power cord into a grounded outlet.

Operation Features:

  • Pre-Operation Check: Before opening the hood, ensure all switches on the Control Box are in the “OFF” position.
  • Material Clamping: Securely clamp the material in the vise, checking for looseness and re-tightening if necessary.
  • Cross Feed Adjustment: Adjust the cross feed and hand-tighten the carriage lock screw (#488-056). Verify that the material will clear the arbor shaft cover and blade flanges.
  • Carriage Release: To release the carriage, pull the half-nut lever toward the control box, slide the carriage to the desired position, and then release the half-nut lever, ensuring it is fully engaged.
  • Shutoff Chain: Adjust the shutoff chain (#447-001) for the desired length of cut.
  • Starting the Saw:
    • Close the hood and ensure both switches are in the “OFF” position.
    • Turn the "Power" switch to "ON" to start blade rotation.
    • Turn the "Feed" switch to "ON" to initiate power feed.
    • Important Note: The "Power" switch must be "ON" for the "Feed" switch to operate.
  • During Cutting:
    • Safety: Do not leave the saw unattended while cutting.
    • Monitoring: Listen for changes in operating noise, which can indicate damaged material or blade.
    • Overload Protection: If the main motor overheats, the safety overload protector may trip. In such an event, immediately turn off both the “Power” and “Feed” switches to prevent blade and saw damage. Inspect the machine and blade for damage. Once cool, press the red reset button on the drive motor to reset the protector.
  • End of Cut:
    • Push both switches toward the saw to “OFF” before opening the hood.
    • Remove the cut slab and inspect the remaining material for security in the vise.
    • Loosen the carriage lock screw and advance the carriage by turning the cross-feed wheel. Each turn advances the cross-feed carriage approximately 1/16 inch (.062).

Maintenance Features:

  • Coolant:
    • Recommendation: Use LORTONE Cutting Oil #086-010 or a neutral petroleum base oil with a high flash point and no additives.
    • Level: Add approximately 2 gallons of coolant until the bottom 1/4 to 1/2 inch of the blade is covered.
    • Caution: Never run the saw without proper coolant. Do not use kerosene, other flammable solvents, water, or water-soluble oils, as this can damage the machine, injure the operator, and void the warranty.
  • Blade Care & Dressing:
    • Initial Use: The blade must be dressed prior to initial use to remove protective paint from the cutting edge.
    • Dressing Procedure: Clamp a Blade Dressing Stick in the vise. With the hood closed and the saw running, lightly pull the blade sharpener handle forward and repeat as needed.
    • Frequency: Dress the blade frequently, as dull or glazed blades can quickly dish or warp. Dished or warped blades are not covered under warranty.
  • Cleaning Maintenance:
    • Frequency: The saw should be cleaned periodically when sediment builds up to a depth of 1/4 inch.
    • Procedure: Unbolt the saw case from the coolant pan and lift out the case. Empty the coolant pan and wipe sludge from the case and power feed screw. Re-install the case in the coolant pan, attach bolts, and add clean and/or filtered oil. Dispose of used oil properly.

Safety Precautions:

  • Always read and follow instructions before assembly or use to prevent damage to the machine or injury to the operator.
  • Do not operate the saw with the hood open. Turn off both switches and unplug the saw prior to opening the hood.
  • Use only 5-10 wt. petroleum oil, non-detergent type, with a high flash point as coolant.
  • Never use water, water-soluble oil, solvents, fuels, anti-freeze, or vegetable oil, as these will result in substandard performance, damage to the machine, and void the warranty.

Lortone LSS-14P Specifications

General IconGeneral
BrandLortone
ModelLSS-14P
CategorySaw
LanguageEnglish

Related product manuals