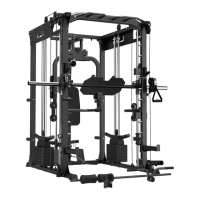
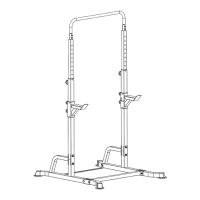
8
STEP 1
1. Preinstall the bolts (#91) and flat joints (#57) are under (#1).
2. Place (#2) and (#3) on both sides of (#1) according to the drawing, then (#4) and (#56) on the
outside. Secure them with bolts (# 92), flat spacer (# 99) and nuts (# 100).
3. Place (#6) and (#56) on both sides of (#2) and secure with bolts (#92), flat spacers (#99) and nuts
(#100).
4. Place (#5) and (#56) on both sides of (#3) and secure with bolts (#92), flat spacer (#99) and nuts
(#100).
5. Place (#7) on the side of (#1) as shown and secure with bolts (#92), flat spacers (#99), and nuts
(#100).
III. ASSEMBLY INSTRUCTIONS
| ASSEMBLY INSTRUCTIONS
IMPORTANT NOTE:
1. The washers should be placed at both ends of the bolt (anti-bolt head and nut), unless
otherwise specified.
2. Preliminary assembly is to tighten all bolts and nuts by hand and tighten with wrench for
complete assembly.
3. Some spare parts have been pre-assembled by the factory.
4. This product is recommended to be installed with 2 people.
6
100
99
2
4
100
100
57
92
91
1
7
7
56
92
56
5
100
100
56
3