www.lupine.de www.lupine.de www.lupine.de
www.lupine.de www.lupine.de www.lupine.de
www.lupine.de www.lupine.de www.lupine.de www.lupine.de
www.lupine.de www.lupine.de www.lupine.de www.lupine.de
Power: Lumens:
Runtime
Neo X2
Runtime
Neo 4 / X4
10W 900 1:30h 2:15h
5W 530 3 h 4:30h
1.5W 170 9:30h 16h
0.3W 35 48h 80h
Red LEDs - 48h 80h
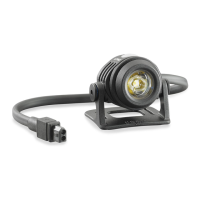
3 // How to mount the light and battery?
Helmetlight Neo:
First attach the thin velcro with the Lupine logo to the helmetmount (see
Fig. 1), then pull the other end of the velcro through the ventilation ope-
nings available on your helmet and fix it on the other side of the helmet
mount.
Direct the light into a straight forward position and tighten the velcro to
avoid slipping of the lighthead during use (see Fig. 2).
With the provided extension, the battery may be carried in your jersey or
backpack. The flexible velcro strap allows to put the battery directly on the
helmet (see Fig. 3).
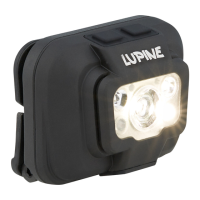
Headlight Neo:
Thanks to the battery FastClick-System you can carry all Lupine FastClick
batteries directly on the headband (see Fig. 4).
More Options:
GoPro mount (Art.No. 1070) for the helmet and
Quickrelease mount (Art.No. 225 and 231) for the handlebar.
* To change the lamphead from one mount to another, you have to open
the two screws on the lamphead with an 3mm allen key.
Dim levels: Explanation:
1 0.3W + 10W 35 + 900 Lumens
2 0.3W + 5W + 10W 35 + 530 + 900 Lumens
3 0.3W + 1.5W + 5W + 10W 35 + 170 + 530 + 900 Lumens
4 Red + 0.3W + 5W + 10W
Low redlight, in combination with the diffu-
sor. Good for reading maps.
5 Red + 0.3W + 5W
6 Low Start on
The light starts on lowest beam
7 Low Start off
The light starts on high beam
8 Battery high
Warning & Reservepower activated early
9 Battery low
Warning & Reservepower activated later
10 Alpine SOS
Blinks till battery is empty or button pushed
11 SOS
Blinks till battery is empty or button pushed
Dim Levels
Additional Functions
Zur Anpassung der Leuchtstufen den
Taster gedrückt halten und warten bis
der Lampenkopf aufblinkt.
Lässt man den Taster los, wird das je-
weilige Programm wie unten aufgeführt
gewählt.
The dimmlevels and a couple of other useful functions can be adjusted. Keep the
button pressed and wait till the main light blinks up once a second.
If you release the button, the particular program as shown below is chosen.
4 // Adjust the lightlevels
Factory settings
Voltage test:
After connecting the lamphead to the battery, the upper and lower red LEDs
will blink to indicate the battery voltage. The voltage helps to interpret the
remaining capacity.
Upper red LEDs blinks: 1 time each volt
Lower red LEDs blinks: 1 time each 1/10 volt
Hints:
More than 8V = battery fully charged
7.1 to 7.9V = recharge
Below 7V = not or only partly ready for use
Low battery warning:
Once the remaining capacity dropped by a relevant amount, the lampheads red
LEDs will turn on. If the battery is empty, the lamphead itself will start to flash a
couple of times. Stop immediately! The light will switch off by itself.
Reservepower:
After switching the light on again, reserve power is available for a short while.
Slow down since the light will be switched off automatically.
Important: charge the battery in a short while. Deep discharging will harm the battery.
An activated reservepower will be shown by the red LEDs flashing.
5 // Additional functions
7x upper red LEDs
3x lower red LEDs
7.3V
+
=
For example:
Protection Class: IP68
Operating temperature: -25°C to +70°C
Technical Data:
*Runtime varies
according to the
battery age,
condition, as well
the ambient
temperature.
Weight:
Neo Lamphead: 50g
Neo X2: 175g
Neo X2 Smartcore: 175g
Neo X4 Smartcore: 195g
Neo 4: 175g
Neo 4 Smartcore: 175g
Battery:
2.0 Ah / 7.2V Li-Ion
3.3 Ah / 7.2V Li-Ion
Wiesel Charger:
Input Voltage: 100 – 240V~, 50-60Hz
Charging current: 1.2A
Factory settings
Register your Neo:
register.lupine.de
LIGHTING SYSTEMS
Bedienungsanleitung / User Manual
Die Verwendung dieses Beleuchtungssystems für bestimmte Zwecke kann in
Europa von Land zu Land unterschiedlich geregelt sein. Informieren Sie sich über
die in Ihrem Land gültigen Bestimmungen.
The laws governing the allowable application domain for this lighting system
may vary from one country to another. We recommend that you inform
yourself about the relevant laws in this domain in your country.
Regelungen/Regulations:
Weiterentwicklungen der Produkte und technische Änderungen vorbehalten.
Rights for improvements and modifications of our products reserved.
Änderungen/ Changes:
Garantie/Warranty:
Innerhalb der Garantiezeit von 24 Monaten umfasst die Gewährleistung alle
Komponenten und deckt fertigungsbedingte Mängel ab. Ausgenommen ist
jedoch der Akku. Des Weiteren erlöschen die Garantieansprüche bei nicht be-
stimmungsgemäßer Benutzung oder Veränderungen jeglicher Art.
The product's two year warranty applies to all components, as well as any ma-
nufacturing defect. The warranty does not include the battery, however. In ad-
dition, any modification or improper use of the product will void the warranty.
Letzte Hinweise / Miscellaneous
Abb.1
Fig.1
Abb.2
Fig.2
Abb.3
Fig.3
Abb.4
Fig.4
6 // Smartcore Batteries
Audible:
To check the capacity, simply press the touch-pad once. At rst an audible signal
will sound, which is especially useful while using the battery mounted on a hel-
met or headband, to give a quick reading in 20% steps.
Capacity Indicator
Taillight
To run the taillight simply press the touch pad two times and the 5 LEDs will
operate continuously. To switch o the taillight, simply press the pad again.
Moving light:
Press the touch pad three times to activate the moving light. To switch it o
press the button another time.
Example:
3 LEDs steady glow (20 %, 40 %, 60 %) + 1 LED blinking (80 %) = 70% Capacity
Visible:
The visible indicator uses 5 red LEDs. The LEDs can operate in two di erent
operating states: blinking and continuous. LED meanings: A blinking LED
is indicating a 10% step and a continuously glowing LED a 20% step.