quick-start guide
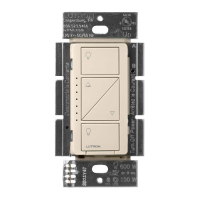
Diva Smart Dimmer and
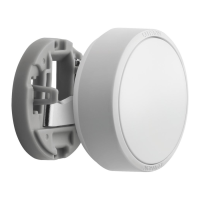
Pico Paddle Remote
Welcome— and thank you for purchasing a Diva smart dimmer
and Pico paddle remote kit.
Double your warranty
Wiring Wizard
Love Caséta Wireless controls? Have ideas for making them
better? Tell us what you think and we’ll extend your warranty
by 1 year. www.casetawireless.com/register
0302106 Rev. A
Contents supplied (DVRF-PKG1D)
Claro wallplate
(CW-1)
Pico paddle remote
(PJ2-P2B)
Wallbox adapter
(PICO-WBX-ADAPT)
Pre-Installation
Some lights have one wall switch— called single-pole, while others have two wall
switches— called 3-way (such as stair lights, which have a switch at both the top and
bottom of the stairs). Be sure to pay close attention to the appropriate wiring diagrams in
the following steps.
To access more detailed information and step-by-step instructions for specific wiring
scenarios please use the “Wiring Wizard” QR code to the left.
WARNING: SHOCK HAZARD.
May result in serious injury or death.
Turn off power at circuit breaker or
fuse before installing.
Disconnect powerIdentify installation type Option 2: Wireless 3-way / replace mechanical 3-way switch with the Pico paddle remote
Option 1: Wireless 3-way /single pole +
Pico paddle remote
Important wiring note:
Option 4: 3-way/4-way with Claro smart accessory switch(es) + Pico paddle remote
Dimmer
(DVRF-6L)
(C) Silver 6-32 x 7/8 in
machine screws (x4)
(D) Black 6-20 x 1.25 in
wood screws (x2)
(E) Wall anchors (x2)
Option 1: Wireless 3-Way / Single-Pole +
Pico Paddle Remote
Option 2: Wireless 3-Way / Replace Mechanical
3-way Switch with the Pico Paddle Remote
Option 4: Wired Multi-Location [3-Way / 4-Way with
Accessory Switch(es)] + Pico Paddle Remote
Installing your Pico paddle remote (secondary location)
A. Over Wallbox Installation replacing existing switch (3-way applications) with Pico paddle remotes
1
Ensure power is still OFF
WARNING! Shock Hazard. May result in serious injury or death.
Turn off power before installing. NOTE: If cover plate is removed,
only install over wall surface. DO NOT install over wallbox.
1. 2.
1.
2.
WARNING! Shock Hazard.
May result in serious injury or death. Turn off the
power before installing. NOTE: If the wallbox
adapter cover plate is removed, only install over
wall surface. DO NOT install over wallbox.
6
Slide Pico paddle remote onto wallbox adapter
7
Attach wallplate
8
Restore power
ON
OR
B. Wall Surface Installation
1
Remove cover plate
Cover Plate
Pry
3
Mount the wallbox adapter
2
4
Slide Pico paddle remote onto wallbox adapter
6
Check mounting
Side View
7
Restore power
ON
2
Unscrew existing switch from wall
Remove the wallplate.
Remove the screws securing the switch and pull it away
from the wall (do not disconnect wires).
3
Disconnect wires
5
Mount the wallbox adapter
1.
2.
‘snap’
If wallplate removal is necessary,
pull forcefully.
4
Connect the wires
Using the provided wire connectors, connect the wires together
(EXCEPT for the ground wire and the neutral wires). Cap the ground wire
and cap the neutral wires.
Ground (Green/Bare Copper)
Neutral connection
5
Attach wallplate
1.
2.
1.
‘snap’
If wallplate removal is necessary, pull forcefully.
2
Mark wall and drill holes
3/16 in
(5 mm)
1
Adapter
Plate
Wallplate
Wallplate
Adapter Plate
(A) Large wire
connectors (x6)
(B) Small wire
connector (x1)
Tools you’ll need
Flat-head screwdriver
Phillips-head screwdriver
Pliers
Ganging and Derating
Double Gang Triple Gang
Important note:
Multi-gang installations may reduce the dimmer’s maximum wattage
rating. See the chart below for maximum wattage information.
* For maximum wattage information when mixing light bulb types
see www.casetawireless.com/ganging
Maximum* wattage derating chart (120 V~ 50/60 Hz)
Load Type Single gang Double gang Triple gang
LED & CFL 150 W 150 W 150 W
or
*
Incandescent & Halogen 600 W 500 W 400 W
Works with energy efficient dimmable
light bulbs:
NOTE: You can mix and match dimmable LED and CFLs,
as well as halogen and incandescent light bulbs with Caséta
dimmers.
Dimmable LED and CFL light bulbs vary in their dimming
performance. If you’re using these bulbs and they flicker or
unexpectedly turn off, please see the “Adjusting low-end trim”
section on page 2 for information on adjusting the dimmer for
best bulb performance.
Incandescent—up to
600 W
LED—up to 150 W
Halogen—up to 600 W
Drill and drill bit
3/16 in (5 mm)
Place tag to identify wire on
different color screw
Different color screw
Ground
(Green / Bare
Copper)
Neutral connection
(C)
(D)
(E)
Find the right LED
For lights switched from one
wired location:
Ground
(Green / Bare Copper)
Insert
and
twist to
tighten
Use blue
connector
Use blue
connector
Green wire
Green wire
NOTE: Red and black wires on dimmer
are interchangeable.
Red
Blue
Black
For lights switched from two or more wired locations with a wireless control from one or more remote locations:
See Claro Smart Accessory Switch Installation Guide (model DVRF-AS) for details on installing accessory
switches. See section A, “Over Wallbox Installation” for replacing any switch location with a Pico paddle remote.
See section B, “Wall Surface Installation” for adding additional points of control using the Pico paddle remote.
For lights switched from one wired location and one wireless location:
IMPORTANT: Before disconnecting the existing devices, tag the wire connected to the different colored screw
(typically a black wire, but wire colors vary, and labeled COM). This is the Common wire.
Installing your in-wall dimmer (main location)
(B)
(A)
(A)
(A)
Option 3: Wireless Multi-Location /
Retain Mechanical 3-Way Switch +
Pico Paddle Remote
Tagged Wire
Ground
(Green / Bare
Copper)
NOTE: Red dimmer wire must
be tied to load side. If the
switch does not work once
you’re all done, turn off power
and flip the red and black wires.
Blue
Red
Black
Neutral connection
(B)
(A)
(A)
(A)
(A)
(A)
Option 3: Wireless multi-location / retain mechanical 3-way switch + Pico paddle remote
For lights switched from two wired locations with a wireless control from one or more remote locations:
Follow the “Wiring Wizard” QR code for detailed instructions.
Jumper
wire
WARNING! Shock Hazard. May result in serious injury or death.
Turn off power before installing. NOTE: If cover plate is removed,
only install over wall surface. DO NOT install over wallbox.
1. 2.
1.
2.
Correct Incorrect
Verify that Step 1
was completed
Wallplate
Pico
paddle
remote
Pico
paddle
remote