6
21. Transpose: Press and hold this button and press one of the Pad Octave –/+ or Key Octave –/+
buttons to move the pads or keys (respectively) down or up a semitone.
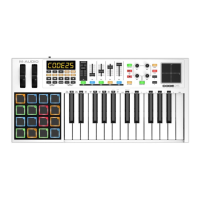
22. X/Y Pad: This touch-sensitive pad lets you control two parameters simultaneously in a two-
dimensional way (rather than a traditional one-dimensional modulation wheel). You can assign
the parameter and range of each axis, X (horizontal) and Y (vertical). This pad can be in one of
three modes as determined by the X-Mode and Y-Mode buttons.
23. X/Y Buttons: Press one of these buttons to send the maximum value for the parameter assigned
to that axis.
In Edit Mode, press one of these buttons when assigning a parameter to assign it to that axis: X
(horizontal) or Y (vertical).
In HID Mode, use the X or Y button as a left-click or right-click mouse command (respectively).
24. X-Mode / Y-Mode: Press one of these buttons to cycle through the available modes for that
axis of the X/Y Pad, distinguishable by the button’s color:
Red: MIDI CC Mode (the axis is assigned to a MIDI CC number)
Pink: In MIDI Note Mode (the axis is assigned a range of MIDI notes)
Yellow: HID Mode (the axis lets you use the X/Y Pad as a mouse/track pad)
Learn more about these modes in the User Guide.
Rear Panel
1. Power Input: If you do not want to use a
computer in your setup (i.e., if you are using
Code 25 to control an external MIDI module),
connect Code 25’s power input to a power
outlet using an optional power adapter (9
VDC, 1 A, center-positive, sold separately).
Alternatively, you can connect Code 25’s
USB Port to a power outlet using a standard
USB charger (sold separately).
2. Power Switch: Press this button to power the Code 25 on or off.
3. USB Port: Use a standard USB cable to connect this USB port to your computer. The
computer’s USB port provides ample power to Code 25. This connection is also used to send
and receive MIDI data to and from your computer.
This connection is also relevant to Code 25’s MIDI Out and MIDI In:
• If an external device is connected to the MIDI Out, your computer can send MIDI messages
out along this path: computer Code 25 external device.
• If an external device is connected to the MIDI In, the external device sends MIDI messages
in along this path: external device Code 25 computer. MIDI messages can then be
sent to an external device via the MIDI Out, but it must pass through the computer first.
4. Sustain In: Connect an optional 1/4” (6.35 mm) TS sustain pedal to this input.
You can also change this input’s MIDI assignment. See the User Guide to learn how to do this.
5. Volume In: Connect an optional 1/4” (6.35 mm) TRS expression pedal to this input.
You can also change this input’s MIDI assignment. See the User Guide to learn how to do this.
6. MIDI In: Use a standard five-pin MIDI cable to connect this MIDI In to the MIDI Out of an
external MIDI device (e.g., another MIDI controller). The MIDI messages sent to this MIDI In will
be sent to your computer via the USB port.
7.
MIDI Out: Use a standard five-pin MIDI cable to connect this MIDI Out to the MIDI In of an
external MIDI device (e.g., a synthesizer, sequencer, drum machine, etc.).
8. Kensington
®
Lock Slot: You can use this slot to secure your Code 25 to a table or other surface.
1
2
34
5
678