Do you have a question about the MA grandMA3 mode2 and is the answer not in the manual?
Describes the layout of Screen 1 on a grandMA3 full-size console.
Details screen layouts for grandMA3 compact and compact XT hardware.
Explains toggling between encoder bar, x-key labels, and mini executor on compact XT.
Illustrates how to toggle the mini executor bar on the grandMA3 compact console.
Describes Screen 2 on a grandMA3 full-size and its relation to grandMA2.
Details Screen 2 layout for grandMA3 compact XT, including Macro Buttons, Page navigation, and Mini Executor Bar.
Details Screen 3 on a grandMA3 full-size console and its relation to grandMA2.
Describes external screens (Screens 4 and 5) on a grandMA3 full-size.
Details the Command Screens (Screen 6) on a grandMA3 full-size console.
Describes Screen 7, the Left Command Screen, on a grandMA3 console.
Explains X-Key Labels, Command Line, and User Defined Area of Screen 7.
Details Letterbox Screens (Screens 8 and 9) on a grandMA3 full-size.
Describes Screen 9, the Right Letterbox Executor Screen.
Details Screen 10, the Left Letterbox Executor Screen, and its features.
Instructions for changing the xPort Node from Mode2 to grandMA3.
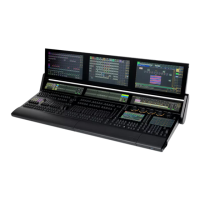
The grandMA3 console, operating in Mode2, is designed to run the grandMA2 software, offering a familiar yet adapted experience for users transitioning between console generations. This mode is available on various grandMA3 models, including the full-size (CRV), light (CRV), compact XT, compact, replay unit, and xPort nodes, all running grandMA2 software version 3.4 or later.
The primary function of the grandMA3 in Mode2 is to provide a platform for running grandMA2 software, allowing users to leverage their existing knowledge and show files. While the core software remains the same, the physical layout of the grandMA3 console necessitates adjustments in how windows, bars, and pool objects are displayed. This adaptation ensures that the grandMA2 software functions seamlessly on the grandMA3 hardware, despite the differing physical interfaces.
The console's screen layout is a key aspect of its functionality. Screen 1 on a grandMA3 full-size in Mode2 corresponds to screen 2 on a grandMA2 full-size console. This screen typically features a user-defined area, a command line, and view buttons. It also prominently displays the "Command line feedback" for reviewing command history and provides quick access buttons for "Tools," "Setup," and "Backup." For grandMA3 compact and compact XT models, screen 1 includes "Macro Buttons" for fast access and "Fader and Button Pages" to show current fader and button configurations.
Screen 2 on a grandMA3 full-size in Mode2 corresponds to screen 3 on a grandMA2 console. This screen is also equipped with "Macro Buttons" for quick access and "Channel Page," "Fader Page," and "Button Page" functionalities, which can be executed using specific keywords. The upper section of this screen, like screen 1, maintains a user-defined area and view buttons. For grandMA3 compact XT, screen 2 has a relocated layout for some buttons and bars, but the core functionalities remain consistent with the full-size model.
External screens (screens 4 and 5 on grandMA3 in Mode2, corresponding to screens 5 and 6 on grandMA2) are designed to extend the visual workspace, requiring a minimum resolution of 1920 x 1080. These screens typically display detailed channel information, including readout, live status, and usage in the show, along with value, effect, output, fade, delay, and value-only layers.
The command screens are crucial for interaction. Screen 6 (Right Command Screen) on a grandMA3 full-size replicates the familiar command section of a grandMA2 console, featuring buttons for functions like "Trackpad," "Blind," "Freeze," "Prvw," "Assign," "Align," "Help," "Fix," "Select," "Off," "View," "Effect," "Goto," "Delete," "User 1," "Temp," "Top," "On," "Page," "Macro," "Preset," "User 2," "<<<," "Learn," ">>>," "Sequ," "Cue," "Exec," "Copy," "List," "Go -," "Pause," "Go +," "Channel," "Fixture," "Group," and "Move." Tapping "Trackpad" toggles to a trackpad interface, offering "Left Click," "Middle Click," "Right Click," "Keys," and "Mouse" options. Screen 7 (Left Command Screen) provides additional macro buttons, command line access, and a user-defined area, with a layout that can be configured to display X-Key labels.
Letterbox screens (screens 8, 9, and 10) are static and exclusive to grandMA3 consoles, extending the functionality of screens 1, 2, and 3, respectively. Screen 8 (Letterbox Encoder Screen) is located below screen 1 and displays network status, the encoder bar (for preset control and encoder toolbar), time control (program and exec time), a virtual grand master fader, and a "B.O." button for blackout. Screen 9 (Right Letterbox Executor Screen) is below screen 2 and shows executors 16 to 30, along with a master section. Screen 10 (Left Letterbox Executor Screen) is below screen 3 and displays executors 1 to 15, as well as time control for program and exec time.
Operating the grandMA3 in Mode2 is designed to be intuitive for users familiar with grandMA2. The console's physical layout, while different, is mapped to provide equivalent functionality. For instance, the "Tools," "Setup," and "Backup" buttons on screen 1 offer direct access to these menus. On compact models, "Macro Buttons" and "Fader and Button Pages" streamline workflow by providing quick access to frequently used functions.
The console offers flexibility in displaying information. On grandMA3 compact XT, users can toggle between the encoder bar and x-key labels using a dedicated button. Similarly, on grandMA3 compact, the mini executor bar can be toggled on or off. The "Macro Buttons" on screens 2 and 3 can be disabled or their starting offset adjusted, allowing for customization of the interface. The macro button area can also be configured to follow the executor settings of the current surface.
Time control, a critical aspect of lighting programming, can be operated both on-screen and through physical controls. On grandMA3 full-size, the custom section can be used to operate program time and exec time, with dedicated wheels and buttons for fader operation, manual X-fade activation, and set time functions.
The grandMA3 in Mode2 includes settings that allow for basic configuration and troubleshooting, which can be considered maintenance-related features. The "grandMA3 Settings" menu, accessible through "Setup" and "User," provides options to customize various aspects of the console's behavior.
Users can disable the backlight of the faders and control the graying out of specific x-keys (X5, X6, X15, X16) that do not exist on a grandMA3 console. The encoder bar's influence on the backlight color of the first four dual encoders can also be managed. Additionally, the wheel and button function can be disabled if needed. These settings allow for fine-tuning the console's visual feedback and interaction, which can be useful for maintaining optimal performance and user comfort.
For xPort Nodes, the process of changing modes between Mode2 and grandMA3 involves a sequence of button presses and rotary knob interactions. This includes selecting the desired mode, confirming the selection, and potentially restoring to factory defaults or keeping existing settings. This structured process helps ensure a smooth transition between modes and provides options for system reset if necessary. The ability to adjust the intensity of faders, executor knobs, and dual encoders through "Console Desk Lights Intensity Exec LED" also contributes to the console's long-term usability and visual consistency.
| Type | Lighting Console |
|---|---|
| Manufacturer | MA Lighting |
| Model | grandMA3 mode2 |
| Network Protocols | Art-Net, sACN |
| Category | Lighting Console |
| DMX Outputs | 4x XLR 5pin |
| DMX Ports | 4x XLR 5pin |
| Power Supply | 100-240V AC, 50-60Hz |
| Software | grandMA3 |
| Touchscreen | Yes |
| MIDI | Yes |